1. Introduction
Thank you for choosing the Rockford Fosgate PM300X2 Punch Marine 2-Channel Amplifier. This amplifier is designed to deliver high-quality audio performance in marine and motorsports environments. Its compact design and Class-A/B technology make it suitable for driving coaxial speakers, component speakers, or a single subwoofer.
This manual provides essential information for the proper installation, operation, and maintenance of your PM300X2 amplifier. Please read it thoroughly before attempting installation or use.
2. Safety Information
WARNING:
- Always disconnect the vehicle's battery negative terminal before installing or servicing any electrical components.
- Ensure all wiring is properly routed and secured to prevent damage from moving parts or sharp edges.
- Use appropriate gauge wiring for power, ground, and speaker connections as specified in the installation section. Incorrect wiring can lead to overheating, fire, or damage to the amplifier and vehicle.
- Do not operate the amplifier if it is damaged or malfunctioning. Refer to the troubleshooting section or contact customer support.
- This amplifier is designed for marine and motorsports use, but it is not submersible. Avoid direct exposure to high-pressure water jets.
3. Package Contents
Verify that your package contains the following items:
- Rockford Fosgate PM300X2 Amplifier
- Mounting Hardware
- User Manual (this document)
4. Setup and Installation
Proper installation is crucial for optimal performance and longevity of your amplifier. If you are unsure about any part of the installation process, consult a professional installer.
4.1 Mounting the Amplifier
The PM300X2 is designed for surface mounting. Choose a location that is dry, well-ventilated, and protected from direct sunlight and excessive heat. Ensure there is sufficient space around the amplifier for air circulation and wiring connections.

Figure 1: Top view of the PM300X2 amplifier, illustrating its compact design and potential mounting areas.
4.2 Wiring Connections
All wiring should be done with the vehicle's battery disconnected. Use high-quality marine-grade wiring for all connections.
4.2.1 Power and Ground Connections
- B+ (Battery Positive): Connect directly to the positive terminal of the battery using an appropriate gauge power cable. Install a fuse holder with a fuse (not included, refer to amplifier specifications for recommended fuse size) within 18 inches (45 cm) of the battery.
- GND (Ground): Connect to a clean, solid chassis ground point. The ground cable should be the same gauge and as short as possible, ideally less than 3 feet (1 meter). Ensure the connection point is free of paint, rust, or dirt.
- REM (Remote Turn-On): Connect to the remote turn-on output of your head unit or a switched 12V source. This signal turns the amplifier on and off with your audio system.
4.2.2 Input Connections
The PM300X2 supports both low-level (RCA) and high-level inputs.
- RCA Input: Connect RCA cables from your head unit's pre-amp outputs to the amplifier's INPUT (Left/Right) RCA jacks.
- High-Level Input: If your head unit does not have RCA outputs, you can use the high-level input. Connect the speaker wires from your head unit directly to the amplifier's high-level input terminals. The amplifier features an Auto Turn-On circuit for high-level inputs, eliminating the need for a separate REM wire in some installations.
4.2.3 Speaker Connections
Connect your speakers to the amplifier's speaker output terminals. The PM300X2 is a 2-channel amplifier and can be configured for 1-channel (bridged) or 2-channel operation.
- 2-Channel Mode: Connect one speaker to the Left (+) and Left (-) terminals, and another speaker to the Right (+) and Right (-) terminals. Ensure the speaker impedance is 2-Ohm or higher per channel.
- 1-Channel (Bridged) Mode: For a single subwoofer, connect the subwoofer to the Left (+) and Right (-) terminals. Ensure the subwoofer impedance is 4-Ohm or higher.
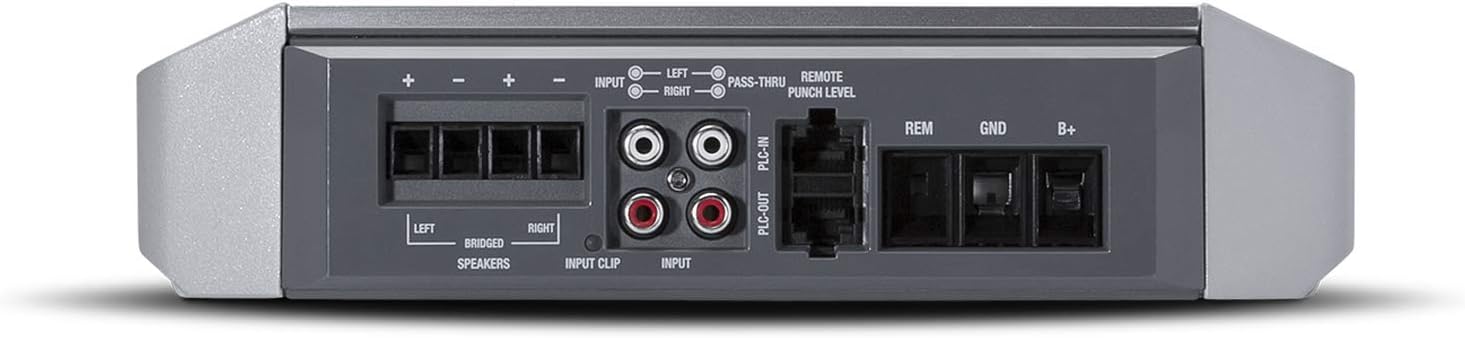
Figure 2: Rear panel connections for power, ground, remote, input, and speaker outputs.
4.3 Initial Settings and Controls
The PM300X2 features several controls for fine-tuning your audio system.
- Input Level: Adjust this control to match the output voltage of your head unit. Start with the control at minimum and slowly increase it until the Output Clip Indicator (Blue) illuminates consistently at your desired maximum volume.
- Punch EQ: Provides an adjustable bass boost (+18dB @ 45Hz) to enhance low-frequency response. Use sparingly to avoid distortion.
- Crossover (X-OVER): This 12dB/octave Butterworth crossover allows you to select between Low-Pass (LP), High-Pass (HP), or Full-Range (AP) operation.
- LP (Low-Pass): Filters out high frequencies, typically used for subwoofers.
- HP (High-Pass): Filters out low frequencies, typically used for full-range or component speakers.
- AP (All-Pass/Full-Range): Allows all frequencies to pass through, bypassing the crossover.
- Output Clip Indicators:
- Blue: Indicates optimal output level.
- Blue/Red: Indicates approaching clipping.
- Red: Indicates clipping/distortion. Reduce input level or Punch EQ.

Figure 3: Front panel controls and indicators for audio adjustment.
5. Operating Instructions
Once installed and initially configured, operating your PM300X2 amplifier is straightforward.
- Power On/Off: The amplifier will automatically turn on when your head unit is powered on (via the REM wire or high-level auto turn-on) and turn off when the head unit is off.
- Volume Control: Adjust the main volume through your head unit. The amplifier's Input Level control should be set once during installation and generally not adjusted during normal operation.
- Sound Adjustment: Fine-tune the sound using the Punch EQ and Crossover settings. Make small adjustments and listen carefully to the changes. Avoid excessive bass boost or high input levels that cause the clip indicator to turn red, as this indicates distortion and can damage speakers.
6. Maintenance
The Rockford Fosgate PM300X2 amplifier is designed for durability in harsh environments. Regular maintenance is minimal but important for long-term performance.
- Cleaning: Periodically wipe the amplifier's exterior with a soft, damp cloth to remove dust and grime. Do not use harsh chemicals or abrasive cleaners.
- Inspection: Annually inspect all wiring connections for corrosion, fraying, or loose terminals. Tighten any loose connections. Check the fuse in the power line.
- Ventilation: Ensure that the amplifier's cooling fins are not obstructed by debris or other objects to maintain proper heat dissipation.
7. Troubleshooting
If you experience issues with your PM300X2 amplifier, refer to the following common problems and solutions before contacting customer support.
| Problem | Possible Cause | Solution |
|---|---|---|
| No Power / Amplifier does not turn on | Blown fuse Loose power or ground connection No remote turn-on signal | Check and replace fuse Verify and tighten all power and ground connections Check remote wire connection and source (12V when head unit is on) |
| No Sound Output | Input cables disconnected Speaker wires disconnected or shorted Crossover setting incorrect Input Level too low | Check RCA or high-level input connections Verify speaker wiring, check for shorts Adjust crossover to AP (Full-Range) for testing, then set appropriately Increase Input Level slowly |
| Distorted Sound | Input Level too high (clipping) Speaker impedance too low Damaged speakers | Reduce Input Level until clip indicator is blue Ensure speaker impedance matches amplifier specifications (2-Ohm per channel, 4-Ohm bridged) Test with different speakers if possible |
| Amplifier Overheating | Insufficient ventilation Speaker impedance too low Prolonged high output | Ensure clear airflow around amplifier Verify speaker impedance Reduce volume or allow amplifier to cool down |
8. Specifications
Below are the technical specifications for the Rockford Fosgate PM300X2 amplifier:
| Feature | Specification |
|---|---|
| Model | PM300X2 |
| Output Power (RMS) | 100 Watts x 2 @ 4-Ohm 150 Watts x 2 @ 2-Ohm 300 Watts x 1 @ 4-Ohm Bridged |
| Number of Channels | 2 |
| Amplifier Class | Class-A/B |
| Item Dimensions (L x W x H) | 9.86 x 7.76 x 2.38 inches |
| Voltage | 12 Volts (DC) |
| Mounting Type | Surface Mount |
| Material Type | Durable plastic or composite |
| Item Weight | 10 Pounds |
| Crossover | 12dB/octave Butterworth (LP/HP/AP) |
| Punch EQ | +18dB boost @ 45Hz |
| Special Features | High-level input with Auto Turn-On, Output Clip Indicators |
9. Warranty Information
The Rockford Fosgate PM300X2 amplifier comes with a 1-Year Manufacturer Warranty. This warranty covers defects in materials and workmanship under normal use. Please retain your proof of purchase for warranty claims.
For detailed warranty terms and conditions, please refer to the official Rockford Fosgate website or contact their customer support.
10. Customer Support
If you have any questions, require technical assistance, or need to initiate a warranty claim, please contact Rockford Fosgate customer support through their official website or the contact information provided with your product packaging.
Before contacting support, please have your product model number (PM300X2) and proof of purchase readily available.