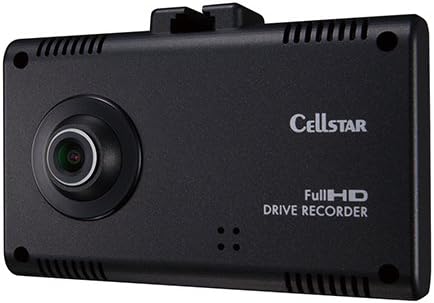
Figure 1.0: Front view of the CELLSTAR CSD-570FH Drive Recorder.
1. Introduction
The CELLSTAR CSD-570FH is a high-quality drive recorder designed and manufactured in Japan, offering reliable video recording for your vehicle. It features Full HD image quality, a 2.4-inch touch panel, and an ultra-fast GPS antenna for accurate location and time data. This manual provides detailed instructions for setup, operation, maintenance, and troubleshooting to ensure optimal performance of your device.
Key features include:
- Full HD recording with a 5-megapixel CMOS camera (2-megapixel recording).
- Integrated GPS for location and time synchronization.
- Intuitive 2.4-inch touch panel interface.
- Multiple recording modes: Always, Event, and Quick.
- Voice recording capability (ON/OFF).
- Designed to reduce interference with terrestrial digital TV signals.
- Parking surveillance mode (requires optional GDO-05 item).
- Compatibility with radar detectors (requires dedicated connection code).
2. Package Contents
Before proceeding with installation, please verify that all items listed below are included in your package:
- CELLSTAR CSD-570FH Drive Recorder Unit
- Mounting Base
- Double-sided Tape (for windshield mounting)
- Ball Joint (for dashboard mounting)
- Double-sided Tape (for dashboard mounting)
- DC Cord (4.5 meters)
- Cord Clips (5 pieces)
- 8 GB microSD Card (with case adapter)
- Dedicated Viewer Software (pre-loaded on the included microSD card)
- Instruction Manual
3. Setup and Installation
3.1. MicroSD Card Insertion
The device requires a microSD card for recording. An 8GB microSD card is included. For optimal performance, use Class 10/SDHC (8GB to 32GB) or Class 10/SDXC UHS-1 or above (64GB) cards, preferably MLC NAND type.
- Ensure the drive recorder is powered off.
- Locate the microSD card slot on the device.
- Insert the microSD card gently until it clicks into place.
- To remove, press the card inward until it springs out.
3.2. Mounting the Drive Recorder
The CSD-570FH can be mounted on either the windshield or the dashboard.
3.2.1. Windshield Mounting
This method provides a clear view of the road ahead.
- Clean the chosen area on your windshield thoroughly to ensure proper adhesion.
- Attach the mounting base to the drive recorder.
- Apply the double-sided tape for windshields to the mounting base.
- Firmly press the drive recorder with the attached mounting base onto the desired location on the windshield, ensuring it does not obstruct your view.
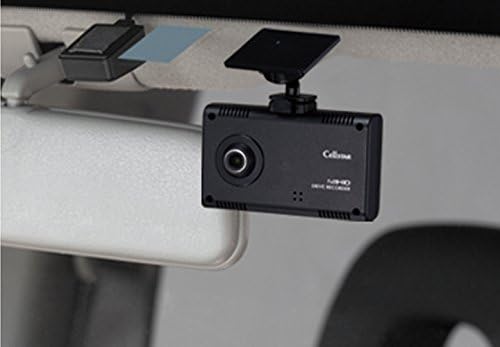
Figure 3.2.1: Drive recorder mounted on the windshield, providing a clear view of the road.

Figure 3.2.2: View from the driver's seat showing the dashcam mounted on the windshield.
3.2.2. Dashboard Mounting
This method allows for installation on the vehicle's dashboard.
- Clean the chosen area on your dashboard thoroughly.
- Attach the ball joint to the drive recorder.
- Apply the double-sided tape for dashboards to the ball joint.
- Firmly press the drive recorder with the attached ball joint onto the desired location on the dashboard.
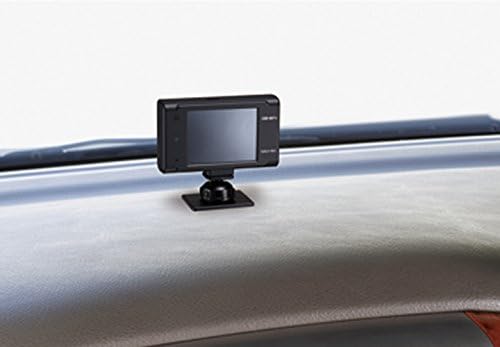
Figure 3.2.3: Drive recorder mounted on the dashboard.
3.3. Power Connection
Connect the supplied DC cord to the drive recorder and then to your vehicle's 12V/24V power outlet (cigarette lighter socket). Use the cord clips to neatly route the cable, ensuring it does not interfere with driving controls.
4. Operating Instructions
4.1. Powering On/Off
The device will automatically power on and begin recording when the vehicle's ignition is turned on, provided it is connected to a power source. To power off, turn off the vehicle's ignition.
4.2. Touch Panel Operation
The CSD-570FH features a 2.4-inch touch panel for easy navigation and settings adjustment.
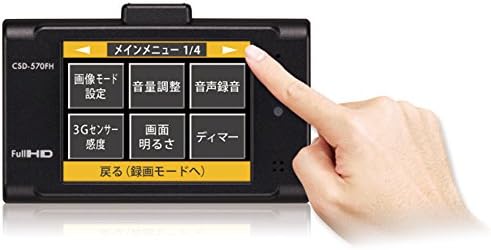
Figure 4.2.1: Interacting with the touch panel menu.
Tap icons or options on the screen to access menus, change settings, or review recordings. Swipe gestures may be used for navigation in certain menus.
4.3. Recording Modes
The drive recorder supports three primary recording modes:
- Always Recording: Continuous recording while the vehicle is in operation. Older files are overwritten by new ones when the microSD card is full.
- Event Recording: Automatically triggered by the built-in 3G sensor (G-sensor) upon detecting sudden impacts, rapid acceleration, or harsh braking. These recordings are typically saved in a protected folder to prevent overwriting.
- Quick Recording: Allows manual initiation of a short recording segment by pressing a designated button on the device or via the touch screen.
You can adjust the 3G sensor sensitivity through the touch panel menu to prevent frequent event recordings from minor bumps or vibrations.
4.4. Voice Recording
The device can record audio inside the vehicle. This feature can be toggled ON or OFF via the touch panel settings menu.
4.5. GPS Functionality
The built-in ultra-fast GPS antenna provides accurate location data and automatically synchronizes the device's date and time. This information is embedded in the recorded video files.
4.6. Terrestrial Digital TV Noise Reduction
The CSD-570FH is designed with countermeasures to minimize electromagnetic interference with terrestrial digital TV signals in your vehicle, ensuring clear reception for other devices.

Figure 4.6.1: Illustration of digital TV signal clarity with the CSD-570FH's noise reduction feature.
4.7. Parking Surveillance Mode (Optional)
To enable parking surveillance mode, the optional GDO-05 item is required. This mode allows the drive recorder to continue monitoring and recording even when the vehicle is parked and the ignition is off, providing security against incidents while unattended.
5. Maintenance
5.1. MicroSD Card Management
Regularly format the microSD card (at least once a month) to maintain optimal recording performance and prevent data corruption. This can typically be done through the device's settings menu. Back up any important recordings before formatting.
Periodically check the microSD card for wear and tear. If recording issues occur, replacing the card with a new, high-quality one is recommended.
5.2. Cleaning the Device
Use a soft, dry cloth to clean the exterior of the drive recorder, including the lens and touch screen. Avoid using abrasive cleaners or solvents, which can damage the device.
Ensure the mounting area on the windshield or dashboard is clean to maintain secure attachment.
6. Troubleshooting
6.1. Device Not Powering On
- Check the power connection: Ensure the DC cord is securely plugged into both the drive recorder and the vehicle's power outlet.
- Verify vehicle power: Confirm that the vehicle's power outlet is functional (e.g., by testing with another device).
- Check vehicle ignition: The device typically powers on with the vehicle's ignition.
6.2. Recording Issues (No Recording / Corrupted Files)
- MicroSD card: Ensure the microSD card is inserted correctly. Try formatting the card via the device's menu. If issues persist, replace the microSD card.
- Card compatibility: Verify that the microSD card meets the recommended specifications (Class 10, MLC NAND type).
6.3. Event Recording Triggering Too Frequently
- 3G Sensor Sensitivity: Adjust the G-sensor sensitivity setting through the touch panel menu. Lowering the sensitivity will reduce triggers from minor bumps or vibrations.
6.4. PC Viewer Software Issues (Audio/Video Sync, Small Map)
- Software Version: Ensure you are using the latest version of the dedicated viewer software. Check the manufacturer's website for updates.
- System Resources: Verify your computer meets the minimum system requirements for the viewer software.
- Alternative Playback: If sync issues persist, try playing the raw AVI files directly with a standard media player. The dedicated viewer software might have specific playback limitations.
- Map Display: The map window for GPS tracking in the viewer software may have a fixed size. There might not be an option to enlarge it within the provided software.
6.5. GPS Not Acquiring Signal
- Placement: Ensure the drive recorder has a clear view of the sky and is not obstructed by metallic tints or other objects on the windshield.
- Environment: GPS signal acquisition can be slower in underground parking, tunnels, or areas with tall buildings.
7. Specifications
| Feature | Specification |
|---|---|
| Brand | CELLSTAR |
| Model Name | CSD-570FH |
| Manufacturer | CELLSTAR |
| Country of Manufacture | Japan |
| Display Size | 2.4 Inches |
| Human Interface Input | Touchscreen |
| Camera Sensor | 5 Megapixel CMOS |
| Video Pixels (Recording) | 2 Megapixels (Full HD), 1 Megapixel (HD), 350,000 Pixels (D1) |
| Video Capture Resolution | 1080p (Full HD) |
| Frame Rate | 30 fps |
| Viewing Angle (Diagonal) | 140° |
| Viewing Angle (Horizontal) | 110° |
| Viewing Angle (Vertical) | 64° |
| F-Value | 2 |
| Minimum Illumination | 5 LUX |
| Special Features | Built-In GPS, Voice Recording, 3G Sensor |
| Recording Trigger | Always, Continuous, Event, Quick |
| Power Supply Voltage | 12V/24V |
| Connectivity Technology | Wired |
| Supported External Storage | 8 GB to 32 GB microSD (Class 10/SDHC, MLC recommended), 64 GB microSD (Class 10/SDXC, UHS-1+, MLC recommended) |
| Mounting Type | Rear Suction Mount (Windshield), Dashboard Mount |
| Product Dimensions | 2.26 x 8.5 x 5.1 cm |
| Weight | 82 g |
8. Warranty Information
Specific warranty details are not explicitly provided in the product description. Please refer to the warranty card included in your product packaging or contact CELLSTAR customer support for comprehensive warranty information. Products manufactured in Japan often come with a manufacturer's warranty, typically covering defects in materials and workmanship for a specified period from the date of purchase.
9. Customer Support
For technical assistance, troubleshooting not covered in this manual, or inquiries regarding your CELLSTAR CSD-570FH Drive Recorder, please contact CELLSTAR customer support. Contact information can typically be found on the manufacturer's official website or in the documentation included with your product.
When contacting support, please have your product model number (CSD-570FH) and purchase details readily available.