1. Product Overview
The JVR 12V Programmable Digital Timer Switch (Model COMINHKPR90865, Part Number TL34) is designed for precise control of electrical devices. It allows users to set up to 16 independent ON/OFF schedules over a 7-day period, offering flexible automation for various applications. This timer operates on 12V DC/AC power and features a built-in rechargeable battery to maintain settings during power outages.

Figure 1: Front view of the JVR 12V Programmable Digital Timer Switch.
2. Safety Information
- Power Source: This timer is designed for 12V DC/AC power input only. Do not connect to higher voltage sources.
- No Voltage Output: The JVR timer does not provide voltage transformation or output voltage. It acts as a switch to control the power flow to a connected device. Ensure the connected device has its own appropriate power supply.
- Installation: Installation should be performed by a qualified individual if you are unfamiliar with electrical wiring. Ensure all connections are secure to prevent short circuits or electrical hazards.
- Environment: This device is not waterproof. Avoid exposure to moisture, rain, or extreme temperatures.
- Maximum Load: Do not exceed the maximum rated current or wattage (16A / 1600W) to prevent damage to the timer or connected equipment.
3. Product Features
- Programmable Schedules: Supports up to 16 independent ON/OFF programs.
- Flexible Timing: Offers a wide timing range from 1 minute to 7 days.
- 7-Day Cycle: Allows programming for daily, specific days of the week, or custom weekday/weekend combinations.
- Power Failure Memory: Built-in rechargeable NiMH battery retains programmed settings for up to 60 days during power outages.
- Energy Efficient: Low power consumption (approximately 9mA when ON, 0mA when OFF).
- User-Friendly Interface: Equipped with an LCD screen and intuitive buttons for easy programming.

Figure 2: Key features including built-in battery and power failure memory.
4. Specifications
| Attribute | Value |
|---|---|
| Brand | JVR |
| Model Number | COMINHKPR90865 (Part Number TL34) |
| Power Source | 12V DC/AC |
| Voltage | 12 Volts |
| Wattage | 1600 Watts (Max) |
| Current | 16 Amps (Max) |
| Number of Settings | 16 ON/OFF programs |
| Timing Range | 1 minute to 7 days |
| Material | Plastic |
| Color | White |
| Product Dimensions | 2.36"D x 2.36"W x 1.26"H (60mm x 60mm x 32mm) |
| Item Weight | 2.4 ounces (68 Grams) |
| Battery Type | NiMH (internal, rechargeable) |
| Average Battery Life (backup) | 10 years |

Figure 3: Product dimensions.
5. Installation
5.1 Wiring Connections
The timer switch uses spade terminals for secure connections. Refer to the diagram below for proper wiring. Ensure all power is disconnected before making any electrical connections.

Figure 4: Spade terminal design and wiring points.
- Power Input (12V DC/AC): Connect your 12V DC or AC power source to terminals labeled 'Power 12VDC/AC'. Ensure correct polarity for DC connections.
- Load Output: Terminals 1 and 2 are the output contacts for the controlled device. Connect your load (e.g., light, motor) to these terminals. The timer acts as a switch, opening or closing this circuit based on your programmed schedule.
- Secure Connections: Use appropriate spade connectors and ensure they are firmly attached to prevent loose connections.
5.2 Mounting
The timer is designed for panel mounting. Secure it using appropriate screws through the mounting holes on the sides of the unit.
6. Operating Instructions
6.1 Initial Setup and Clock Setting
Upon first use or after a prolonged power outage, the internal battery may need to charge. Connect the timer to a 12V power source for at least 30 minutes to ensure the battery is sufficiently charged to retain settings.

Figure 5: Timer display and control buttons.
- Reset: Press the RES button (recessed) with a pointed object to clear all settings and reset the timer. The display will show 00:00.
- Set Current Time: Press the CLOCK button. While holding CLOCK, press WEEK to set the current day of the week, HOUR to set the current hour, and MIN to set the current minute. Release CLOCK when finished.
6.2 Programming ON/OFF Schedules
The timer supports up to 16 ON/OFF programs. Each program consists of an ON time and an OFF time.
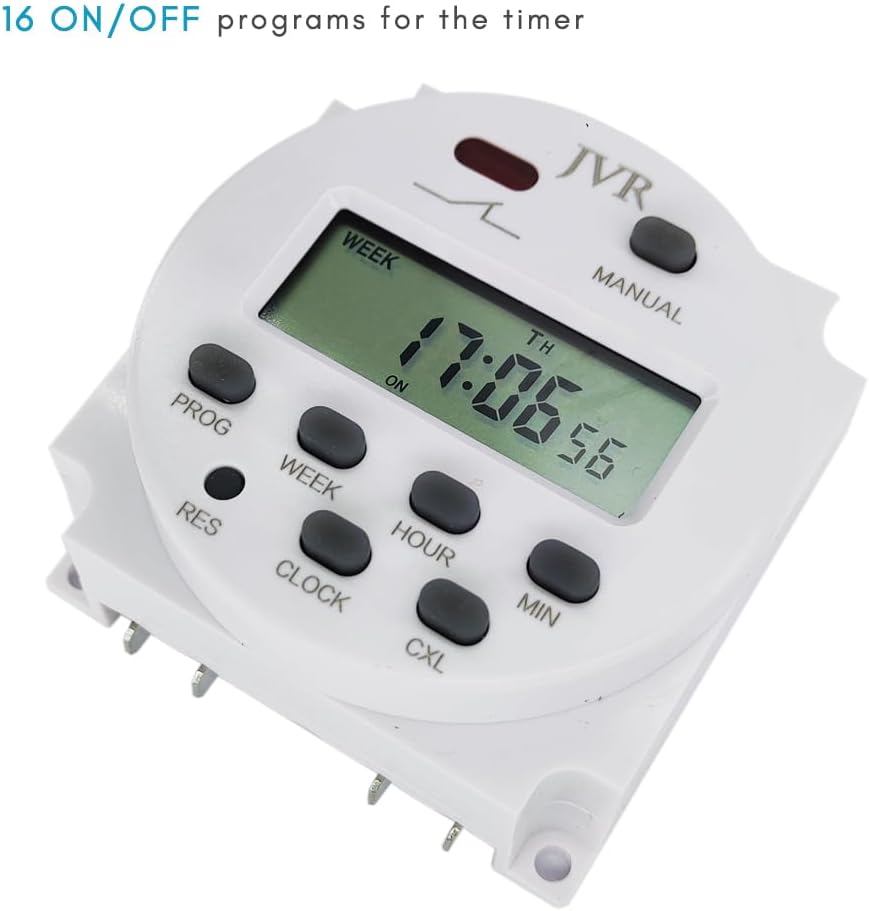
Figure 6: The timer supports 16 ON/OFF programs.
- Enter Program Mode: Press the PROG button once. The display will show "1 ON". This is for the first ON program.
- Set ON Time:
- Press WEEK to select the day(s) for this program. Options include: Daily, One Day (e.g., Mo), Weekend (Sa Su), Weekday (Mo Tu We Th Fr), Mo-We-Fr, Tu-Th-Sa, Mo-Tu-We, Th-Fr-Sa, etc.
- Press HOUR to set the desired ON hour.
- Press MIN to set the desired ON minute.
- Set OFF Time: Press PROG again. The display will show "1 OFF". Repeat the steps above to set the OFF day(s), hour, and minute for the first program.
- Continue Programming: Press PROG to cycle through subsequent ON/OFF programs (2 ON, 2 OFF, ..., 16 ON, 16 OFF). Repeat the setting process for each desired program.
- Exit Program Mode: After setting all desired programs, press the CLOCK button to return to the current time display.
6.3 Manual Override
Press the MANUAL button to cycle through different operating modes:
- AUTO ON: The timer will follow the programmed schedule, starting with an ON state.
- AUTO OFF: The timer will follow the programmed schedule, starting with an OFF state.
- ON: The output is continuously ON, overriding all programs.
- OFF: The output is continuously OFF, overriding all programs.
Ensure the timer is set to AUTO ON or AUTO OFF for programmed schedules to execute.

Figure 7: The timer supports 7-day programmable schedules.
7. Applications
The JVR 12V Programmable Digital Timer Switch is suitable for a variety of 12V DC/AC applications requiring automated control. Common uses include:
- Automatic chicken coop doors
- Fish feeders for aquariums or ponds
- Preheating systems
- Controlling neon lights or other 12V lighting
- Small kitchen appliances (if 12V compatible)
- Solar-powered systems (e.g., controlling pumps or lights)
- DIY automation projects

Figure 8: Examples of diverse applications for the timer switch.
8. Troubleshooting
- Display is blank: Ensure the timer is connected to a 12V power source. If it's a new installation or after a long period of no power, the internal battery may be fully discharged. Connect to power for at least 30 minutes to charge the battery.
- Programs are not running:
- Check if the timer is in AUTO ON or AUTO OFF mode. If it's in continuous ON or OFF, programs will be overridden.
- Verify that the current time and day are set correctly.
- Review your programmed ON/OFF times for any conflicts or errors.
- Output not switching:
- Confirm that the 12V power input is stable.
- Check the wiring connections to the load (terminals 1 and 2) for looseness or incorrect wiring.
- Ensure the connected load does not exceed the maximum wattage (1600W) or current (16A) rating of the timer.
- Timer unresponsive: Press the RES button with a pointed object to perform a factory reset. You will need to re-set the clock and all programs.
9. Maintenance
The JVR 12V Programmable Digital Timer Switch requires minimal maintenance.
- Keep the device clean and free from dust. Use a soft, dry cloth for cleaning.
- Avoid exposing the timer to liquids or corrosive substances.
- Ensure adequate ventilation if installed in an enclosed space to prevent overheating.
10. Warranty and Support
This JVR timer switch comes with a 1-year manufacturer's warranty from the date of purchase. This warranty covers defects in materials and workmanship under normal use.
For technical support, warranty claims, or any questions regarding the operation of your JVR timer switch, please contact JVR customer service through your retailer or the official JVR website.

