Introduction
This manual provides detailed instructions for the setup, operation, and maintenance of your Onkyo TX-NR545 7.2-Channel Network A/V Receiver. Please read this manual thoroughly before using the receiver to ensure proper and safe operation. The TX-NR545 is designed to deliver powerful audio and supports advanced features such as Dolby Atmos, DTS-HD Master Audio, 4K Ultra HD video pass-through, Wi-Fi, Bluetooth, and network streaming capabilities.

Figure 1: Front view of the Onkyo TX-NR545 A/V Receiver, showcasing its sleek black design, central display, and various control knobs and buttons.
Setup
1. Unpacking
Carefully remove the receiver and all accessories from the packaging. Ensure all components listed below are present:
- Onkyo TX-NR545 A/V Receiver
- Remote Control (RC-898M)
- Power Cord
- Indoor FM Antenna
- AM Loop Antenna
- Speaker Setup Microphone (AccuEQ)
- Quick Start Guide
2. Connecting Speakers
The TX-NR545 supports a 7.2-channel configuration, including 5.1.2-channel Dolby Atmos setups. Connect your speakers to the corresponding terminals on the rear panel. Ensure correct polarity (+ to + and - to -) for optimal sound quality.
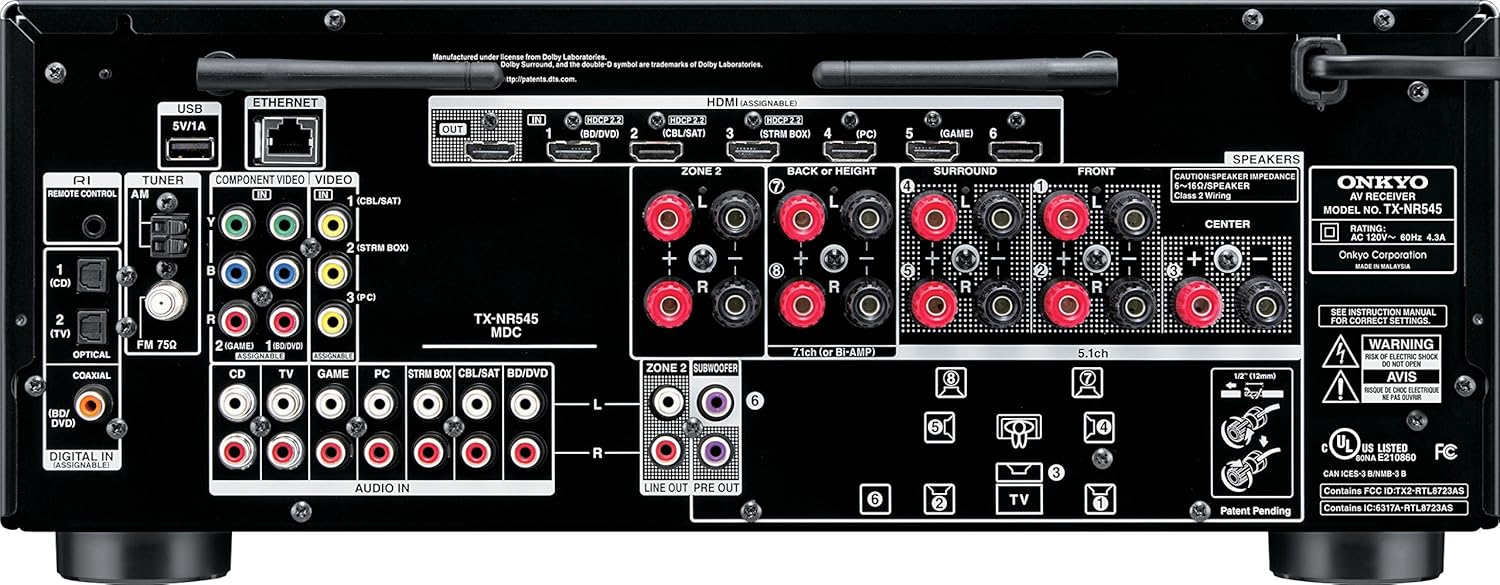
Figure 2: Rear panel of the Onkyo TX-NR545 A/V Receiver, illustrating the various input and output connections including HDMI, speaker terminals, and audio inputs.
- Front Speakers (L/R): Connect to the FRONT L/R terminals.
- Center Speaker: Connect to the CENTER terminal.
- Surround Speakers (L/R): Connect to the SURROUND L/R terminals.
- Surround Back/Height Speakers (L/R): Connect to the SURROUND BACK/HEIGHT L/R terminals for 7.1 or Dolby Atmos configurations.
- Subwoofers: Connect up to two powered subwoofers to the SUBWOOFER PRE OUT 1 and 2 jacks.
3. Connecting Audio/Video Devices
Use HDMI cables for connecting most modern A/V devices. The TX-NR545 features multiple HDMI inputs and one HDMI output (ARC compatible).
- HDMI Devices: Connect Blu-ray players, game consoles, cable boxes, and streaming devices to the HDMI IN 1-6 ports.
- TV Connection: Connect your TV's HDMI ARC input to the receiver's HDMI OUT (MAIN) port.
- Analog Audio/Video: Utilize the Component Video, Composite Video, and Analog Audio inputs for legacy devices.
- Digital Audio: Optical and Coaxial digital audio inputs are available for devices without HDMI audio output.
4. Network Connection
The receiver supports both wired and wireless network connections for streaming services and firmware updates.
- Wired (Ethernet): Connect an Ethernet cable from your router to the NETWORK port on the rear panel.
- Wireless (Wi-Fi): Access the receiver's setup menu to configure Wi-Fi settings. Select your network and enter the password.
5. Initial Setup and Calibration (AccuEQ)
After connecting all components, perform the initial setup and speaker calibration using the supplied AccuEQ microphone. This process optimizes sound settings for your specific room acoustics and speaker placement.
- Connect the AccuEQ microphone to the SETUP MIC jack on the front panel.
- Follow the on-screen instructions displayed on your TV.
- Place the microphone at your primary listening position.
- The receiver will emit test tones to measure speaker distances, levels, and crossover frequencies.
- Save the settings once calibration is complete.
Operating Instructions
1. Basic Operation
- Power On/Off: Press the ON/STANDBY button on the front panel or remote control.
- Volume Control: Use the MASTER VOLUME knob on the front panel or the VOL +/- buttons on the remote.
- Input Selection: Press the input selector buttons (e.g., BD/DVD, GAME, TV) on the front panel or remote to switch between connected devices.

Figure 3: The RC-898M remote control for the Onkyo TX-NR545, featuring dedicated buttons for input selection, volume, menu navigation, and playback controls.
2. Audio Modes and Surround Sound
The TX-NR545 supports various audio formats and listening modes. Use the LISTENING MODE button on the front panel or remote to cycle through available modes.
- Dolby Atmos: For content encoded with Dolby Atmos, the receiver will automatically engage this mode if compatible speakers are connected.
- DTS-HD Master Audio: High-resolution audio format for Blu-ray discs.
- Stereo: Outputs audio from the front left and right speakers only.
- Direct/Pure Audio: Bypasses tone controls and processing for the purest sound reproduction.
3. Network Features and Streaming
Leverage the receiver's network capabilities for a wide range of audio streaming options.
- Wi-Fi/Ethernet: Connect to your home network to access internet radio, Spotify Connect, Pandora, and other streaming services.
- Bluetooth: Pair your smartphone, tablet, or PC to stream audio wirelessly. Activate Bluetooth mode on the receiver and search for "Onkyo TX-NR545" on your device.
- AirPlay: Stream audio directly from Apple devices over your Wi-Fi network.
- USB Playback: Connect a USB storage device to the front USB port to play audio files.
Maintenance
- Cleaning: Use a soft, dry cloth to clean the exterior of the receiver. Do not use abrasive cleaners or solvents.
- Ventilation: Ensure adequate ventilation around the receiver to prevent overheating. Do not block ventilation openings.
- Firmware Updates: Periodically check for firmware updates via the network connection. Updates can improve performance and add new features. Refer to the on-screen menu for update options.
Troubleshooting
If you encounter issues with your TX-NR545, refer to the following common solutions before contacting support.
| Problem | Possible Cause | Solution |
|---|---|---|
| No sound from speakers. | Incorrect input selected, speaker wires loose, receiver in mute mode, protection circuit activated. | Verify input selection. Check speaker wire connections. Press MUTE button on remote. Turn off receiver, wait, then turn on again. |
| No picture on TV. | Incorrect HDMI connection, TV input not selected correctly, HDMI cable issue. | Ensure HDMI cables are securely connected. Select correct HDMI input on TV. Try a different HDMI cable. |
| Network features not working. | No network connection, incorrect Wi-Fi password, router issue. | Check Ethernet cable or Wi-Fi settings. Restart your router and receiver. Ensure network settings are correct. |
| Remote control not working. | Dead batteries, obstructed signal, incorrect remote mode. | Replace batteries. Remove obstructions between remote and receiver. Ensure remote is in "RECEIVER" mode. |
Factory Reset
If problems persist, a factory reset may resolve the issue. Note that this will erase all custom settings.
- With the receiver turned on, press and hold the CBL/SAT button on the front panel.
- While holding CBL/SAT, press the ON/STANDBY button.
- "Clear" will appear on the display. Release the buttons.
- The receiver will enter standby mode.
Specifications
| Feature | Specification |
|---|---|
| Product Dimensions | 12.92 x 17.12 x 6.81 inches |
| Item Weight | 19 pounds |
| Surround Sound Channel Configuration | 7.2 Channel |
| Total HDMI Ports | 6 |
| Connectivity Technology | Bluetooth, Wi-Fi, HDMI |
| Compatible Devices | Speaker, Television, Smartphone, Tablet, Personal Computer |
| Audio Output Mode | Surround |
| Video Encoding | H.264, H.265/HEVC |
Warranty and Support
For detailed warranty information, please refer to the warranty card included with your product or visit the official Onkyo website. Onkyo provides customer support for technical assistance and service inquiries.
- Online Support: Visit the Onkyo support page for FAQs, software downloads, and service center information.
- Contact Information: Refer to your product documentation for specific contact numbers or email addresses for your region.