
1. Introduction
This manual provides detailed instructions for the installation, operation, and maintenance of your JOOAN 1080P 8-Channel DVR Security Video Recorder. Please read this manual thoroughly before using the product to ensure proper functionality and safety. This DVR supports P2P service for mobile remote monitoring and PC easy remote access, offering a 5-in-1 multi-function digital video recording solution.
2. Product Overview
2.1. Package Contents
Verify that all items are present in your package. The standard package includes the DVR unit, power adapter, USB mouse, and user manual. Depending on the kit purchased, it may also include security cameras and necessary cables.

Figure 2.1: DVR unit and included accessories. The image displays the DVR, power adapter, USB mouse, and a user manual, along with several security cameras and connection cables.
2.2. DVR Ports and Connections
Familiarize yourself with the various ports on the rear panel of the DVR for proper connection of cameras, display monitors, network, and power.
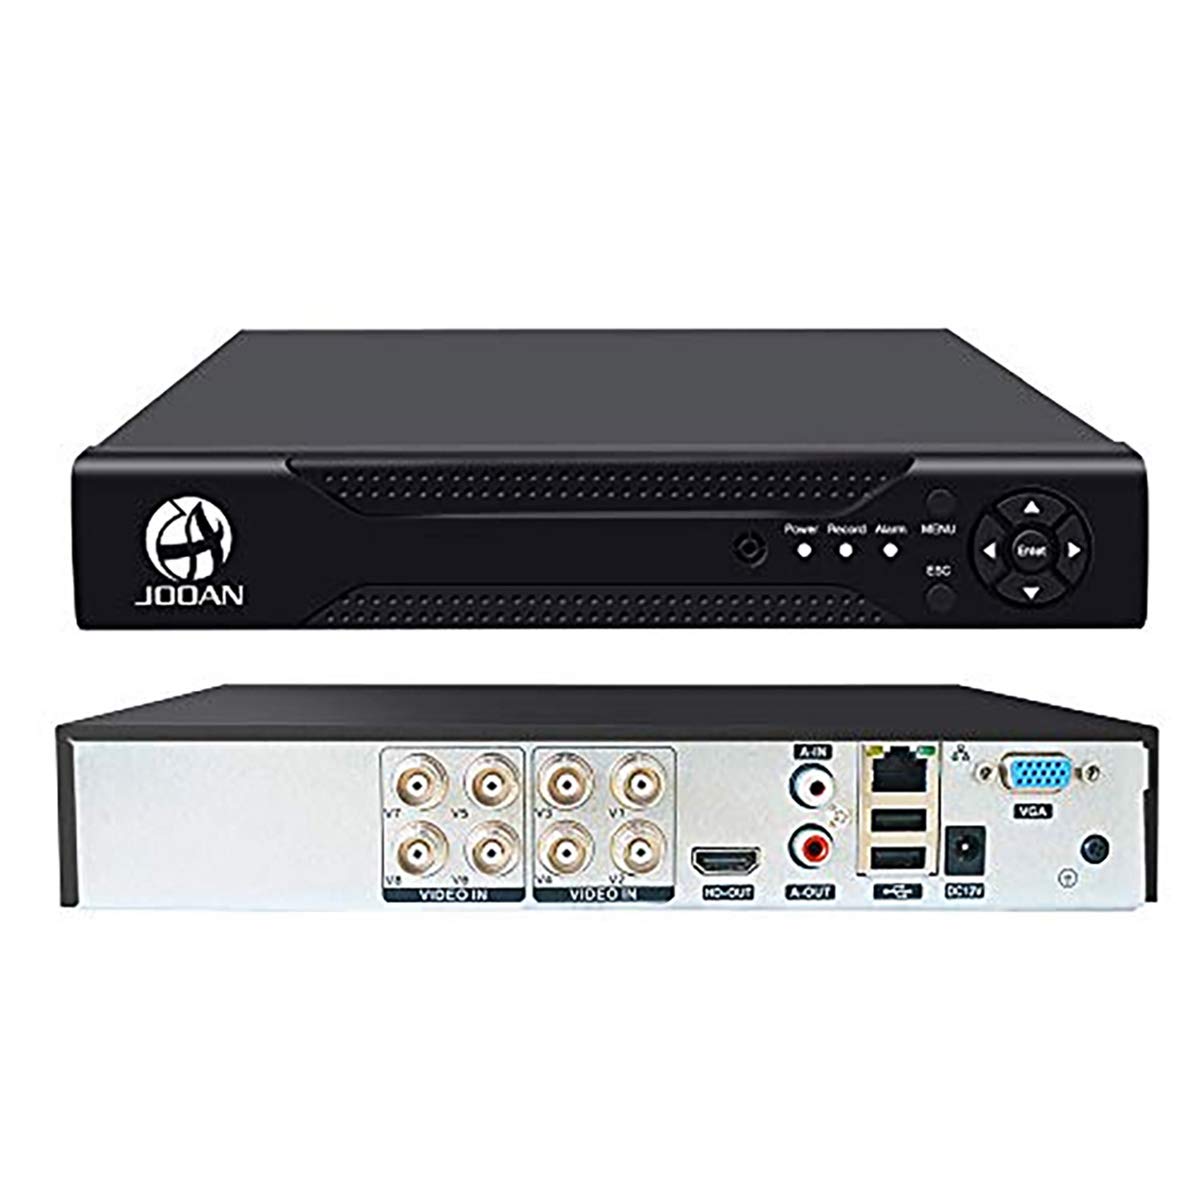
Figure 2.2: Rear panel connections. This image highlights the Video Input (BNC connectors), HDMI Output, VGA Output, Audio Input/Output, Ethernet Port, USB Ports for mouse, and DC 12V Power Input.
- Video Input: Connect security cameras via BNC connectors.
- HDMI/VGA Output: Connect to a monitor or TV for video display.
- Audio Input/Output: For connecting microphones and speakers.
- Ethernet Port: For network connection to a router.
- USB Ports: For connecting the USB mouse and external storage devices.
- DC 12V Power Input: For connecting the power adapter.
3. Setup
3.1. Initial Hardware Connection
Follow these steps to connect your DVR system:
- Connect your security cameras to the DVR's Video Input ports using BNC cables.
- Connect a monitor or TV to the DVR's HDMI or VGA output port.
- Connect the USB mouse to a USB port on the DVR.
- Connect the Ethernet cable from your router to the DVR's Ethernet port for network access.
- Connect the power adapter to the DC 12V Power Input and then to a power outlet.
- Power on the DVR.
Video 3.1: General operation video demonstrating initial setup and connections. This video illustrates how to connect cameras and other peripherals to the DVR, and navigate the basic interface.

Figure 3.1: Network and camera connection diagram. This image shows the DVR connected to a router via an Ethernet cable and a camera connected via a BNC cable, highlighting the ONVIF protocol support.
3.2. Network Configuration for Remote Access
To enable remote viewing, ensure your DVR is connected to the internet via the Ethernet port. Access the DVR's network settings through the main menu on your connected monitor. Enable P2P (Cloud) service for easy mobile and PC access.
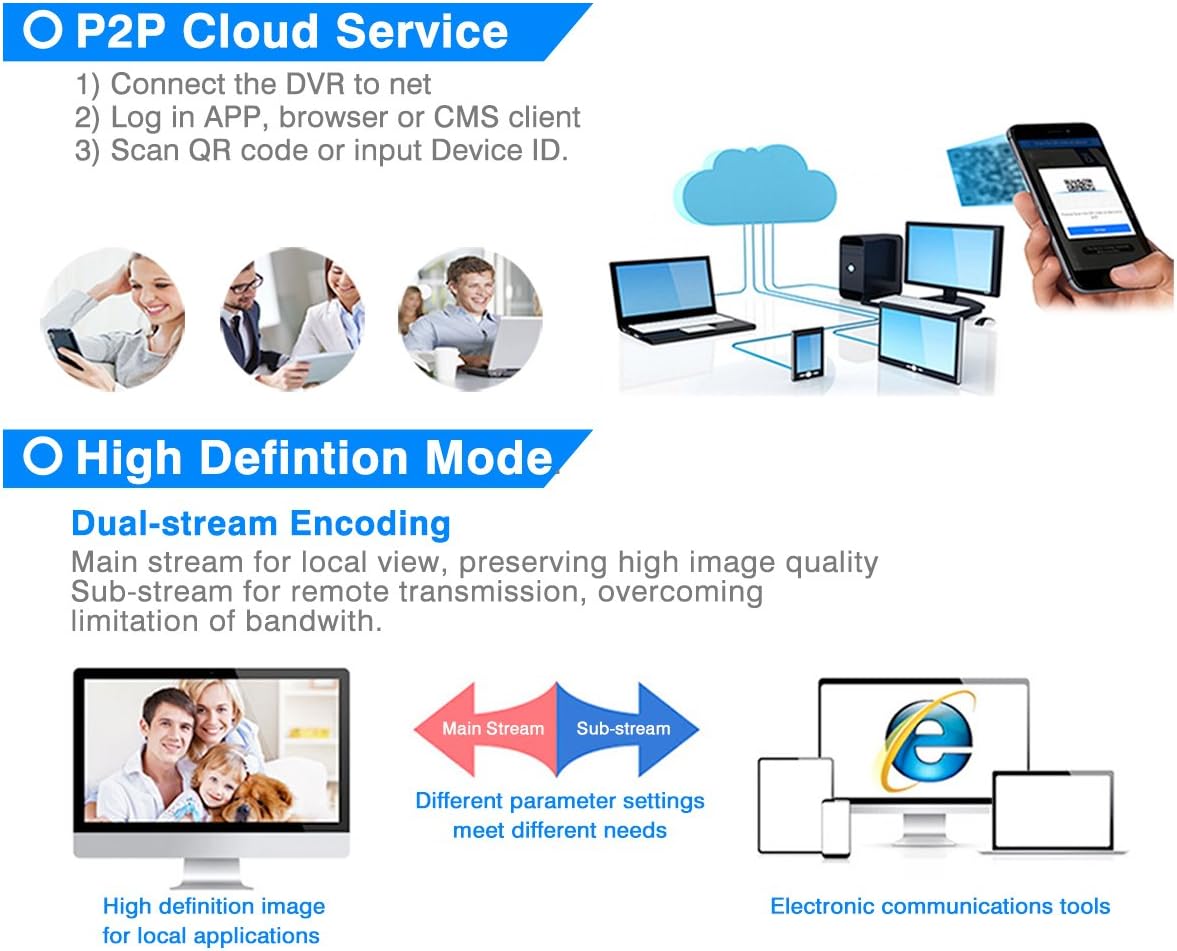
Figure 3.2: P2P Cloud Service and Dual-stream Encoding. This diagram illustrates how to connect the DVR to the network for P2P cloud service and explains the benefits of dual-stream encoding for local and remote viewing.
4. Operating Instructions
4.1. Mobile Remote Monitoring
Download the official mobile application (available for iOS and Android) by scanning the QR code displayed on your DVR's network settings screen. Once installed, add your DVR device by scanning the device ID QR code or manually entering the ID. This allows you to view live feeds and manage your system remotely.

Figure 4.1: Mobile and PC remote viewing. This image shows how to scan QR codes to download the mobile app and view the security feed on smartphones, tablets, and PCs.
Video 4.1: How to add the DVR to your phone for remote viewing. This video guides users through the process of connecting their DVR to a mobile device for remote access.
For app download, visit: http://dl.danale.com/getvideoapp
4.2. PC Remote Monitoring (VMS/CMS Client)
The DVR supports remote monitoring via PC using VMS (Video Management Software) or CMS (Central Management Software) clients. Install the appropriate software on your computer, then add your DVR device using its network details or Cloud ID to access live feeds and recordings.
Video 4.2: General operation video demonstrating PC remote access. This video shows how to configure and use the VMS/CMS client on a PC to monitor your DVR system.
4.3. Recording Configuration
Access the "Record Conf." menu from the main interface to set up recording schedules, modes (manual, schedule, stop), and enable detection-triggered recording or alarms. You can configure recording for individual channels or all channels simultaneously.
Video 4.3: General operation video demonstrating recording configuration. This video guides you through setting up recording schedules and modes for your DVR.
4.4. Motion, Face, and Human Detection
The DVR supports advanced detection features including motion detection, face detection, and human detection. These features can trigger alarms, send notifications, or initiate recording. Configure these settings in the "Alarm" menu to enhance your security monitoring.
Video 4.4: General operation video demonstrating motion, face, and human detection setup. This video shows how to enable and configure various detection features for enhanced security.
4.5. Changing Channel Type for IP Cameras
If you wish to add more IP cameras, you may need to adjust the channel type settings. Navigate to the "System" menu, then "Digital" or "ChannelType" to configure the channel allocation between local (analog) and IP cameras. The DVR supports various configurations, allowing for a mix of camera types up to a maximum of 10 cameras (e.g., 2 IP cameras + 8 analog cameras).

Figure 4.5: Channel Type configuration menu. This image displays the menu where you can select different channel type configurations to support various combinations of analog and IP cameras.
Video 4.5: General operation video demonstrating channel type changes. This video shows how to switch channel types to add more IP cameras to your DVR system.
5. Maintenance
Regular maintenance ensures the longevity and optimal performance of your DVR system.
- HDD Information: Periodically check the status of your hard disk drive (HDD) through the DVR's system menu to ensure it is functioning correctly and has sufficient storage space.
- Backup: Regularly back up important video footage to an external storage device via the USB port or network.
- Firmware Upgrade: Check for and install firmware updates from the manufacturer's website to improve system stability and add new features. This can typically be done through the "Advanced" menu.
- System Restore: In case of system issues, you may use the restore function (found in the "Advanced" menu) to revert to factory settings. Note that this will erase all configurations.
6. Troubleshooting
6.1. PAL/NTSC Error
If you encounter a "PAL/NTSC ERROR" message on your display, it indicates a mismatch between the camera's video standard and the DVR's setting. You can resolve this by changing the video standard in the DVR's output settings.
Video 6.1: How to change the video standard of the camera on the DVR. This video demonstrates the steps to correct a PAL/NTSC error by adjusting the video standard settings.
6.2. General Issues
- No Video Display:
- Check all cable connections (power, video, HDMI/VGA).
- Ensure the monitor is powered on and set to the correct input source.
- Verify the camera's video standard matches the DVR's setting (refer to 6.1).
- Remote Access Failure:
- Confirm the DVR is connected to the internet and has a valid IP address.
- Check network settings and ensure P2P service is enabled.
- Verify correct device ID and password in the mobile app or PC software.
- Recording Not Working:
- Ensure a hard disk drive (HDD) is installed and properly initialized.
- Check recording schedules and modes in the "Record Conf." menu.
- Verify that motion detection or alarm triggers are correctly configured if using those modes.
7. Specifications
| Feature | Detail |
|---|---|
| Brand | JOOAN |
| Model Number | 02-1001-000048 |
| Number of Channels | 8 |
| Connectivity Technology | HDMI |
| Compatible Devices | Smartphone |
| Memory Storage Capacity | 6 TB (Hard disk not included) |
| Media Format Digital Video | HDD |
| Video Input | VGA |
| Item Weight | 2.8 Pounds |
| UPC | 700465870513 |
8. Warranty and Support
For warranty information and technical support, please refer to the official JOOAN website or contact their customer service directly. Keep your purchase receipt for warranty claims.

