1. Introduction
This manual provides detailed instructions for the installation, operation, and maintenance of your JOVISION JVS-N71-HC 960P Box IP Camera. This camera is designed for both indoor and outdoor security surveillance, featuring 960P HD resolution, night vision capabilities, and network connectivity via Jovision's patented CloudSEE technology.
The JVS-N71-HC camera supports the ONVIF protocol, ensuring compatibility with various network video monitoring products. It offers advanced features such as motion detection, privacy masking, and remote monitoring via multiple platforms.
2. Product Overview
2.1 Package Contents
Upon opening the package, verify that all components are present and undamaged. The standard package includes:
- JOVISION JVS-N71-HC IP Camera
- Mounting hardware
- Software disc (for 64-channel NVR software)
- User Manual (this document)

Figure 2.1: Contents of the JOVISION JVS-N71-HC package.

Figure 2.2: The retail packaging for the JOVISION JVS-N71-HC IP Camera.
2.2 Camera Components
Familiarize yourself with the main parts of the camera:
- Lens: Captures video footage.
- IR Illuminators: Two lattice lights provide infrared illumination for night vision.
- Light Sensor: Detects ambient light levels to automatically switch between day and night modes.
- Mounting Bracket: For wall mounting.
- Cable Interface: Includes power input, Ethernet port, and video output.

Figure 2.3: Front view of the JVS-N71-HC camera, highlighting the lens and IR illuminators.

Figure 2.4: Side view of the JVS-N71-HC camera, showing the model label.
3. Setup
3.1 Physical Installation
The JVS-N71-HC camera is designed for wall mounting. Choose a suitable location that provides the desired viewing angle and is within reach of power and network connections. Ensure the mounting surface is sturdy enough to support the camera's weight.
- Mark the drilling points on the wall using the camera's mounting bracket as a template.
- Drill pilot holes and insert wall anchors if necessary.
- Secure the mounting bracket to the wall using the provided screws.
- Attach the camera to the mounting bracket and adjust its angle for optimal coverage.
3.2 Cable Connections
Connect the necessary cables to the camera's interface:
- Power: Connect a 12V DC power adapter (not included) to the power input port.
- Network: Connect an Ethernet cable from your network router or switch to the camera's RJ45 Ethernet port.
- Video Output (Optional): If using analog video output, connect a BNC cable to the video output port.
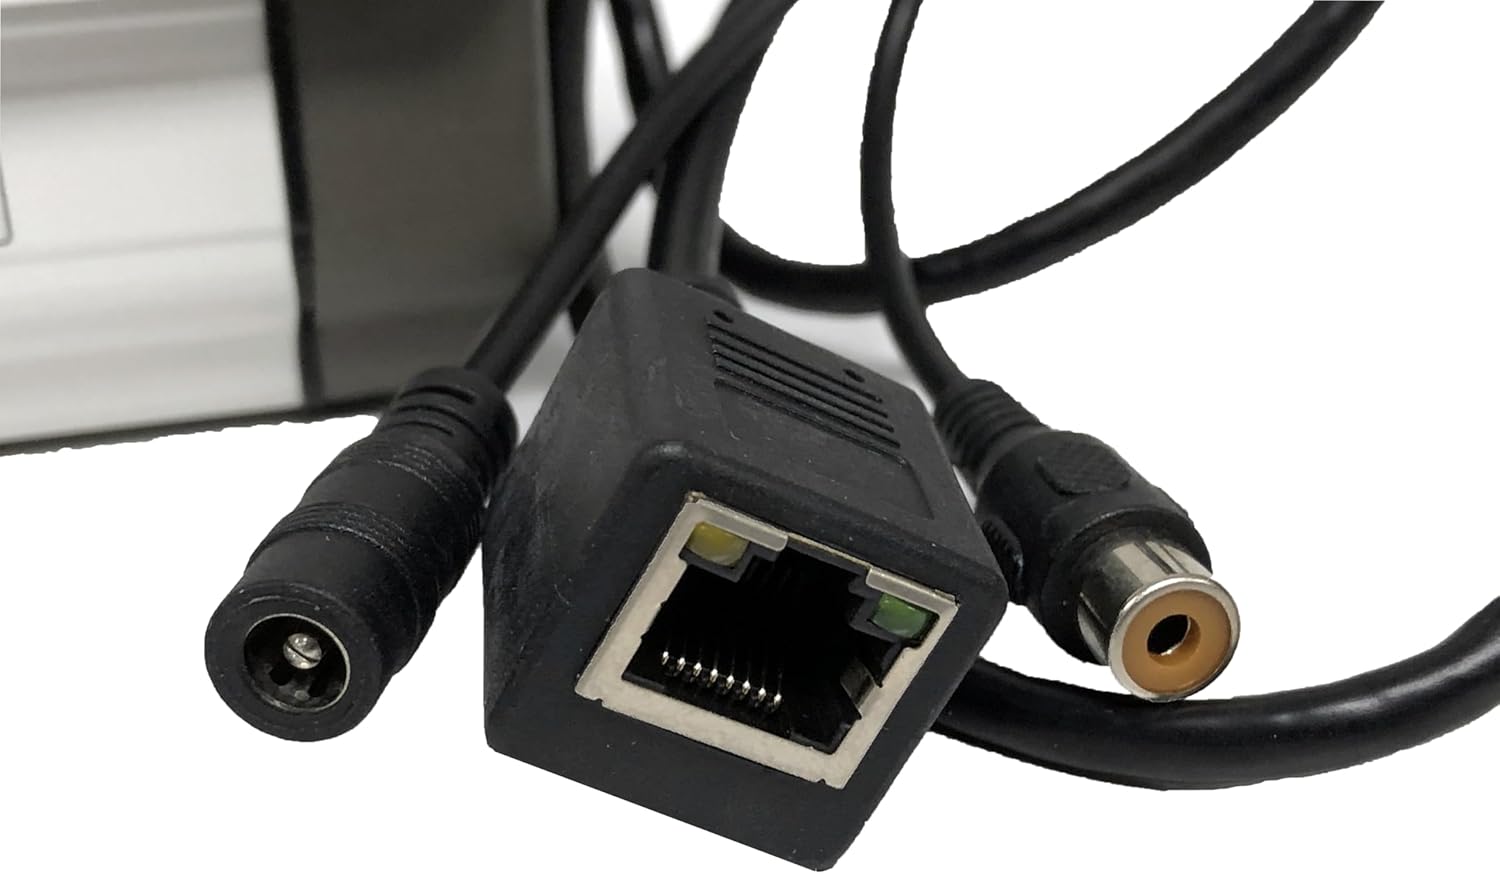
Figure 3.1: Camera cable connections, including power, Ethernet, and video output.
3.3 Software Installation and Initial Configuration
The JVS-N71-HC camera is designed to work with Jovision standalone NVR systems or PC-based "CloudSEE" NVR software. The CloudSEE PC software is available for free download from the Jovision website.
- Install the provided 64-channel NVR software from the disc onto your PC, or download the latest "CloudSEE" software from the official Jovision website.
- Ensure your camera is powered on and connected to the same network as your PC or NVR system.
- Launch the CloudSEE software. The software should automatically detect the camera on the local network.
- Follow the on-screen prompts to add the camera to your system. You may need to configure network parameters (static IP, DHCP, or ADSL) within the software.
- For P2P remote surveillance, register an account with CloudSEE and add your camera using its unique device ID.
4. Operating Instructions
4.1 Remote Monitoring
Access your camera's live feed and recordings through various platforms:
- CloudSEE PC Software: Use the installed "CloudSEE" NVR software for comprehensive management and viewing.
- WebCC: Access the camera via a web browser by entering its IP address.
- Mobile App: Download the Jovision mobile app for iOS or Android devices to view your camera remotely.
- JNVR/CV: Compatible with Jovision NVR systems for centralized recording and management.
4.2 Video Recording and Quality
The camera supports video resolution of 1280x960 (960P) and uses H.264/JPEG compression. It offers tri-stream functionality, allowing users to select the stream and adjust resolution, frame rate, and video quality to optimize storage and bandwidth.
4.3 Night Vision
Equipped with two lattice lights and IR-CUT technology, the camera automatically switches between color (day) and black-and-white (night) modes based on ambient light. This ensures clear surveillance even in low-light or complete darkness.
4.4 Motion Detection and Alerts
The camera supports motion detection. You can configure up to four different detection zones. When motion is detected, the system can automatically send email alerts or trigger client-end alarms. Refer to the software's settings for detailed configuration of motion detection sensitivity and alert actions.
4.5 Privacy Masking
To protect privacy in specific areas, the camera supports up to four privacy masking zones. These zones will appear as blacked-out areas in the video feed, preventing recording or viewing of sensitive regions.
4.6 Video Adjustment
Within the camera's software interface, you can adjust various video parameters to suit your environment and preferences, including Contrast, Brightness, Saturation, and Acuity.
5. Maintenance
5.1 Cleaning
Regularly clean the camera lens and housing with a soft, dry cloth to ensure optimal image clarity. Avoid using harsh chemicals or abrasive materials that could damage the lens or finish.
5.2 Software Updates
Periodically check the Jovision official website for firmware and software updates. Keeping your camera's software up-to-date ensures optimal performance, security, and access to new features. Updates can typically be performed locally or directly from the Jovision website.
5.3 System Restart
The camera supports automatic restart after a power off or accidental problem, ensuring continuous operation. If you encounter persistent issues, a manual power cycle (unplugging and replugging the power adapter) can often resolve minor glitches.
6. Troubleshooting
If you experience problems with your JOVISION JVS-N71-HC IP Camera, refer to the following common issues and solutions:
- No Video Feed:
- Ensure the camera is powered on and the power adapter is securely connected.
- Verify the Ethernet cable is properly connected to both the camera and the network device.
- Check network settings in the CloudSEE software to ensure the camera has a valid IP address and is accessible.
- Confirm that the camera is added correctly to your NVR system or CloudSEE account.
- Poor Image Quality:
- Clean the camera lens.
- Adjust video settings (brightness, contrast, acuity) in the software.
- Ensure sufficient lighting in the surveillance area, especially for night vision.
- Night Vision Not Working:
- Check if the IR illuminators are physically obstructed.
- Verify that the camera's day/night mode is set to auto or night mode in the software.
- Motion Detection Not Triggering:
- Review motion detection zone settings and sensitivity in the software.
- Ensure alert actions (email, client-end alarm) are correctly configured.
For further assistance, consult the Jovision website or contact their technical support.
7. Specifications
| Feature | Specification |
|---|---|
| Model Number | JVS-N71-HC |
| Video Resolution | 1280x960 (960P), 1.3 MP |
| Video Compression | H.264/JPEG |
| Connectivity Technology | Wireless (Wi-Fi), Wired (Ethernet) |
| Connectivity Protocol | ONVIF |
| Power Source | 12V DC (Battery Powered listed in specs, but typically external adapter) |
| Indoor/Outdoor Usage | Indoor, Outdoor |
| Special Features | Motion Sensor, Night Vision (2 Lattice Lights, IR-CUT) |
| Material | Metal (Industrial grade all metal vandal proof design) |
| International Protection Rating | IP67 |
| Compatible Devices | Cameras, Personal Computers |
| Mounting Type | Wall Mount |
| Item Weight | 1.65 pounds |
| Package Dimensions | 10.4 x 5.3 x 5 inches |
| UPC | 700900438803 |
8. Warranty and Support
8.1 Warranty Information
For detailed warranty information regarding your JOVISION JVS-N71-HC IP Camera, please consult your retailer or visit the official Jovision website. Warranty terms and conditions may vary by region and purchase location.
8.2 Technical Support
If you require technical assistance, have questions about product functionality, or need help with troubleshooting, please refer to the support section on the official Jovision website. The website also provides access to software downloads, FAQs, and contact information for customer service.