Introduction
This manual provides detailed instructions for the proper installation, use, and maintenance of your Smartline 12 ft x 24 ft Oval Swimming Pool Liner. Designed for steel-sided above-ground pools with a 52-inch wall height, this 25-gauge heavy-duty virgin vinyl liner features a Tuscan pattern and Unibead style for versatile installation. Adhering to these guidelines will ensure optimal performance and longevity of your pool liner.
Product Overview
Key Features
- Dimensions: 12 ft x 24 ft Oval, suitable for 52-inch wall height pools.
- Material: 25 Gauge Heavy Duty Virgin Vinyl for superior durability.
- Style: Unibead design, allowing for both J-hook and standard bead installation.
- Pattern: Tuscan, featuring a combination of triangle and rhombus shaped stones forming a chevron wave pattern.
- Construction: Features 100% virgin vinyl, double welded seams, and heat bonded construction for enhanced strength.
- Protection: Equipped with Lamiclear technology, including an acrylic top coat and UV resistant print layer, to protect against abrasion, chemicals, and UV fading.
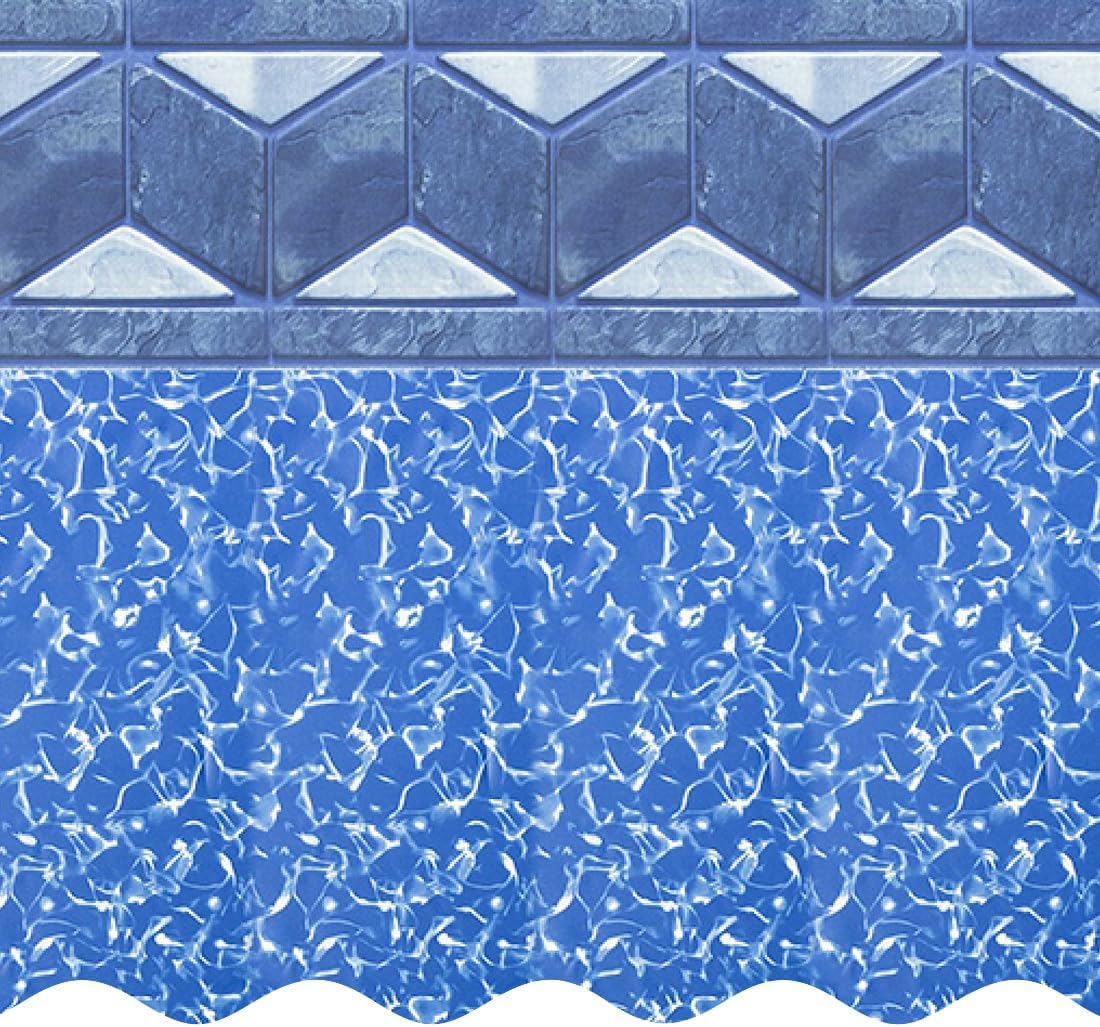
Image: Close-up of the Smartline Tuscan Unibead Pool Liner, showcasing its distinctive pattern.
Included Components
- 12 ft x 24 ft Oval Unibead Pool Liner (Tuscan Pattern)
- Skimmer Gaskets
- Return Gaskets

Image: Illustration showing the included skimmer and return gaskets, essential for proper liner installation around pool openings.
Setup and Installation
Pre-Installation Checklist
- Verify Pool Measurements: Ensure your pool is 12 ft x 24 ft oval with a 52-inch wall height. Measure the outside wall from the ground to underneath the top rail for height, and from the center point across the longest and widest ends for oval dimensions.
- Prepare Pool Surface: The pool base must be flat, smooth, and free of debris, sharp objects, or roots.
- Check Weather Conditions: Ideal installation temperatures are between 70-80 degrees Fahrenheit (21-27 degrees Celsius). Avoid windy conditions.
- Gather Tools: You may need a utility knife (for J-hook removal), measuring tape, and a soft brush or broom.
Installation Steps
- Unpack and Warm Liner: Carefully remove the liner from its packaging. Lay the liner out in direct sunlight for a minimum of one hour. This allows the virgin vinyl material to warm up and become more pliable, making it easier to stretch and fit during installation, which helps prevent wrinkles.
- Position the Liner: Place the liner in the center of the pool, ensuring the floor seam is centered and the liner is evenly distributed.
- Install Unibead Liner:
- For Overlap Style Pools (J-Hook): Simply open up the J-hook portion of the Unibead liner and slip it over the top edge of the pool wall. Ensure it is securely seated around the entire perimeter.
- For Beaded Style Pools (Standard Bead): Locate the score or groove mark on the J-hook portion of the liner. Carefully remove the J-hook by cutting along this score mark. This will leave only the standard bead, which is then inserted into your pool's bead receiver opening. Ensure the bead is fully seated in the receiver.
- Smooth Out Wrinkles: Once the liner is secured, begin smoothing out any wrinkles from the center outwards. You can use a soft broom or your hands.
- Begin Filling Pool: Start filling the pool with water. As the water level rises, continue to smooth out any remaining wrinkles. The weight of the water will help press the liner against the pool walls and floor.
- Install Skimmer and Return Fittings: Once the water level reaches the skimmer and return openings, carefully cut out the liner in these areas. Install the provided skimmer and return gaskets and fittings according to your pool's specific instructions. Ensure a watertight seal.
- Continue Filling: Fill the pool to its recommended operating level.
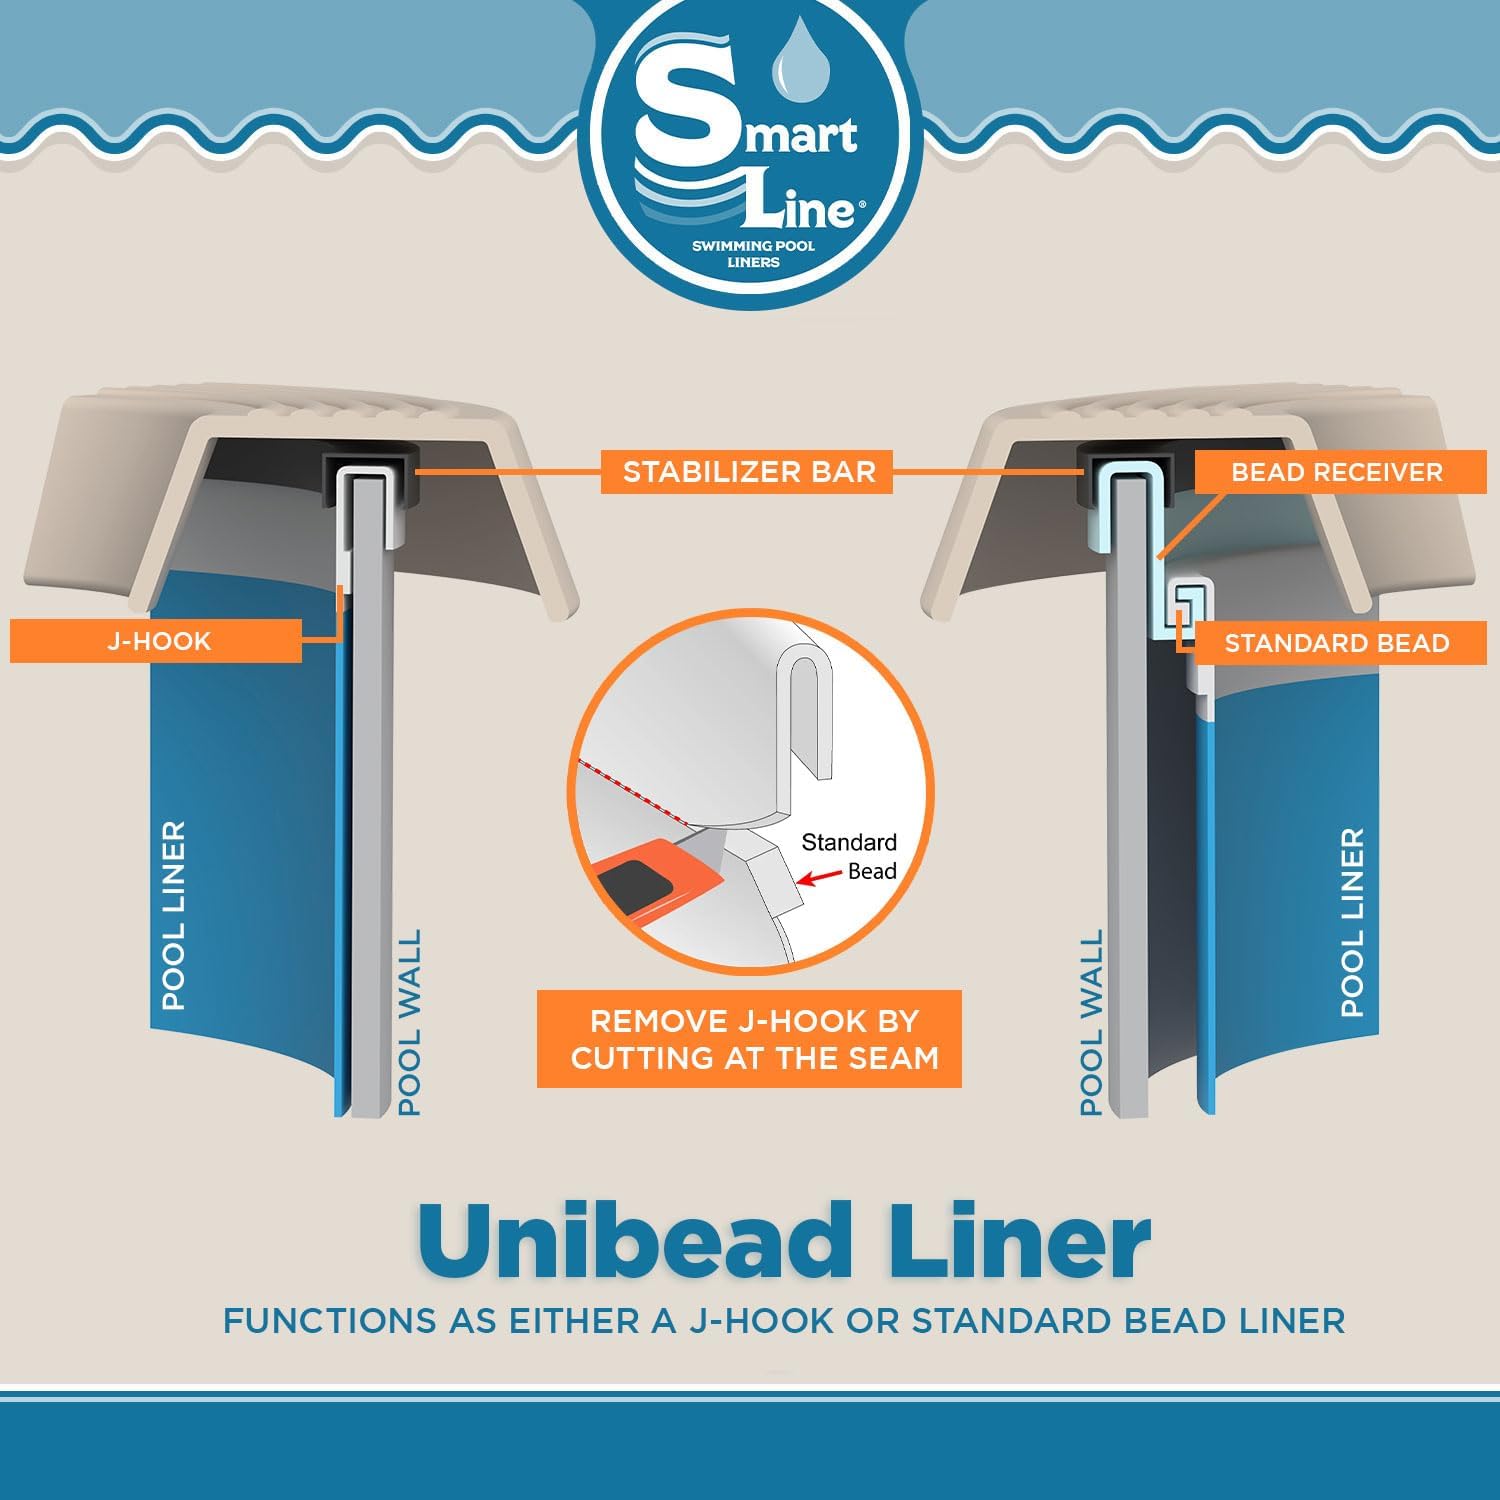
Image: Diagram illustrating the dual functionality of the Unibead liner, showing how it can be used as a J-hook or converted to a standard bead by cutting along the seam.
Important Note: This liner is designed for steel-sided above-ground pools. It will not work with Intex or Pop-Up pools.
Maintenance
General Care
- Chemical Balance: Regularly test and maintain proper pool water chemistry. Imbalanced chemicals can degrade the liner material over time.
- Cleaning: Use soft brushes and cleaning agents specifically designed for vinyl pool liners. Avoid abrasive cleaners or sharp objects that could damage the liner surface.
- UV Protection: The liner is manufactured with UV resistant properties (Lamiclear technology) to minimize fading. However, prolonged exposure to direct sunlight and harsh chemicals can still affect its appearance over many years.
- Abrasion Prevention: Ensure there are no sharp objects in the pool or on the pool deck that could rub against or puncture the liner.

Image: Visual comparison demonstrating the fade resistance of Smartline liners due to UV protection, contrasting with unprotected liners.
Troubleshooting
Common Issues
- Wrinkles After Filling: Small wrinkles may settle as the liner stretches. Ensure the liner was properly warmed and smoothed during initial filling. If persistent, consider partially draining and re-smoothing, or consult a pool professional.
- Leaks: Inspect the liner for visible tears or punctures. Check around skimmer and return fittings for proper sealing. Small holes can often be repaired with a vinyl patch kit. For larger damage or persistent leaks, professional assistance may be required.
- Fading/Discoloration: While the liner has UV protection, prolonged exposure to harsh chemicals or extreme sunlight can cause some fading over time. Ensure proper chemical balance is maintained.
Specifications
Technical Data
| Attribute | Detail |
|---|---|
| Model Number | 17034RA |
| Dimensions | 12 ft x 24 ft Oval |
| Wall Height Compatibility | 52 inches |
| Gauge | 25 Gauge |
| Material | Heavy Duty Virgin Vinyl |
| Style | Unibead (J-hook & Standard Bead compatible) |
| Pattern | Tuscan |
| Package Dimensions | 40 x 13.5 x 6.5 inches |
| Item Weight | 56 pounds |
| Manufacturer | Smartline |
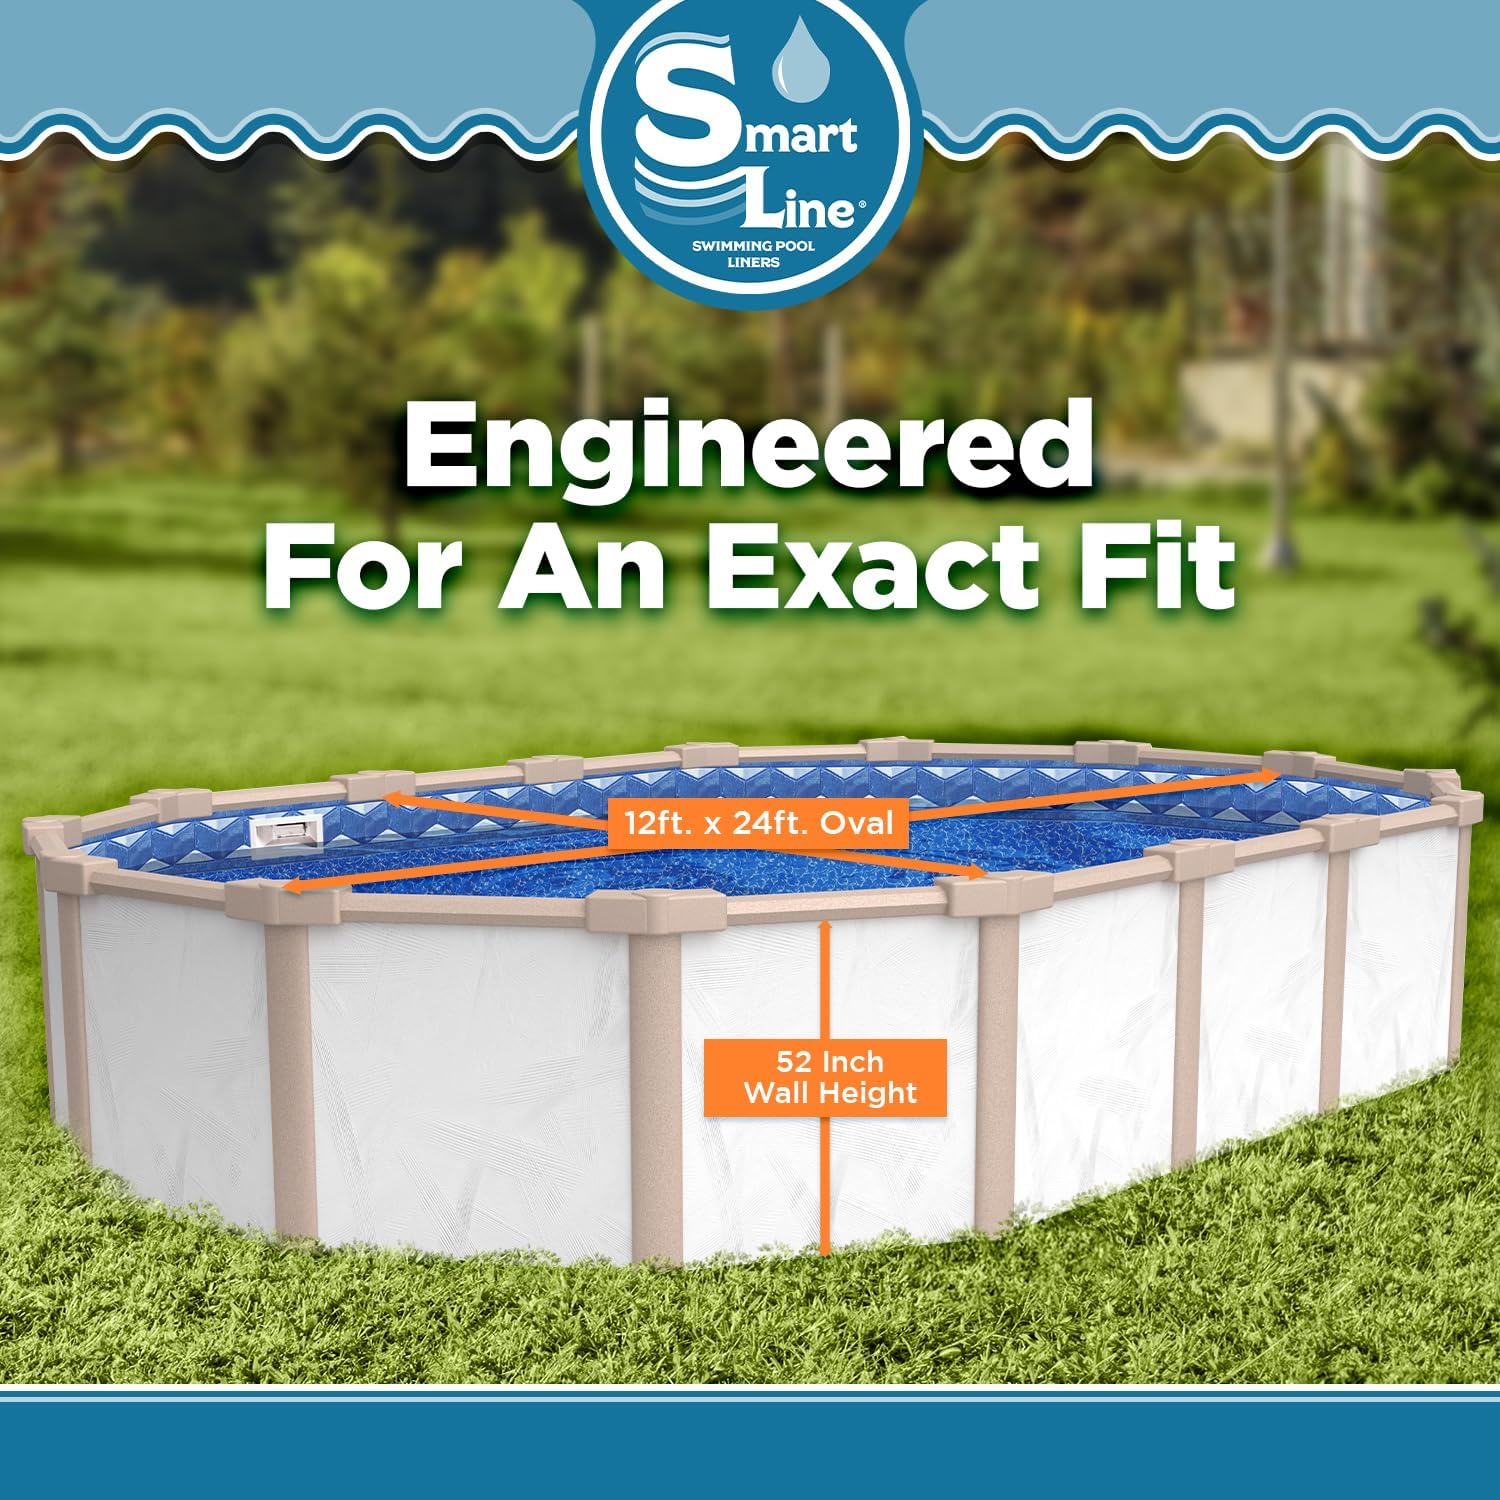
Image: Illustration detailing the exact fit engineering for the 12 ft x 24 ft oval pool with a 52-inch wall height.
Warranty Information
The Smartline pool liner includes a 25-year limited warranty. This warranty protects against defects in material and workmanship. For specific terms, conditions, and claim procedures, please refer to the warranty documentation provided with your purchase or contact Smartline customer support.

Image: Graphic highlighting the 25-year lifespan, 100% virgin vinyl, double welded seams, and heat bonded construction of the Smartline liner.
Customer Support
For further assistance, technical support, or warranty claims, please contact Smartline customer service. Refer to the contact information provided on the product packaging or the official Smartline website. When contacting support, please have your model number (17034RA) and purchase details readily available.