1. Introduction
This manual provides detailed instructions for the safe and effective operation of your Neewer EG-250B 250W 5600K Studio Monolight Flash Speedlite. Please read this manual thoroughly before use to ensure optimal performance and longevity of the product. This monolight is designed for professional studio photography, location shoots, and portrait work, offering reliable and consistent illumination.
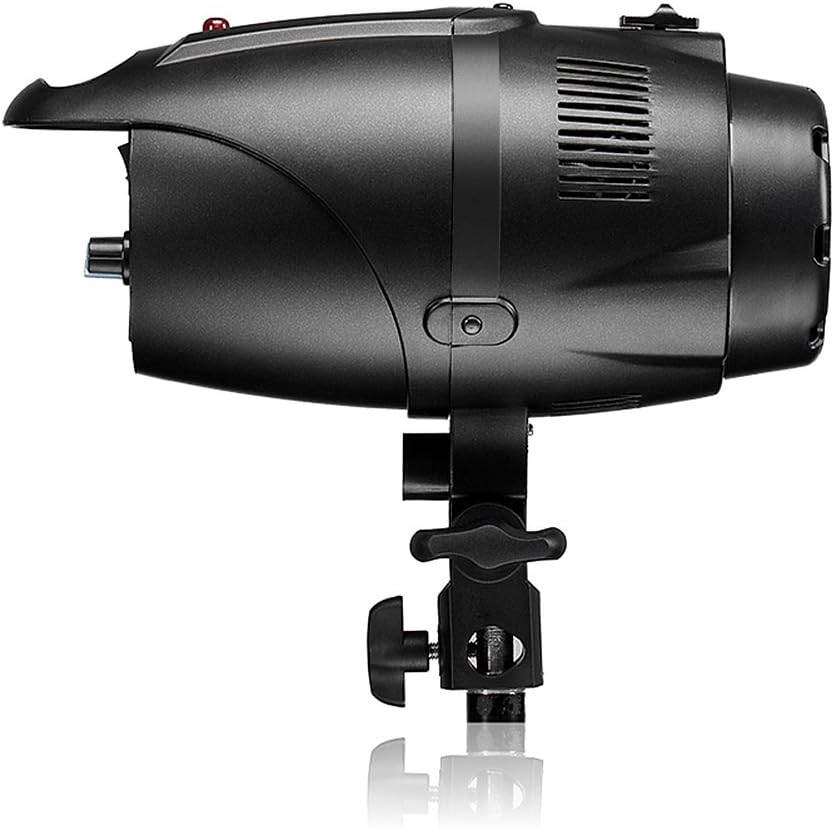
Figure 1: Neewer EG-250B Studio Monolight with protective cap.
2. Product Features
- Enhanced Light Intensity: Features a 10mm Speedlite tube, improving light intensity by 20%.
- Extended Lifespan: Designed for a lifespan exceeding 150,000 flashes.
- Color Temperature: Provides a stable color temperature of 5600K.
- Bowens Mount Compatibility: Equipped with a standard Bowens mount, allowing compatibility with a wide range of accessories such as softboxes, barn doors, snoots, and beauty dishes.
- Uniform Light Distribution: The convex Speedlite tube design ensures wider and more homogeneous light output.
- High-Quality Components: Utilizes a Rubycon capacitor for low impedance, high ripple current capability, and extended service life.

Figure 2: The universal Bowens mount allows attachment of various photographic accessories.
3. Package Contents
Verify that all items listed below are included in your package:
- 1x Neewer EG-250B 250W Bowens Mount Flash Light
- 1x 75W Modeling Lamp
- 1x Alternative Fuse
- 1x 5m Power Cable
- 1x 3.5m Sync Cable
4. Safety Instructions
To prevent damage to the product or injury to yourself or others, please observe the following safety precautions:
- Do not operate the unit with wet hands or near water.
- Ensure the power supply voltage matches the unit's requirements (AC 100V-130V/60Hz).
- Avoid direct eye exposure to the flash, as it can cause temporary vision impairment.
- Do not disassemble or modify the unit. Refer servicing to qualified personnel.
- Keep the unit away from flammable materials and ensure adequate ventilation to prevent overheating.
- Always disconnect the power cable before cleaning or performing maintenance.
- Replace fuses only with the specified type (8A).
5. Component Identification
Familiarize yourself with the various parts of the Neewer EG-250B monolight.
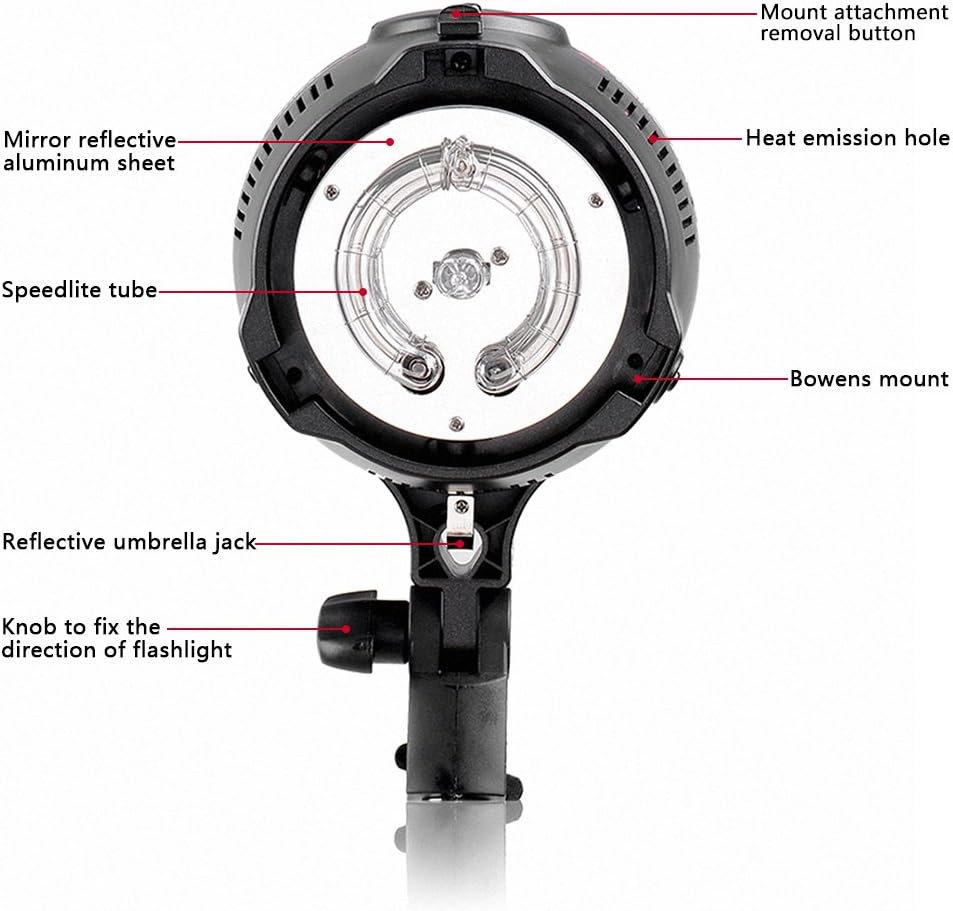
Figure 3: Front view of the monolight, highlighting the flash tube, Bowens mount, and other features. Key components include the mount attachment removal button, heat emission holes, mirror reflective aluminum sheet, Speedlite tube, Bowens mount, reflective umbrella jack, and the knob to fix the direction of the flashlight.

Figure 4: Rear control panel, showing the power switch, photo switch, fuse, test button, PC interface for receiver, optical receiver, charge indicator, mode control for modeling lamp, buzzer, power control dial, and power interface.
6. Setup
- Mounting: Attach the monolight to a sturdy light stand using the integrated mounting bracket. Secure it by tightening the knob to fix the direction.
- Modeling Lamp Installation: Carefully insert the 75W modeling lamp into its socket. Ensure it is seated correctly.
- Accessory Attachment: If using a light modifier (e.g., softbox, reflector), align its Bowens mount with the monolight's Bowens mount and twist to lock it in place. To remove, press the mount attachment removal button and twist.
- Power Connection: Connect the 5m power cable to the power interface on the rear panel and then to a suitable AC 100V-130V/60Hz power outlet.
- Sync Connection (Optional): For wired synchronization, connect the 3.5m sync cable from your camera's PC sync port to the PC interface for receiver on the monolight.

Figure 5: The monolight with a standard reflector attached to the Bowens mount.
7. Operating Instructions
- Power On: Flip the "POWER" switch to the ON position. The charge indicator will illuminate.
- Adjusting Flash Power: Rotate the "Power control" dial to adjust the flash output from 1/1 (full power) to 1/16.
- Modeling Lamp Control: Use the "MODE" switch to control the modeling lamp. Options typically include ON, OFF, or proportional to flash power.
- Buzzer Function: The "BUZZ" switch activates or deactivates the audible beep indicating the flash is recycled and ready.
- Photo Switch (Slave Mode): The "P.CELL" switch enables the optical slave function. When activated, the monolight will fire in sync with another flash unit's light output.
- Test Flash: Press the "Test button" to manually fire a test flash. This also discharges any remaining power.
- Synchronization:
- Wired Sync: Connect your camera's PC sync port to the monolight's PC interface using the sync cable.
- Optical Slave: Ensure the "P.CELL" switch is ON. The monolight will detect and fire when another flash fires.
- Recycle Time: Allow the flash to fully recycle (0.2-1.8 seconds) before the next shot. The charge indicator will confirm readiness.
- Power Off: When finished, flip the "POWER" switch to the OFF position and disconnect the power cable.
8. Maintenance
- Cleaning: Use a soft, dry cloth to clean the exterior of the monolight. For stubborn dirt, a slightly damp cloth can be used, followed by a dry one. Do not use harsh chemicals or abrasive cleaners.
- Flash Tube and Modeling Lamp: Handle the flash tube and modeling lamp with care. Avoid touching them directly with bare hands, as oils can reduce their lifespan. If replacement is needed, ensure the unit is unplugged and cooled down.
- Storage: Store the monolight in a cool, dry place, away from direct sunlight and excessive humidity. Use the protective cap when not in use.
- Fuse Replacement: If the unit fails to power on, check the fuse. Disconnect power, unscrew the fuse holder on the rear panel, and replace the 8A fuse with the alternative fuse provided or a new one of the same specification.

Figure 6: Close-up view of the Speedlite tube and modeling lamp, showing the internal components.
9. Troubleshooting
| Problem | Possible Cause | Solution |
|---|---|---|
| Monolight does not power on. | No power supply; Blown fuse; Power switch off. | Check power cable connection; Replace fuse (8A); Ensure power switch is ON. |
| Flash does not fire. | Not fully recycled; Sync cable disconnected; Optical slave not enabled or blocked; Camera settings incorrect. | Wait for charge indicator; Check sync cable connection; Ensure P.CELL is ON and sensor is clear; Verify camera flash settings. |
| Modeling lamp not working. | Lamp burnt out; MODE switch off. | Replace modeling lamp (75W); Check MODE switch setting. |
| Inconsistent flash output. | Power fluctuations; Unit not fully recycled. | Ensure stable power source; Allow full recycle time between flashes. |
10. Specifications
| Parameter | Value |
|---|---|
| Model | EG-250B |
| Voltage | AC 100V-130V/60Hz |
| Power | 250W |
| Recycle Time | 0.2-1.8s |
| Flash Duration | 1/2000-1/4000s |
| Flash Index (GN) | 52 |
| Power Control | 1/1-1/16 adjustable |
| Color Temperature | 5600K |
| Overheat Protection | Yes |
| Cooling Fan | No |
| Fuse | 8A |
| Power Cable Length | 5m |
| Dimensions (approx.) | 23 x 12 x 12 cm (9.06 x 4.72 x 4.72 inches) |
| Net Weight (approx.) | 1.1 kg (2.43 lbs) |
| Modeling Lamp Model | 75W Dimmable |
| Light Sensor | Flash sync cable, Flash test cable |
| Compatible Mounts | Bowens Mount |
11. Warranty and Support
For warranty information and technical support, please refer to the documentation provided at the time of purchase or visit the official NEEWER website. Keep your purchase receipt as proof of purchase for any warranty claims.