Important Safety Instructions
Read all instructions carefully before using this treadmill. Keep this manual for future reference.
- Always consult your physician before starting any exercise program.
- Keep children and pets away from the treadmill during operation.
- Place the treadmill on a flat, stable surface with at least 2 meters of clear space behind it.
- Ensure the safety key is properly attached to your clothing during use. In case of emergency, the safety key will stop the treadmill.
- Do not operate the treadmill if it has a damaged cord or plug, or if it is not working properly.
- Wear appropriate athletic footwear and clothing.
- Do not attempt to service the treadmill yourself. Contact qualified service personnel.
Package Contents
Verify that all components are present before assembly:
- Treadmill Main Frame
- Console Assembly
- Upright Posts (Left and Right)
- Base Frame
- Hardware Kit (bolts, washers, nuts, tools)
- Safety Key
- User Manual
Setup and Assembly
Follow these steps to assemble your Aerofit HF934 treadmill. It is recommended that two people perform the assembly.
- Unpack Components: Carefully remove all parts from the packaging and lay them out on a clear, flat surface.
- Attach Upright Posts: Secure the left and right upright posts to the base frame using the provided bolts and washers. Ensure they are firmly tightened.
- Mount Console Assembly: Attach the console assembly to the top of the upright posts. Connect any necessary cables from the console to the main frame.
- Secure Handrails: If separate, attach the handrails to the upright posts or console frame.
- Final Checks: Double-check all bolts and connections to ensure they are secure. Plug the power cord into a grounded outlet.
Operating Instructions
Console Overview
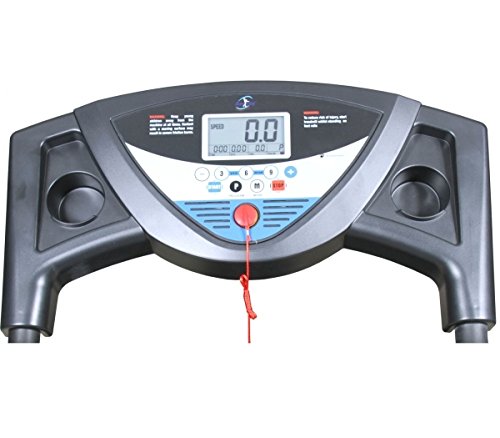
Image: The control console of the Aerofit HF934 treadmill, showing the digital display, speed and program buttons, and the safety key attachment point.
The console features a digital display showing speed, time, distance, calories, and pulse. It includes buttons for starting/stopping, adjusting speed, and selecting programs.
- Display Screen: Shows workout metrics.
- START Button: Initiates the treadmill belt movement.
- STOP Button: Halts the treadmill belt movement.
- SPEED +/- Buttons: Adjust the running belt speed.
- PROGRAM Button: Selects pre-set workout programs.
- MODE Button: Changes display modes or confirms selections.
- Safety Key Slot: Where the safety key must be inserted for operation.
Starting the Treadmill
- Ensure the treadmill is plugged into a grounded power outlet.
- Attach the safety key clip to your clothing and insert the safety key into its designated slot on the console. The display will illuminate.
- Step onto the treadmill belt, placing your feet on the side rails.
- Press the START button. The treadmill will begin with a 3-second countdown, then the belt will start moving at a low speed.
- Gradually increase the speed using the SPEED + button to your desired pace.
Using Programs
- From standby mode, press the PROGRAM button to cycle through available pre-set programs.
- Once you have selected a program, press START to begin the workout. The treadmill will automatically adjust speed according to the program profile.
Stopping the Treadmill
- To stop the treadmill during operation, press the STOP button. The belt will gradually slow down and come to a complete stop.
- In an emergency, pull the safety key from the console. The treadmill will stop immediately.
Maintenance
Regular maintenance ensures the longevity and safe operation of your treadmill.
- Cleaning: Wipe down the console and other surfaces with a damp cloth after each use. Do not use abrasive cleaners.
- Belt Lubrication: Lubricate the running belt every 3 months or after 100 hours of use, whichever comes first. Use only silicone-based treadmill lubricant. Lift the belt and apply a thin line of lubricant to the center of the deck.
- Belt Tension and Alignment: Check the running belt tension and alignment periodically. If the belt slips or drifts to one side, refer to the troubleshooting section or contact customer support for adjustment instructions.
- Motor Cover: Periodically vacuum dust from under the motor cover to prevent overheating. Ensure the treadmill is unplugged before removing the cover.
Troubleshooting
| Problem | Possible Cause | Solution |
|---|---|---|
| Treadmill does not start. | Power cord not plugged in; Safety key not inserted; Circuit breaker tripped. | Ensure power cord is securely plugged in; Insert safety key fully; Reset circuit breaker. |
| Belt slips during use. | Belt tension too loose; Belt worn out. | Adjust belt tension (refer to manual for specific steps or contact support); Replace belt if worn. |
| Unusual noise from treadmill. | Loose components; Lack of lubrication; Motor issue. | Check and tighten all visible bolts; Lubricate running belt; Contact customer support if noise persists. |
| Display not working. | Loose cable connection; Console malfunction. | Check console cable connections; Contact customer support. |
Specifications
| Feature | Detail |
|---|---|
| Model | HF934 |
| Motor Horsepower | 1.5 HP (Continuous Duty) |
| Control System | Digital Concept PWM Control |
| Display Type | LCD |
| Special Feature | Portable, Foldable Design |
| Power Source | Corded Electric |
| Target Audience | Adult, Youth (Home Use) |
| Assembly Required | Yes |
Folding and Storage
The Aerofit HF934 treadmill features a foldable design for convenient storage.

Image: The Aerofit HF934 treadmill shown in its upright, folded position, demonstrating its space-saving design.
- Power Off: Ensure the treadmill is completely stopped and unplugged from the power outlet.
- Lift Deck: Carefully lift the running deck from the rear until it locks into an upright position. You may hear a click indicating it is secured.
- Move: The treadmill can now be moved using the transport wheels located on the front stabilizer.
- Unfolding: To unfold, gently push the deck release lever (if present) or carefully lower the deck until it rests flat on the floor.
Warranty and Support
This Aerofit treadmill is covered by a manufacturer's warranty. Please refer to the warranty card included with your purchase for specific terms and conditions.
For technical assistance, parts, or service inquiries, please contact Aerofit customer support. Have your model number (HF934) and purchase date available when contacting support.
Note: Specific contact details are not provided in this manual. Please refer to your product packaging or the official Aerofit website for current support information.