1. Introduction
The Floureon ZJ-8220 DE is a high-speed thermal receipt printer designed for various business environments, including retail, hospitality, and more. It offers reliable performance with a print speed of 300 mm/s and supports a maximum paper width of 80 mm. Equipped with multiple interfaces including USB, Ethernet, and RS-232, it provides flexible connectivity options. Key features include an auto-cut function and support for cash drawer driving. Its splash-proof, oil-proof, and dust-proof design makes it suitable for demanding environments like kitchens.

Figure 1.1: Front view of the Floureon ZJ-8220 DE Thermal Printer with the paper compartment open.
2. Safety Information
Please read and understand the following safety precautions before operating the printer:
- Do not expose the printer to water or excessive humidity.
- Ensure the power supply matches the printer's specifications.
- Avoid placing the printer in direct sunlight or near heat sources.
- Do not attempt to disassemble or repair the printer yourself. Refer to qualified service personnel.
- Keep out of reach of children.
3. Package Contents
Verify that all items are present in the package:
- Floureon ZJ-8220 DE Thermal Printer
- Power Adapter
- Power Cable
- USB Cable
- Thermal Paper Roll (starter)
- Driver CD / User Manual

Figure 3.1: Included accessories and components with the Floureon ZJ-8220 DE printer.
4. Product Overview
4.1. Printer Components
Familiarize yourself with the main parts of the printer:
- Paper Cover: Protects the paper roll compartment.
- Paper Exit: Where printed receipts emerge.
- Control Panel: Contains indicator lights and the FEED button.
- Power Switch: Turns the printer on/off.
- Interface Ports: USB, RS-232 (Serial), Ethernet (LAN), and Cash Drawer port.
- Power Input: Connects to the power adapter.
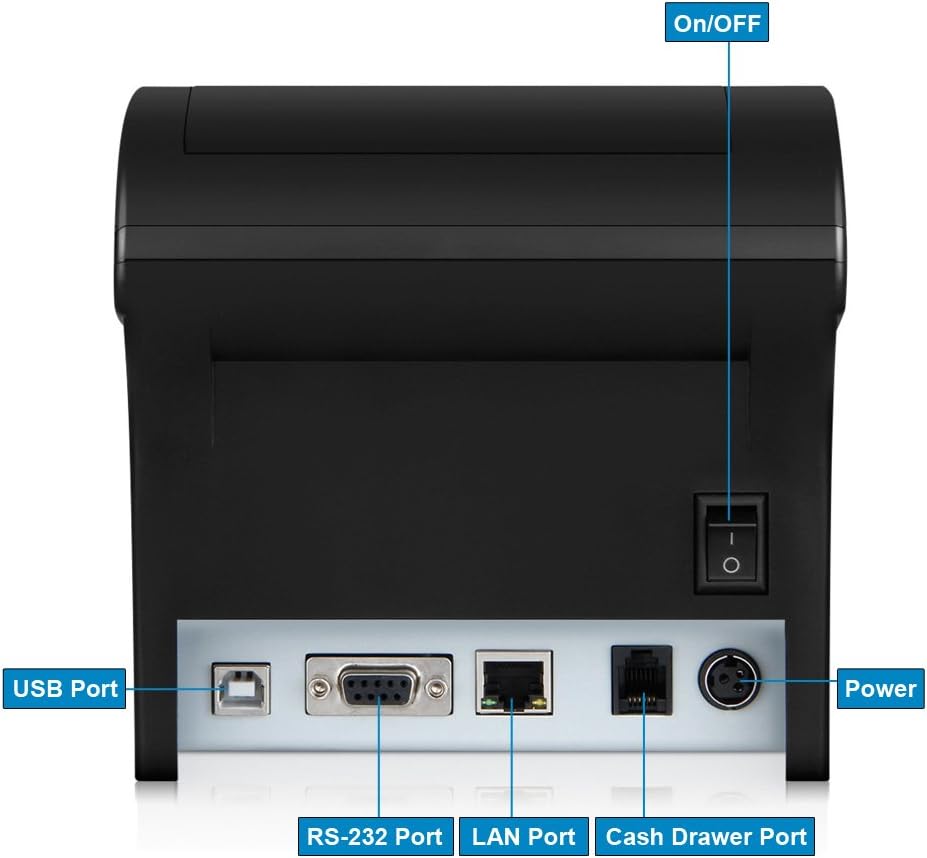
Figure 4.1: Rear panel of the printer detailing all available connection ports and the power switch.
4.2. Indicator Lights and Button
The control panel features several indicators and a button:
- POWER Indicator: Illuminates when the printer is powered on.
- ERROR Indicator: Flashes or illuminates to indicate an error condition (e.g., paper jam, print head overheating).
- PAPER OUT Indicator: Illuminates when the paper roll is empty or running low.
- FEED Button: Press to advance paper manually. Hold to print a self-test page (when powering on).
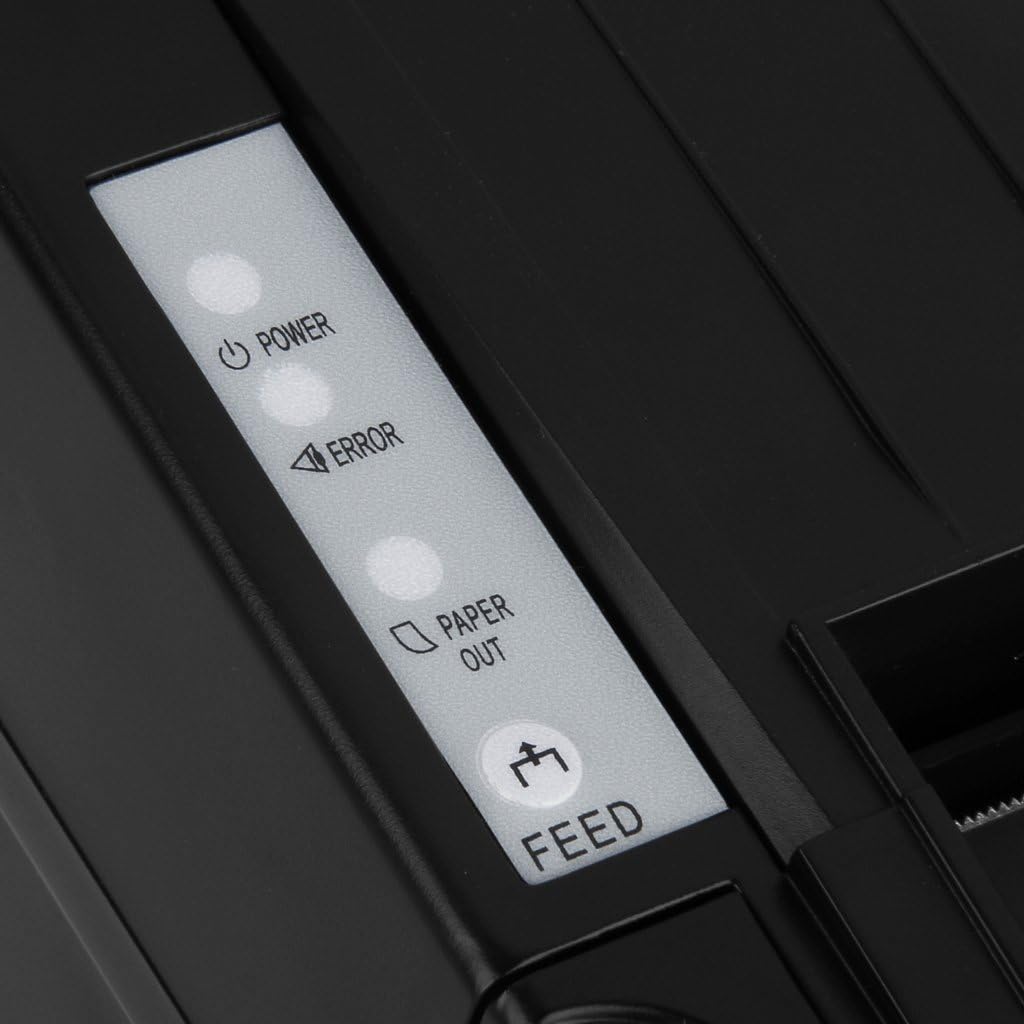
Figure 4.2: Detail of the printer's indicator lights and FEED button.
5. Setup
5.1. Loading Thermal Paper
- Open the paper cover by pushing the lever or button on the side/front.
- Insert the thermal paper roll with the printing side facing the print head (usually the smooth, shiny side).
- Pull a small amount of paper out past the paper exit slot.
- Close the paper cover firmly until it clicks into place. Ensure the paper is taut and aligned.

Figure 5.1: The printer in operation, showing a receipt exiting the paper slot.
5.2. Connecting the Printer
Connect the printer to your system using one of the following methods:
- USB Connection: Connect one end of the USB cable to the printer's USB port and the other end to an available USB port on your computer.
- Ethernet (LAN) Connection: Connect an Ethernet cable from the printer's LAN port to your network router or switch.
- RS-232 (Serial) Connection: Connect a serial cable from the printer's RS-232 port to the serial port on your computer or POS system.
- Cash Drawer Connection: Connect the cash drawer cable to the dedicated Cash Drawer port on the printer.
After connecting the data cable, connect the power adapter to the printer's power input and then plug the power cable into a wall outlet. Flip the power switch to the 'ON' position.
5.3. Driver Installation
The printer supports various operating systems, including Windows, Android, and iOS. Drivers are typically provided on a CD or can be downloaded from the manufacturer's support website.
- Insert the driver CD into your computer's CD-ROM drive or download the appropriate driver package.
- Follow the on-screen instructions to install the printer driver. For Windows, you may need to manually select the correct port (e.g., USB Virtual Port, COM port, or network port) during installation.
- After installation, it is recommended to restart your computer.
6. Operating Instructions
6.1. Basic Printing
Once the printer is set up and drivers are installed, you can print from any application that supports printing. Select the Floureon ZJ-8220 DE as your default printer or choose it from the print dialog box.
6.2. Auto-Cut Function
The printer features an automatic paper cutter. After each print job, the printer will automatically cut the receipt. Ensure there are no obstructions near the paper exit slot.
6.3. Cash Drawer Driving
The printer can trigger a connected cash drawer to open. This function is typically controlled by your POS software. Ensure the cash drawer is properly connected to the printer's cash drawer port.
7. Maintenance
7.1. Cleaning the Printer
Regular cleaning helps maintain print quality and extends the printer's lifespan.
- Turn off the printer and unplug it from the power outlet before cleaning.
- Use a soft, lint-free cloth slightly dampened with water or isopropyl alcohol to wipe the exterior.
- Gently clean the print head with a cotton swab dampened with isopropyl alcohol. Allow it to dry completely before use.
- Remove any paper dust or debris from the paper path using a soft brush or compressed air.
7.2. Replacing Thermal Paper
When the PAPER OUT indicator illuminates, it's time to replace the paper roll. Follow the steps in Section 5.1 to load a new roll.
8. Troubleshooting
This section addresses common issues you might encounter.
| Problem | Possible Cause | Solution |
|---|---|---|
| Printer does not power on. | Power cable loose or disconnected; power outlet faulty. | Check power connections; try a different outlet. |
| No printing. | Paper out; incorrect driver/port selection; cable disconnected. | Load paper; verify driver settings and port; check data cable connection. |
| Print quality is poor/faded. | Thermal paper loaded incorrectly; print head dirty; low quality paper. | Reload paper (printing side up); clean print head; use recommended thermal paper. |
| Paper jam. | Paper not loaded correctly; foreign object in paper path. | Open cover, remove jammed paper carefully; check for obstructions. |
| Cash drawer does not open. | Cash drawer not connected; POS software not configured. | Ensure cable is secure; configure POS software to send open command. |
9. Specifications
| Feature | Detail |
|---|---|
| Model Name | ZJ-8220 DE |
| Print Technology | Thermal |
| Print Speed | 300 mm/s |
| Max Paper Width | 80 mm |
| Connectivity | Ethernet, USB, RS-232 (Serial) |
| Supported OS | Android, Windows, iOS |
| Media Type | Plain Paper (Thermal) |
| Dimensions (L x W x H) | 15.01 x 15.01 x 8.99 cm |
| Weight | 2.1 kg |
| Special Features | Auto-Cut Function, Cash Drawer Driving, Splash-proof, Oil-proof, Dust-proof |
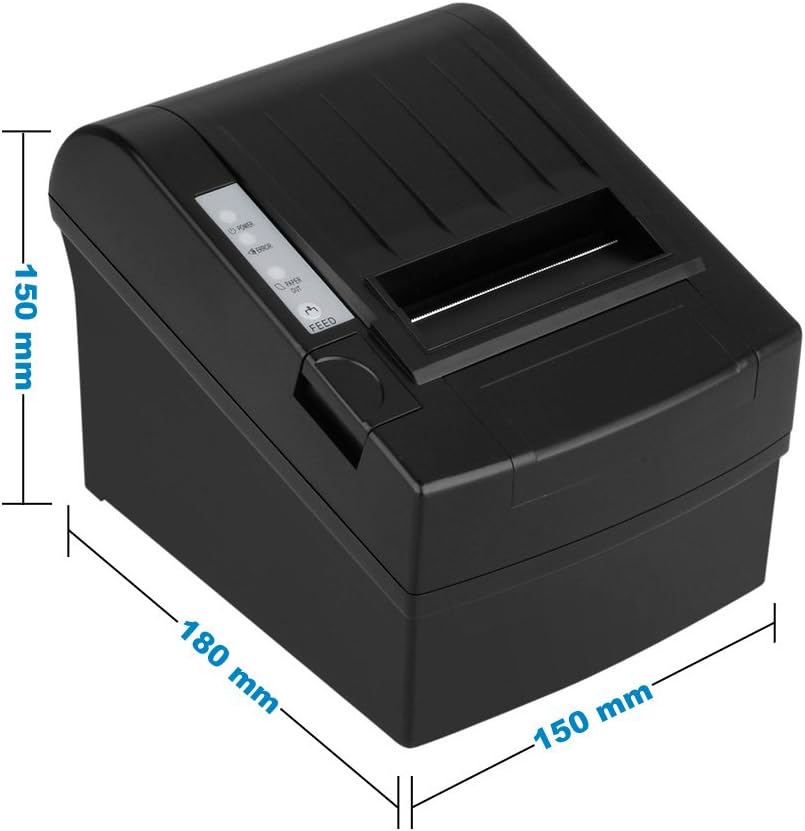
Figure 9.1: Physical dimensions of the Floureon ZJ-8220 DE printer.
10. Warranty and Support
For warranty information and technical support, please refer to the documentation provided with your purchase or contact your retailer or the manufacturer directly. Keep your proof of purchase for warranty claims.