1. Introduction
The Bosch D720 Series LED Keypad is a robust and reliable interface designed for use with compatible Bosch security control panels. It provides clear visual feedback through its LED display and allows users to arm, disarm, and manage their security system with ease. This manual provides essential information for the proper installation, operation, and maintenance of your D720 LED Keypad.
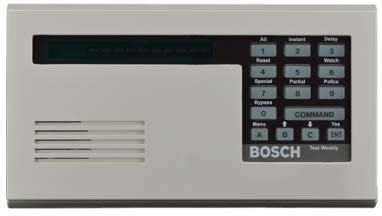
Figure 1: Front view of the Bosch D720 Series LED Keypad, showing the LED display, numeric keypad, and function buttons.
2. Safety Information
Please read all safety instructions carefully before installing or operating the keypad. Failure to follow these instructions may result in injury, damage to the product, or improper operation.
- Electrical Safety: Installation should only be performed by qualified personnel in accordance with all local and national electrical codes. Disconnect power to the control panel before wiring the keypad.
- Environmental Conditions: Do not expose the keypad to extreme temperatures, humidity, or direct water. It is designed for indoor use only.
- Handling: Handle the keypad with care to avoid physical damage.
- Cleaning: Use a soft, dry cloth for cleaning. Do not use liquid or aerosol cleaners.
3. Package Contents
Verify that all items are present in the package:
- 1 x Bosch D720 Series LED Keypad
- Mounting Hardware (screws, anchors)
- Installation Guide (separate document, if applicable)
4. Setup and Installation
This section outlines the general steps for installing the D720 LED Keypad. For detailed wiring diagrams and specific panel compatibility, refer to the control panel's installation manual.
4.1 Mounting Location
Choose a convenient and accessible location, typically near an entry/exit door, away from direct sunlight or heat sources. Ensure the mounting surface is flat and stable.
4.2 Wiring
- Disconnect Power: Ensure the security control panel is completely powered off before making any wiring connections.
- Open Keypad: Carefully open the keypad housing to access the terminal block.
- Connect Wiring: Connect the keypad to the control panel's data bus terminals (typically labeled DATA IN, DATA OUT, +12V, GND) using appropriate gauge wire. Ensure correct polarity.
- Secure Wiring: Route wires neatly and secure them to prevent strain or accidental disconnection.
4.3 Mounting the Keypad
- Mark Holes: Use the keypad's base as a template to mark the mounting screw locations on the wall.
- Drill Holes: Drill pilot holes if necessary, and insert wall anchors if mounting into drywall.
- Secure Keypad: Attach the keypad base to the wall using the provided mounting screws.
- Close Housing: Carefully close the keypad housing, ensuring no wires are pinched.
4.4 Power Up and Test
Once wiring and mounting are complete, restore power to the control panel. The keypad should power on and display system status. Test basic functions like arming and disarming to confirm proper communication.
5. Operating Instructions
The D720 LED Keypad provides intuitive control over your security system. Familiarize yourself with the keypad layout and common commands.
5.1 Keypad Layout and Functions
| Button/Indicator | Function |
|---|---|
| LED Display | Shows system status, zone information, and prompts. |
| Numeric Keypad (0-9) | Used for entering user codes and numerical data. |
| [1] All / Reset | Arms the system in "All" mode (full arming). Also used to reset alarms or troubles. |
| [2] Instant / Delay | Arms the system with instant protection or with an entry/exit delay. |
| [3] Watch | Activates a "Watch" mode, typically for monitoring specific zones. |
| [4] Special | Accesses special functions or programming menus. |
| [5] Partial | Arms the system in "Partial" mode (e.g., stay arming, perimeter only). |
| [6] Police | Dedicated panic button for police dispatch (if configured). |
| [7] Bypass | Allows bypassing of specific zones before arming. |
| [8] | General purpose key, often used for additional functions or navigation. |
| [9] | General purpose key, often used for additional functions or navigation. |
| [0] Menu | Accesses the user menu for system settings and options. |
| COMMAND | Used to confirm entries or execute commands. |
| [A], [B], [C] | Programmable function keys for quick access to common operations. |
| ENT (Enter) | Confirms data entry or command execution. |
5.2 Basic Operations
- Arming the System (All Mode): Enter your user code, then press [1] All. The keypad will indicate "Armed All".
- Arming the System (Partial Mode): Enter your user code, then press [5] Partial. The keypad will indicate "Armed Partial".
- Disarming the System: Enter your user code. The keypad will indicate "Disarmed".
- Bypassing Zones: Enter your user code, then press [7] Bypass. Follow the prompts on the LED display to select zones to bypass. Press ENT to confirm.
- Resetting Alarms/Troubles: After an alarm or trouble condition, enter your user code, then press [1] Reset.
6. Maintenance
The Bosch D720 LED Keypad requires minimal maintenance to ensure long-term reliable operation.
- Cleaning: Periodically wipe the keypad surface with a soft, dry, lint-free cloth. Do not use abrasive cleaners, solvents, or spray directly onto the keypad.
- Inspection: Regularly inspect the keypad for any signs of physical damage or loose connections.
- Firmware Updates: Any firmware updates for the keypad are typically performed by a qualified technician as part of the overall security system maintenance.
7. Troubleshooting
If you experience issues with your D720 LED Keypad, refer to the following common problems and solutions:
| Problem | Possible Cause / Solution |
|---|---|
| Keypad is blank / No power |
|
| Keypad displays "Trouble" |
|
| Cannot arm the system |
|
| Keys are unresponsive |
|
For persistent issues or complex problems, contact Bosch technical support or a certified security system technician.
8. Specifications
| Feature | Detail |
|---|---|
| Model | D720 Series LED Keypad |
| Manufacturer | Bosch |
| Product Dimensions | 4.6 x 8.2 x 0.8 inches |
| Connectivity | Wired (Data Bus) |
| Display Type | LED |
| ASIN | B00TY4V8JK |
9. Warranty and Support
Bosch security products are backed by a manufacturer's warranty. For specific warranty terms and conditions, please refer to the documentation included with your control panel or visit the official Bosch Security Systems website.
For technical support, product inquiries, or service, please contact your authorized Bosch dealer or visit the Bosch Security Systems support portal:
- Bosch Security Systems Website: www.boschsecurity.com
- Customer Support: Refer to the contact information provided on the website or by your installer.