1. Introduction and Safety Information
Thank you for choosing the vidaXL Adjustable Height Dance Pole. This manual provides essential information for the safe and correct installation, operation, and maintenance of your dance pole. Please read all instructions carefully before assembly and use.
Important Safety Warnings:
- Maximum Weight Capacity: The dance pole is designed for individual use. While robust, always adhere to the manufacturer's specified weight limit. Based on user feedback, it is recommended for single-person use and a maximum load of 80 kg (176 lbs). Do not exceed this limit.
- Proper Installation is Crucial: Ensure the pole is installed correctly and securely between a solid floor and a sturdy ceiling. Improper installation can lead to instability and serious injury.
- Regular Checks: Before each use, verify that all components are tightly secured and the pole is stable. Re-tighten if necessary.
- Clearance: Ensure adequate clear space around the pole for safe movement.
- Not for Children: This product is not a toy and should not be used by children without strict adult supervision.
- Consult a Professional: If you are unsure about the suitability of your ceiling or floor for tension-mounted equipment, consult a qualified professional.
2. Components List
Before beginning assembly, ensure all parts are present and undamaged. Refer to the image below for a visual guide to the components included in your package.
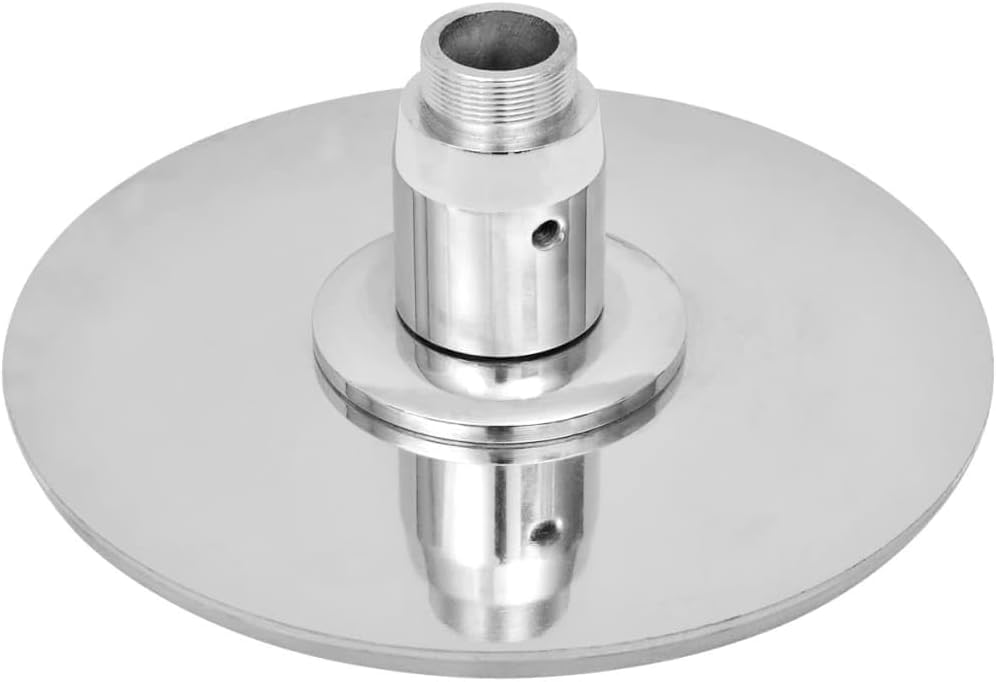
Image 2.1: All components of the dance pole.
This image displays the complete set of parts for the vidaXL Adjustable Height Dance Pole. It includes the main pole sections, two extension poles (25 cm and 12.5 cm), the large top dome, the smaller bottom base, a hex key, a tightening rod, and a black carrying bag for portability.
- Main Pole Sections: Chrome-plated iron, 45 mm diameter.
- Extension Poles: Two pieces (25 cm and 12.5 cm) for height adjustment.
- Top Dome: 36 cm diameter, for ceiling contact.
- Bottom Base: 23 cm diameter, for floor contact.
- Adjusting Rod/Hex Key: Tools for assembly and tightening.
- Carrying Bag: For convenient storage and transport.
3. Setup Instructions
Follow these steps carefully to ensure a secure and stable installation of your dance pole.
- Prepare the Area: Choose a location with a solid, level floor and a sturdy, flat ceiling. Ensure there is ample clear space around the pole for safe movement.
- Measure Ceiling Height: Accurately measure the height from your floor to the ceiling at the chosen installation point. The pole is adjustable for ceiling heights between 224 cm and 275 cm.
- Select Extensions: Based on your ceiling height, determine which extension pole(s) (25 cm, 12.5 cm, or both) are needed to achieve the desired height.
- Assemble Pole Sections: Screw the main pole sections together, incorporating the necessary extension(s). Ensure all connections are tight.
- Attach Top Dome and Bottom Base: Securely attach the top dome to the upper pole section and the bottom base to the lower pole section.
- Position the Pole: Place the assembled pole upright, with the bottom base centered on your desired floor spot and the top dome against the ceiling.
- Tension and Tighten: Using the adjusting rod/hex key, rotate the lower section of the pole (or the adjustment mechanism near the bottom base) to extend the pole and create tension between the floor and ceiling. Continue tightening until the pole is firmly secured and does not wobble. It is crucial that the pole is extremely tight and stable.
- Final Stability Check: Gently push and pull on the pole from various directions to confirm its stability. If there is any movement, re-tighten until it is completely secure.

Image 3.1: Dance pole installed and in use.
This image shows the vidaXL dance pole properly installed and in use, demonstrating its secure tension-mounted setup between the floor and ceiling.

Image 3.2: Top and bottom adjustment mechanisms.
This image provides detailed views of the top dome's ceiling contact point and the bottom base's adjustment mechanism, which is used to tension the pole.
4. Operating Instructions
Your vidaXL dance pole can typically be used in two modes: static or spinning. Refer to the specific adjustment mechanism on your pole to switch between modes.
Static Mode:
In static mode, the pole remains fixed and does not rotate. This mode is generally preferred for beginners and for practicing foundational moves that require a stable grip.
Spinning Mode:
In spinning mode, the pole rotates freely, allowing for dynamic movements and spins. To engage spinning mode, locate the adjustment screws or pins near the bottom of the pole. Use the provided tool (e.g., hex key) to loosen or remove the locking mechanism that holds the pole static. Ensure the mechanism is fully disengaged for smooth spinning. To return to static mode, re-engage and tighten the locking mechanism.
Important: Always ensure the pole is securely installed and stable before attempting any movements, regardless of the mode. Start with basic exercises and gradually progress to more complex routines as your strength and confidence improve.
5. Maintenance
Regular maintenance will prolong the life of your dance pole and ensure continued safe use.
- Cleaning: Wipe the chrome-plated surface of the pole with a soft, damp cloth after each use to remove sweat and residue. For a deeper clean, use a mild, non-abrasive cleaner specifically designed for chrome or stainless steel. Avoid harsh chemicals or abrasive materials that could damage the finish.
- Check Tightness: Periodically check all connections and the overall tension of the pole. Re-tighten any loose parts immediately.
- Inspect for Damage: Regularly inspect the pole for any signs of wear, cracks, bends, or other damage. If any damage is found, discontinue use immediately and contact customer support.
- Storage: If disassembling for storage, clean all components thoroughly and store them in the provided carrying bag in a dry place.
6. Troubleshooting
This section addresses common issues you might encounter with your dance pole.
| Problem | Possible Cause | Solution |
|---|---|---|
| Pole feels unstable or wobbly. | Insufficient tension; uneven floor/ceiling; loose connections. | Re-tighten the pole using the adjustment mechanism until it is firm. Ensure the installation surface is flat and sturdy. Check all pole section connections. |
| Difficulty assembling sections. | Misalignment; debris in threads. | Ensure sections are aligned correctly before screwing. Check threads for any obstructions and clean if necessary. Refer to the setup instructions carefully. |
| Spinning function not working or stiff. | Locking mechanism engaged; dirt in bearings. | Ensure the static locking mechanism is fully disengaged. Clean the area around the bearings if accessible. |
| Pole leaves marks on ceiling/floor. | Excessive pressure; soft surface. | Ensure the pole is not overtightened. Consider using protective pads (not included) if installing on delicate surfaces. |
7. Specifications
- Model Number: 30032
- Material: Chrome-plated Iron
- Pole Diameter: 45 mm
- Adjustable Height Range: 224 cm - 275 cm (7.3 ft - 9 ft)
- Bottom Base Diameter: 23 cm (9 inches)
- Top Dome Diameter: 36 cm (14.2 inches)
- Extension Poles Included: 1 x 25 cm, 1 x 12.5 cm
- Product Dimensions (assembled): Approximately 275 x 4.5 x 275 cm (Height x Diameter x Height); 13.5 kg (29.8 lbs)
- Color: Silver/Chrome
8. Warranty and Support
For warranty information, product support, or to purchase replacement parts, please contact vidaXL customer service directly. Refer to your purchase documentation or the official vidaXL website for contact details.
Website: www.vidaxl.com
Please have your model number (30032) and purchase date ready when contacting support.


