Introduction
This manual provides detailed instructions for the installation, operation, and maintenance of your Orion HCCA Series HCCA3000.2H 2-Channel Class H Amplifier. Please read this manual thoroughly before attempting installation or operation to ensure proper use and to prevent damage to the unit or your vehicle's audio system.
The HCCA3000.2H is a high-performance 2-channel Class H amplifier designed to deliver significant power and sound clarity for demanding car audio systems. It features a MOSFET power supply, low/high pass crossovers, and bass boost control.
Safety Information
- Always disconnect the vehicle's battery negative terminal before starting any electrical work.
- Ensure all wiring is properly routed and secured to prevent pinching or damage.
- Use appropriate gauge power and ground wires as specified in the installation section.
- Mount the amplifier securely in a location that allows for adequate ventilation and is protected from moisture and excessive heat.
- Do not operate the amplifier if it is damaged or malfunctioning. Refer to the troubleshooting section or contact qualified service personnel.
- Prolonged exposure to high volume levels can cause hearing damage.
Package Contents
- Orion HCCA3000.2H Amplifier
- Bass Knob Remote Control
- Mounting Hardware
- User Manual (this document)
Product Features
- High Power Output: Delivers 3000W RMS power for demanding audio systems.
- Class H Amplification: Provides efficient, powerful, and clean sound reproduction with minimal heat generation.
- Advanced Protection Circuitry: Equipped with protection against overheating and short circuits, ensuring long-lasting performance.
- MOSFET Power Supply & Output Stage: Ensures stable, efficient, and durable power delivery for consistent performance.
- Precision Audio Control: Features adjustable crossover and tuning options for accurate frequency management.
- Customized Bass Enhancement: Variable bass boost for stronger, deeper, and more resonant low-end response.
- 1 Ohm Stable: Capable of driving low impedance loads for maximum power delivery.
Controls and Connections
Amplifier Overview

This image displays the top view of the Orion HCCA3000.2H amplifier, highlighting its robust red heatsink design and the prominent Orion HCCA branding.
Power and Speaker Terminals
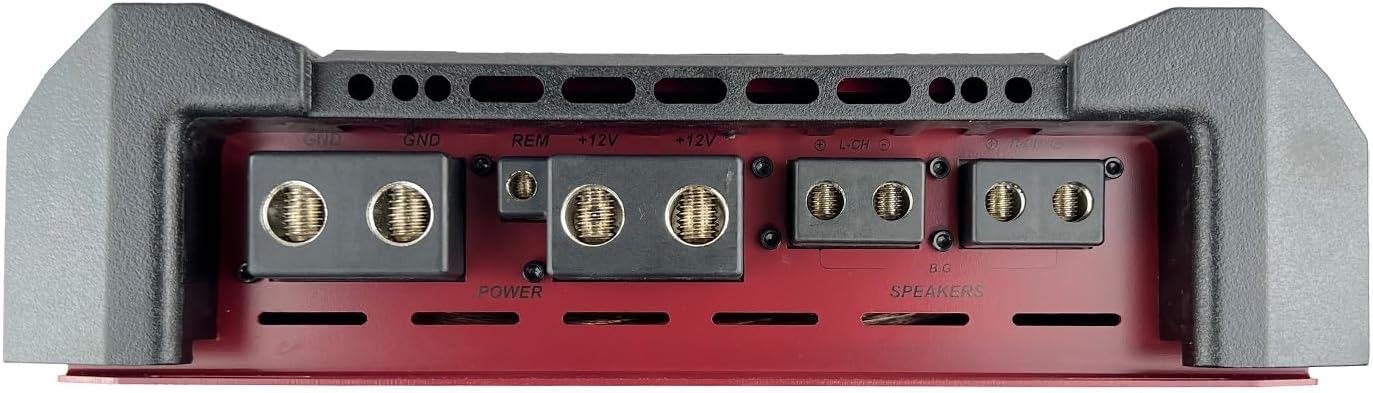
This image shows the rear panel of the amplifier, detailing the power input terminals (+12V, GND, REM) and the speaker output terminals. Ensure secure connections for optimal performance and safety.
- GND (Ground): Connect to a clean chassis ground point.
- REM (Remote): Connect to the remote turn-on output of your head unit.
- +12V (Power): Connect directly to the positive terminal of the vehicle's battery via a fused power cable.
- SPEAKERS: Connect your speakers to these terminals. Refer to the wiring diagrams for correct impedance matching.
Audio Input and Control Panel

This image illustrates the amplifier's control panel, featuring RCA input/output jacks, gain (Level) control, Bass Boost, High Pass Filter (HPF), Low Pass Filter (LPF), Crossover selection, and Phase switch. Also visible are the protection and power indicator LEDs.
- RCA Inputs (L/R): Connect to the RCA outputs of your head unit.
- Line Out (L/R): Provides a full-range signal for connecting additional amplifiers.
- Level (Gain): Adjusts the input sensitivity to match the output of your head unit.
- Bass Boost: Adjusts the bass enhancement level (0 to +18 dB at 30-60 Hz).
- HPF (High Pass Filter): Adjusts the high-pass crossover frequency (400Hz - 12.5kHz).
- LPF (Low Pass Filter): Adjusts the low-pass crossover frequency (40Hz - 300Hz).
- X-over Switch: Selects between High Pass, Low Pass, or Full Range operation.
- Phase: Adjusts the output phase (0 or 180 degrees).
- Remote Bass Knob Port: Connects the included remote bass control.
Remote Bass Knob

This image shows the external bass control knob, which allows for convenient adjustment of bass levels from the driver's seat. It includes power and clipping indicators.
Setup and Installation
Proper installation is crucial for the performance and longevity of your amplifier. If you are unsure about any steps, consult a professional installer.
Mounting Location
- Choose a dry, well-ventilated location away from direct sunlight and heat sources.
- Ensure sufficient airflow around the amplifier's heatsink.
- Mount the amplifier securely to a solid surface using the provided hardware.
Wiring Connections
- Power Wiring: Run a heavy gauge power cable (e.g., 0-gauge or 4-gauge, depending on total system power) from the vehicle's battery positive terminal to the amplifier's +12V terminal. Install an appropriate fuse holder within 18 inches of the battery.
- Ground Wiring: Connect a heavy gauge ground cable of the same length as the power cable from the amplifier's GND terminal to a clean, bare metal chassis ground point. Ensure good electrical contact.
- Remote Turn-On: Connect a smaller gauge wire (e.g., 18-gauge) from the head unit's remote output to the amplifier's REM terminal.
- RCA Audio Input: Connect RCA cables from your head unit's pre-amp outputs to the amplifier's RCA inputs.
- Speaker Wiring: Connect your speakers to the amplifier's speaker terminals. Pay close attention to polarity (+/-) and ensure the total impedance of the connected speakers matches the amplifier's stable operating impedance (1 Ohm stable).
- Remote Bass Knob: Connect the remote bass knob to the designated port on the amplifier using the provided cable.
Operating Instructions
Initial Setup and Adjustments
- Gain (Level) Adjustment: Start with the amplifier's gain control set to minimum. Play a familiar music track at about 75% of your head unit's maximum volume. Slowly increase the amplifier's gain until you hear distortion, then back off slightly. This sets the maximum clean output.
- Crossover Settings:
- For subwoofers, set the X-over switch to LPF and adjust the LPF frequency (e.g., 80-120 Hz) to blend with your main speakers.
- For full-range speakers, set the X-over switch to HPF and adjust the HPF frequency (e.g., 80-100 Hz) to remove low bass frequencies that speakers cannot reproduce.
- For full-range signal without filtering, set the X-over switch to Full.
- Bass Boost: Use the Bass Boost control sparingly. Excessive bass boost can lead to distortion and potential speaker damage. Adjust to your preference, ensuring sound clarity.
- Phase Control: If using with a subwoofer, experiment with the 0 and 180-degree phase settings to find the one that provides the most impactful bass response.
Remote Bass Knob Usage
The remote bass knob allows for real-time adjustment of the amplifier's bass output. The knob typically controls the gain for the low-frequency range. The power indicator confirms the amplifier is on, and the clipping indicator warns of excessive signal, which can cause distortion.
Maintenance
- Keep the amplifier clean and free of dust and debris. Use a soft, dry cloth for cleaning.
- Ensure all connections remain tight and free from corrosion. Periodically check wiring for any signs of wear or damage.
- Verify that the amplifier's ventilation fins are not obstructed to prevent overheating.
Troubleshooting
| Problem | Possible Cause | Solution |
|---|---|---|
| No Power / Amplifier Not Turning On | Blown fuse, loose power/ground/remote wire, faulty remote turn-on signal. | Check fuses (battery and amplifier). Verify all power, ground, and remote connections are secure. Test remote wire for +12V when head unit is on. |
| No Sound Output | Loose RCA cables, incorrect gain setting, speaker wires disconnected, amplifier in protection mode. | Check RCA connections. Adjust gain. Verify speaker wiring. Check amplifier's protection indicator. |
| Distorted Sound | Gain set too high, incorrect crossover settings, speaker impedance mismatch, poor ground connection. | Reduce gain. Adjust crossover frequencies. Verify speaker impedance. Improve ground connection. |
| Amplifier Overheating | Insufficient ventilation, impedance too low, prolonged high volume. | Ensure proper airflow around the amplifier. Verify speaker impedance. Reduce volume or operating time. |
If these steps do not resolve the issue, contact Orion customer support or a qualified service technician.
Specifications

This graphic provides a quick overview of the amplifier's key performance specifications.
| Specification | Value |
|---|---|
| Model | HCCA3000.2H |
| Output Power (RMS) | 3000 Watts |
| Maximum Power | 6000 Watts |
| Number of Channels | 2 |
| Impedance Stability | 1 Ohm Stable |
| Frequency Response | 10Hz - 35kHz |
| Low Pass Filter (LPF) | 40Hz - 300Hz |
| High Pass Filter (HPF) | 400Hz - 12.5kHz |
| Bass Boost Control | Variable (0 to +18 dB) |
| Maximum Supply Voltage | 16 Volts (DC) |
| Material Type | Aluminum |
| Item Dimensions (L x W x H) | 29.2" x 11.7" x 2.8" (741.68mm x 297.18mm x 71.12mm) |
| Item Weight | 35.9 Pounds |
| Manufacturer | ORION |
| UPC | 818550010659 |

This image provides a visual representation of the amplifier's physical dimensions for installation planning.
Warranty and Support
For warranty information, technical support, or service inquiries, please refer to the official ORION website or contact your authorized ORION dealer. Keep your purchase receipt as proof of purchase for warranty claims.