1. Important Safety Information
Please read and understand all instructions before beginning installation. Failure to do so may result in electric shock, fire, or other injuries that could be hazardous or fatal. This product must be installed in accordance with the applicable installation code by a person familiar with the construction and operation of the product and the hazards involved.
- WARNING: Risk of electric shock. Disconnect power at the fuse or circuit breaker before installing or servicing.
- All electrical connections must be in accordance with local codes, ordinances, or the National Electric Code (NEC).
- Consult a qualified electrician if you are unsure about wiring procedures.
- This fixture is designed for outdoor, wet location use. Ensure all connections are properly sealed to prevent water intrusion.
- Do not attempt to modify the integrated LED light source. It is not replaceable.
2. Package Contents
Verify that all components are present before beginning installation:
- 1 x VAXCEL Melbourne Post Light Fixture (with integrated LED)
- 1 x Clear Crackle Glass Shade
- Mounting Hardware (screws, wire nuts)
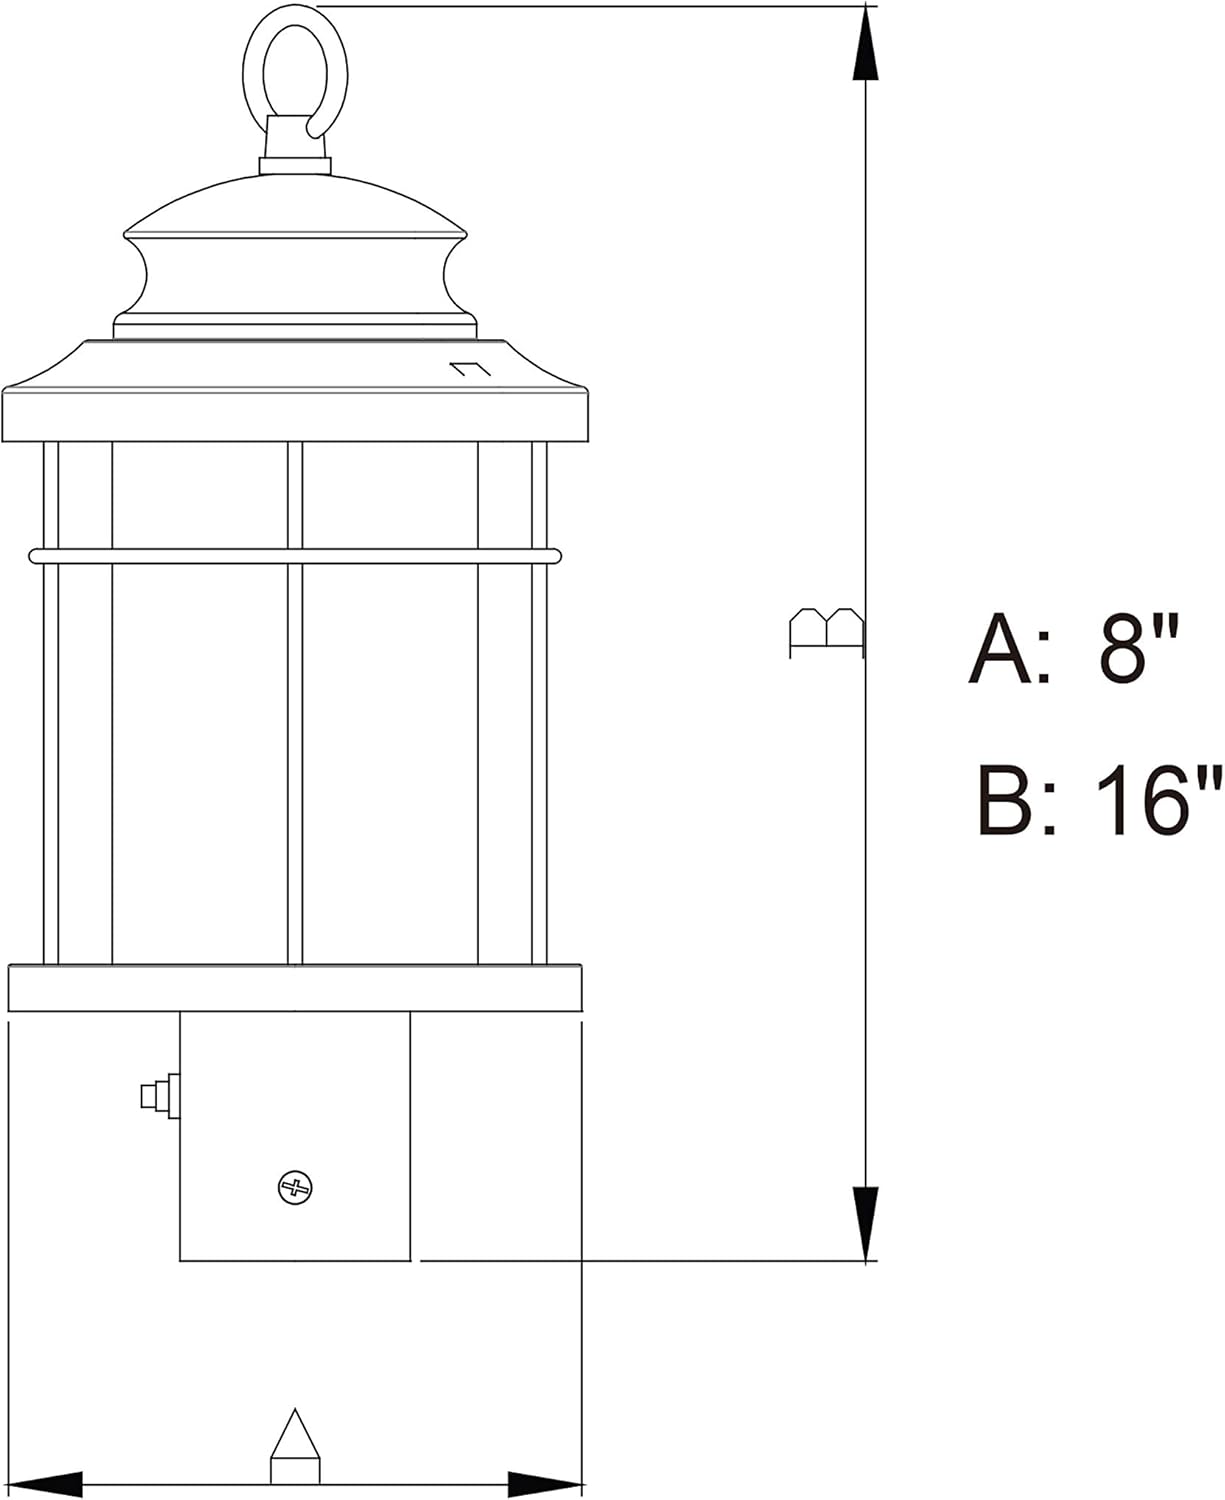
3. Specifications
| Feature | Specification |
|---|---|
| Model Number | T0165 |
| Dimensions (L x W x H) | 8" x 8" x 16" |
| Weight | 3.97 Pounds |
| Material | Alloy Steel, Glass |
| Light Source | Integrated LED (6 Watts) |
| Brightness | 300 Lumens |
| Color Temperature | 3000 Kelvin (Warm White) |
| Color Rendering Index (CRI) | 82 |
| Voltage | 120 Volts |
| Special Features | Dusk to Dawn Sensor, Exterior Wet Rated |
| Mounting Type | Post Mounted (fits standard 3-inch diameter post, not included) |
4. Installation Instructions (Setup)
Before you begin, ensure the power is turned off at the circuit breaker. This fixture is designed to be mounted on a standard 3-inch diameter post (post not included).
- Prepare the Post: Ensure your existing 3-inch diameter post is securely installed and has electrical wiring extending from its top.
- Connect Wiring: Carefully connect the fixture's wires to your household electrical wires. Use the provided wire nuts to secure connections:
- Connect the black wire from the fixture to the black (hot) wire from the post.
- Connect the white wire from the fixture to the white (neutral) wire from the post.
- Connect the green or bare copper ground wire from the fixture to the green or bare copper ground wire from the post.
- Mount the Fixture: Carefully place the fixture onto the top of the 3-inch post, aligning any pre-drilled holes if applicable. Secure the fixture to the post using the provided mounting screws. Do not overtighten.
- Install Glass Shade: Gently place the clear crackle glass shade into the fixture, ensuring it is seated properly and securely.
- Restore Power: Once the fixture is securely mounted and all connections are made, restore power at the circuit breaker.


5. Operating Instructions
The VAXCEL Melbourne Post Light features an integrated dusk-to-dawn photocell sensor for automatic operation. There are no manual controls for this light fixture.
- Automatic On/Off: The photocell sensor (refer to Figure 3) detects ambient light levels. The fixture will automatically turn on when it gets dark and turn off when it detects sufficient daylight.
- Initial Operation: Upon initial power-up, the light may take a few minutes to calibrate or may turn on briefly before turning off if it is daytime. This is normal operation.
6. Maintenance
Regular maintenance will help preserve the appearance and functionality of your VAXCEL Melbourne Post Light.
- Cleaning: To clean the fixture, ensure power is off. Wipe with a soft, damp cloth. Do not use abrasive cleaners or solvents, as they may damage the finish or glass.
- LED Light Source: The LED light source is integrated and designed for long-lasting performance. It is not user-replaceable.
- Photocell: Keep the photocell sensor (Figure 3) free from dirt, debris, or obstructions (e.g., leaves, snow) to ensure proper dusk-to-dawn operation.
7. Troubleshooting
If your VAXCEL Melbourne Post Light is not functioning as expected, refer to the following common issues and solutions:
| Problem | Possible Cause | Solution |
|---|---|---|
| Light does not turn on at night. | No power to the fixture. Photocell is obstructed or faulty. Wiring issue. | Check circuit breaker and wall switch (if applicable). Ensure photocell is clean and not blocked by objects. Verify wiring connections are secure (with power off). |
| Light stays on during the day. | Photocell is obstructed or faulty. Insufficient ambient light reaching the sensor. | Ensure photocell is clean and not blocked. Relocate the fixture if it's in a shaded area during the day. |
| Light flickers or dims. | Loose wiring connection. Power fluctuations. | Check all wiring connections (with power off). Consult an electrician if power fluctuations are suspected. |
If these steps do not resolve the issue, please contact VAXCEL customer support.
8. Warranty Information
The VAXCEL Melbourne 1L LED Dusk to Dawn Outdoor Post Light (Model T0165) is covered by a 5-year limited warranty from the date of purchase. This warranty covers defects in materials and workmanship under normal use. For full warranty terms and conditions, please refer to the VAXCEL official website or contact customer support.
9. Contact Information
For further assistance, technical support, or warranty claims, please contact VAXCEL customer service:
- Website: Visit the VAXCEL Store on Amazon
- Please have your model number (T0165) and proof of purchase ready when contacting support.