
Introduction
This manual provides essential instructions for the safe and effective use of your GasBRUH Heavy Duty Weed Torch Propane Burner. This high-output propane torch is designed for various outdoor applications, including weed control, starting charcoal, melting snow, and other heating tasks. Please read this manual thoroughly before assembly or operation to ensure proper usage and safety.

Figure 1: GasBRUH Weed Torch operating with different propane tank sizes.
Safety Information
WARNING: Failure to follow these safety instructions may result in serious injury, property damage, or death.
- Outdoor Use Only: This device is designed exclusively for outdoor use. Never operate indoors or in enclosed spaces.
- Personal Protective Equipment: Always wear appropriate personal protective equipment, including gloves, long sleeves, long pants, and sturdy boots, to protect yourself from heat and flame.
- Fire Safety: Keep a fire extinguisher and a bucket of water readily available near the torch and your work area. Ensure no flammable materials are nearby.
- Gas Leak Check: Always perform a gas leak check before each operation. Use a soapy water solution on all connections; bubbles indicate a leak.
- Ignition Procedure: Point the torch nozzle downwards and away from yourself and others before attempting to light it.
- Disconnect After Use: For safety, always disconnect the propane tank from the torch after use or when the torch is not in use.
- Children and Pets: Keep children and pets away from the operating area.
- Ventilation: Ensure adequate ventilation when operating, even outdoors, to prevent gas accumulation.
Package Contents
Verify that all items are present in your package:
- Weeding Torch
- Propane Hose (8.8 FT)
- Toolkit (includes wrench and rubber O-rings)
- Convenience Bag
- Color Box (packaging)
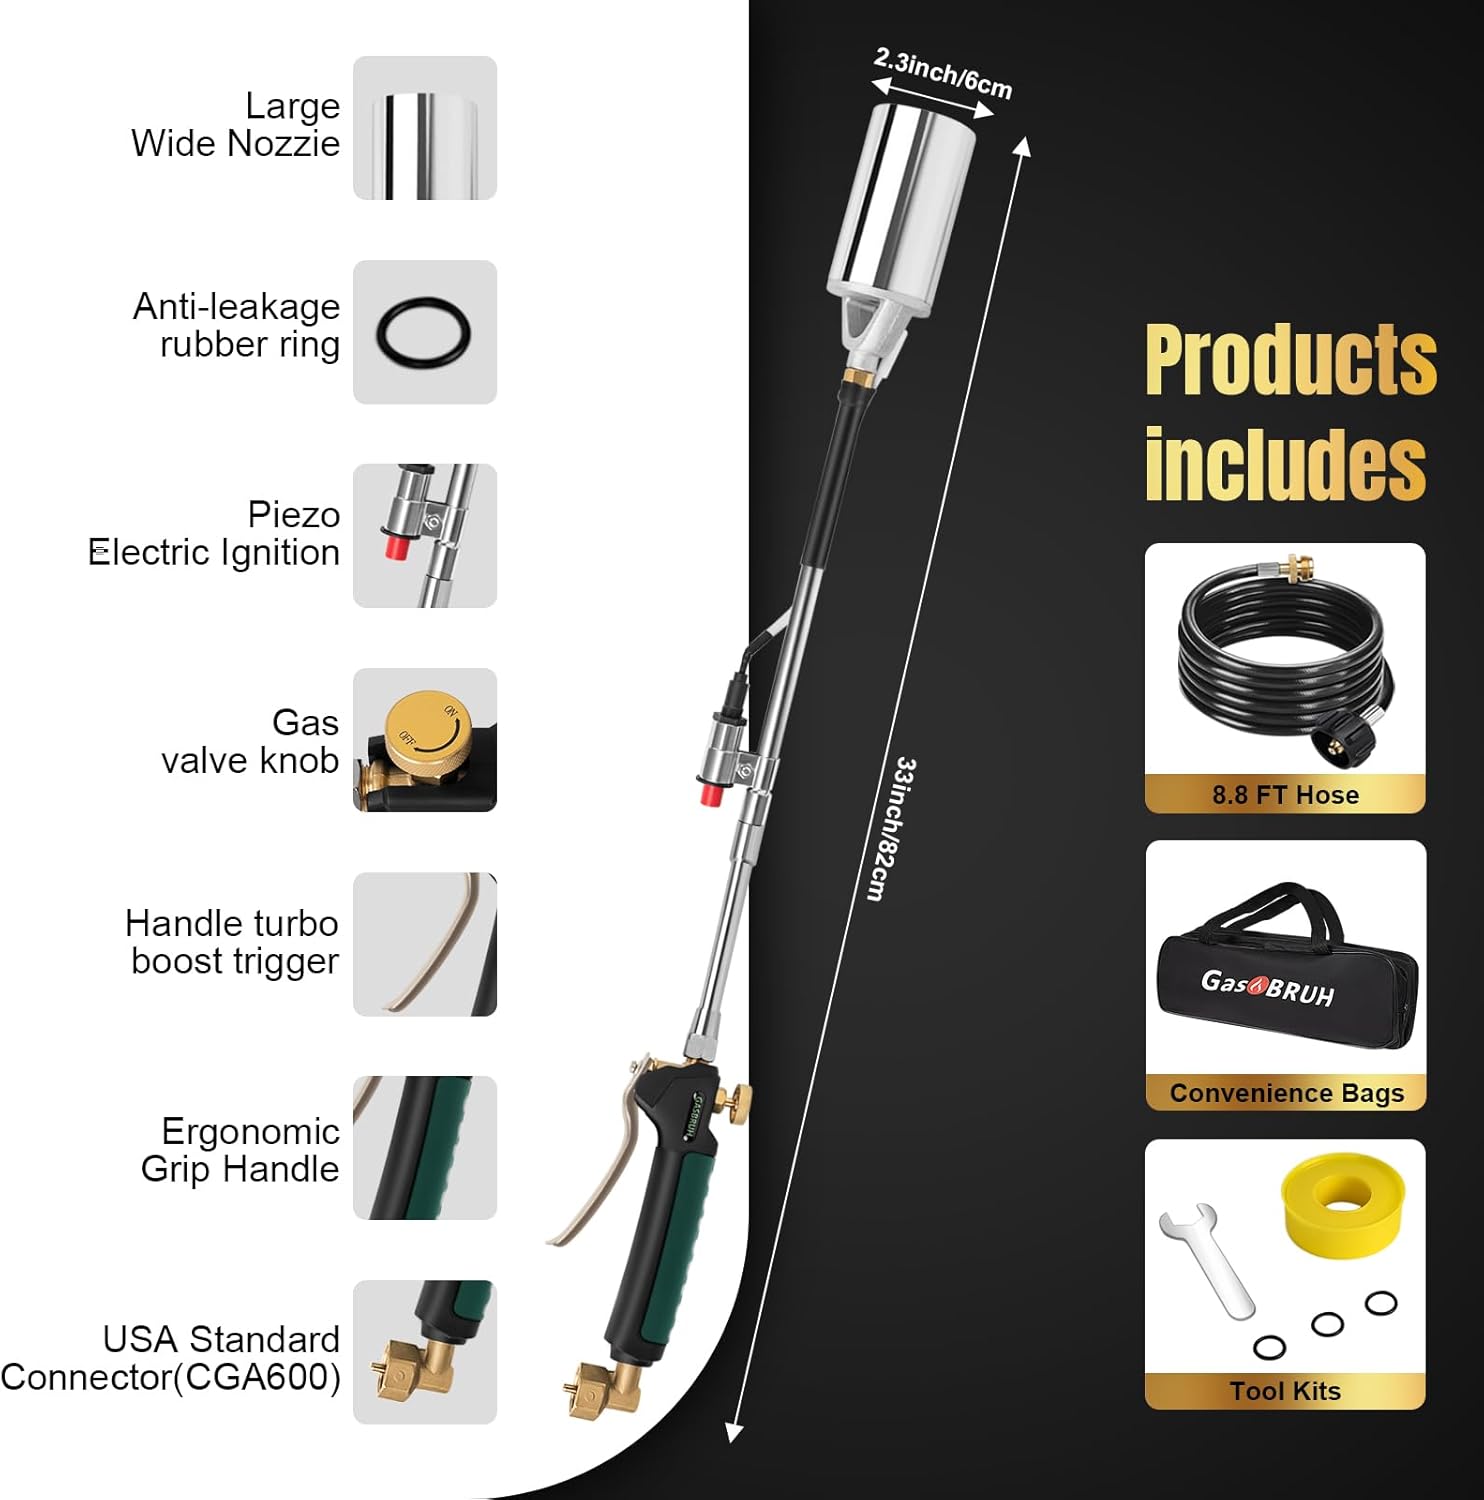
Figure 2: Included components of the GasBRUH Weed Torch.

Figure 3: Detailed view of the torch components.
Setup
Follow these steps to assemble and connect your GasBRUH Weed Torch:
- Connect Torch Ends: Rotate the torch components clockwise to securely connect the ends. Ensure all connections are tight.
- Connect to Propane Tank:
- For 1 lb propane cylinders: Directly connect the torch to the cylinder.
- For 5-40 lb standard propane tanks: Use the provided 8.8 ft high-pressure hose to connect the torch to the tank.
- Check for Leaks: Before proceeding, apply a soapy water solution to all gas connections. If bubbles appear, tighten the connection and re-check. Do not proceed if a leak is detected.

Figure 4: Assembly and connection steps.
Video 1: Demonstrates how to connect and use the GasBRUH propane weed torch with a 1lb propane tank. This video shows the assembly, gas connection, and ignition process.
Operating Instructions
Once assembled and connected, follow these steps to operate your weed torch:
- Open Gas Valve: Slowly turn the gas valve knob on the torch handle counter-clockwise to release propane gas.
- Ignite Flame: Point the torch nozzle downwards and away from any flammable objects. Press the piezo ignition button to light the flame. If the torch does not light immediately, close the gas valve, wait a few seconds, and repeat the process.
- Adjust Flame Intensity: Use the gas valve knob to control the flame size. For a more powerful burst, press the handle turbo boost trigger.
- Application:
- Weed Control: Pass the flame quickly over weeds. The goal is to heat the plant cells, causing them to wilt, not to burn them to ash.
- Charcoal/Campfire Starting: Direct the flame onto charcoal or kindling until it ignites.
- Snow/Ice Melting: Apply flame to snow or ice surfaces to melt them.
- Other Uses: Can be used for various heating tasks such as repairing roofing or roads, searing meat, or soldering.
- Shut Down: After use, first close the gas valve completely on the propane tank, then close the gas valve on the torch handle. Allow the torch to cool down before storing.

Figure 5: Examples of torch applications.
Maintenance
Regular maintenance ensures the longevity and safe operation of your GasBRUH Weed Torch:
- Cleaning: After each use, ensure the torch is cool. Wipe down the exterior with a damp cloth to remove any dirt or debris. Do not use abrasive cleaners.
- Inspect Connections: Periodically inspect the hose and all connections for signs of wear, cracks, or damage. Replace any damaged components immediately.
- O-Rings: The torch is designed with rubber O-rings at connection points for a gas-tight seal. Inspect these O-rings for wear and replace them if necessary using the provided toolkit.
- Storage: Store the torch in its convenience bag in a cool, dry place, away from direct sunlight and sources of ignition. Ensure the propane tank is disconnected before storage.
Troubleshooting
If you encounter issues with your GasBRUH Weed Torch, refer to the following common problems and solutions:
| Problem | Possible Cause | Solution |
|---|---|---|
| Torch does not light or has a weak flame. |
|
|
| Inconsistent flame or sputtering. |
|
|
| Gas smell detected. |
|
|
Specifications
- Model: WEED006
- Brand: GasBRUH
- Material: Stainless Steel
- Product Dimensions: 32"L x 5.5"W x 2.7"H
- Hose Length: 8.8 FT
- Maximum Output: Up to 360,000 BTU
- Maximum Temperature: Over 2000°F
- Ignition Type: Piezo Electric Ignition
- Compatibility: 1 lb propane cylinders and 5-40 lb standard propane tanks (via hose)
Warranty and Support
GasBRUH products are crafted from refractory steel for enhanced durability. If you encounter any post-purchase issues or require assistance, please contact the GasBRUH support team. Our professional team is available to assist you with processing a replacement or refund as needed.
For support, please refer to the contact information provided on your product packaging or visit the official GasBRUH website.