1. Introduction
This manual provides essential instructions for the safe and efficient assembly, operation, and maintenance of your TOOLPORT 5x8 m Reception Tent, Model PRO Smart. Please read all instructions carefully before beginning assembly to ensure proper setup and to prevent damage or injury. Keep this manual for future reference.

Image 1.1: Fully assembled TOOLPORT 5x8 m Reception Tent.
2. Safety Instructions
- Weather Conditions: Do not assemble or use the tent in strong winds, heavy rain, snow, or thunderstorms. High winds can cause the tent to collapse, leading to severe injury or property damage.
- Anchoring: Always secure the tent firmly to the ground using all provided pegs and guy ropes. In soft ground, additional anchoring may be required (e.g., sandbags, heavier stakes).
- Fire Hazard: Keep all heat sources, open flames, and cooking equipment away from the tent fabric. The PVC material is not fireproof.
- Ventilation: Ensure adequate ventilation, especially if using heating or cooking appliances inside the tent. Carbon monoxide poisoning is a risk in enclosed spaces.
- Children: Keep children away from the assembly area. Do not allow children to play unsupervised inside or around the tent.
- Structural Integrity: Do not hang heavy objects from the tent frame. The frame is designed for structural support of the tent fabric only.
- Sharp Objects: Avoid contact with sharp objects that could puncture or tear the PVC fabric.
- Electrical Safety: Exercise caution with electrical equipment. Ensure all wiring is properly insulated and protected from moisture.
3. Package Contents
Before assembly, verify that all components are present and undamaged. If any parts are missing or damaged, contact TOOLPORT customer service.
- Galvanized Steel Frame Construction (tubes and connectors)
- Roof Tarp (high-quality PVC 700 N)
- Side Tarps (with wind deflectors and windows)
- Gable End Panels (one with zipper entrance)
- Tensioners
- Ground Pegs / Stakes
- Guy Ropes
- Assembly Instructions
- Assembly Tools (e.g., wing nuts, hex key)
4. Setup
Assembly requires at least 2-4 people, depending on the tent size. For the 5x8 m model, allow approximately 2 to 3.5 hours for setup.
4.1 Frame Assembly
- Unpack all frame components and lay them out. Refer to the numbered tubes in the separate assembly guide for identification.
- Connect the galvanized steel tubes (approx. 38mm diameter) using the galvanized steel connectors (approx. 42mm diameter). Ensure all connections are securely bolted with the provided wing nuts.
- Assemble the roof structure first, then attach the vertical support legs.

Image 4.1: Detail of bolted frame connection for enhanced stability.
4.2 Tarp Installation
- Carefully unfold the roof tarp and drape it over the assembled frame. Ensure it is centered and evenly distributed. The roof tarp is a single piece for maximum stability.
- Attach the roof tarp to the frame using the tensioners and elastic fixation straps. Ensure the tarp is taut to prevent water pooling.
- Install the gable end panels and side tarps. The side panels are modular and can be removed every two meters. Secure them to the frame using the elastic straps.
- Ensure the zipper entrance on one of the gable ends is functional and properly aligned.
4.3 Ground Anchoring
- Once the tent is fully assembled, secure it to the ground using the provided pegs and guy ropes.
- Drive pegs firmly into the ground at all designated anchor points.
- Attach guy ropes to the tent frame and secure them to additional pegs, pulling them taut at an angle to provide maximum stability against wind.

Image 4.2: Key structural and material features for robust setup.
5. Operating (Usage)
The TOOLPORT Reception Tent is designed for temporary outdoor events, parties, and storage. Its high-quality PVC fabric and robust steel frame provide a reliable shelter.
- Event Shelter: Provides a spacious area for guests, catering, or equipment. The 5x8 m tent can accommodate approximately 27 seated guests or 64 standing guests.
- Weather Protection: The PVC 700 N tarp is 100% waterproof with heat-sealed seams and offers UV protection (UV 50+). It is resistant to temperatures between -20 °C and +50 °C.
- Ventilation: Side panels with wind deflectors and optimal air circulation help regulate the ambient temperature inside the tent.
- Access: The entrance gable features a sturdy zipper door for easy access.

Image 5.1: Spacious interior of the tent, suitable for various events.
6. Maintenance
Proper maintenance will extend the lifespan of your reception tent.
- Cleaning: Clean the PVC tarps with mild soap and water. Do not use harsh chemicals or abrasive cleaners, as these can damage the material. Rinse thoroughly and allow to dry completely before storage.
- Frame Care: Inspect the galvanized steel frame periodically for any signs of rust or damage. While galvanized, prolonged exposure to moisture can still cause issues. Clean any dirt or debris from the frame.
- Storage: Ensure all tent components (tarps, frame, accessories) are clean and completely dry before packing away. Store in a cool, dry place, protected from direct sunlight and pests.
- Inspection: Before and after each use, inspect the tarps for tears, punctures, or weakened seams. Check the frame for bent tubes or loose connections. Repair any damage promptly to prevent further issues.
7. Troubleshooting
Here are solutions to common issues you might encounter:
| Problem | Possible Cause | Solution |
|---|---|---|
| Water leakage | Improperly tensioned tarp, damaged fabric, or extreme weather. | Ensure tarp is taut and seams are sealed. Inspect for tears and repair with a PVC repair kit. Avoid use in extreme weather. |
| Tent instability in wind | Insufficient anchoring, loose frame connections, or strong winds exceeding tent capacity. | Verify all pegs and guy ropes are securely fastened. Tighten all frame bolts. Do not use in winds exceeding recommended limits. Consider additional anchoring for soft ground. |
| Difficulty assembling frame | Incorrect part identification, misaligned tubes, or insufficient manpower. | Refer to the numbered assembly guide. Ensure tubes are correctly oriented. Seek assistance from additional people. |
| Zipper malfunction | Dirt in zipper, misaligned teeth, or damaged pull. | Clean zipper with a brush. Gently realign teeth. If damaged, contact customer service for replacement parts. |
8. Specifications
| Feature | Detail |
|---|---|
| Model Number | PRO Smart (6070) |
| Dimensions (L x W x H) | 800 x 500 x 200 cm (5x8 m) |
| Weight | 120 kg |
| Frame Material | Galvanized Steel (Tubes: 38mm diameter, Connectors: 42mm diameter) |
| Tarp Material | High-quality PVC 700 N |
| Color | Grey-White |
| Water Resistance | 100% Waterproof (heat-sealed seams) |
| UV Protection | UV 50+ |
| Temperature Resistance | -20 °C to +50 °C |
| Recommended Use | Events, parties, temporary shelter |
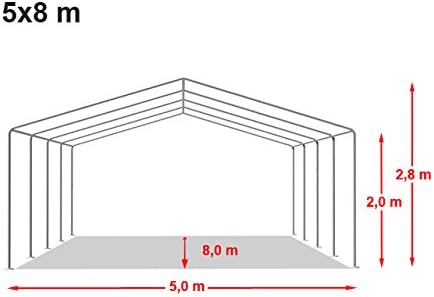
Image 8.1: Tent dimensions diagram (5x8 m).
9. Warranty and Support
For warranty information, please refer to the terms and conditions provided at the time of purchase or contact your retailer. For technical support, missing parts, or any other inquiries, please contact TOOLPORT customer service directly. Have your model number (PRO Smart) and purchase details ready when contacting support.
You can visit the TOOLPORT store for more information: TOOLPORT Store


