
Leica M3
Leica M3 Single Stroke User Manual
Model: M3
1. Introduction
This manual provides comprehensive instructions for the operation, maintenance, and troubleshooting of your Leica M3 Single Stroke camera, equipped with the 50mm F 2.0 Summicron-M Lens. Please read this manual thoroughly before using your camera to ensure proper handling and to maximize its performance and longevity.
The Leica M3 is a classic 35mm rangefinder camera known for its robust build quality, precise mechanics, and exceptional optical performance when paired with Leica M-mount lenses. This model features a single-stroke film advance lever for quick and efficient film winding.

Figure 1.1: The Leica M3 Single Stroke camera body with its lens cap, showcasing its classic design and robust construction.
2. Components and Controls
Familiarize yourself with the main components and controls of your Leica M3 camera and 50mm F 2.0 Summicron-M Lens.

Figure 2.1: Various views of the Leica M3 camera body, highlighting the top plate with shutter speed dial and film advance, the front with the lens mount and viewfinder, the back with the film counter, and the bottom plate for film loading.

Figure 2.2: The Leica 50mm F 2.0 Summicron-M Lens, shown with a protective filter and lens cap. This image emphasizes the front element and aperture ring.
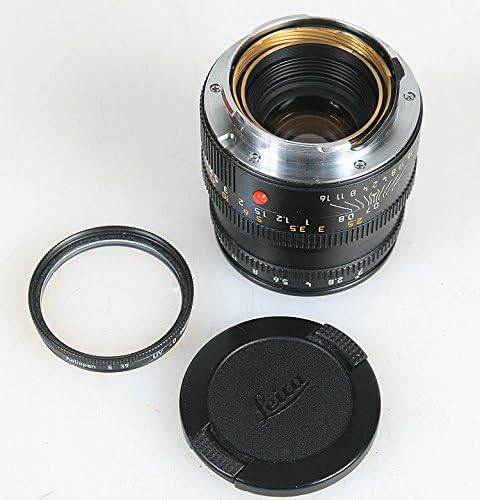
Figure 2.3: Rear view of the Leica 50mm F 2.0 Summicron-M Lens, displaying the M-mount bayonet and the rear optical element.
2.1 Camera Body Features
- Viewfinder/Rangefinder: For composing and focusing your shots.
- Shutter Speed Dial: Located on the top plate, controls exposure time.
- Film Advance Lever: Single stroke mechanism for winding film and cocking the shutter.
- Shutter Release Button: Activates the shutter.
- Rewind Knob: For rewinding film back into the cassette.
- Film Counter: Displays the number of exposures taken.
- Accessory Shoe: For mounting external viewfinders or flash units.
- Base Plate: Removable for film loading and battery access (if applicable for light meter).
2.2 Lens Features (50mm F 2.0 Summicron-M)
- Aperture Ring: Controls the lens aperture (f-stop) for depth of field and exposure.
- Focusing Ring: Adjusts the lens focus for sharp images.
- Depth of Field Scale: Indicates the range of acceptable sharpness at various apertures.
- M-Mount: Bayonet mount for attaching the lens to the Leica M3 camera body.
3. Setup and Initial Use
3.1 Attaching the Lens
- Ensure the camera body and lens mounts are clean and free of dust.
- Align the red dot on the lens barrel with the red dot on the camera's lens mount.
- Insert the lens into the camera mount and rotate it clockwise until it clicks securely into place.
- To remove, press the lens release button on the camera body and rotate the lens counter-clockwise.
3.2 Loading Film
The Leica M3 uses 35mm film. Film loading requires careful attention to avoid light leaks and ensure proper film transport.
- Turn the camera upside down and unlock the base plate by rotating the locking key.
- Remove the base plate and the take-up spool.
- Insert a new 35mm film cassette into the film chamber on the left side of the camera.
- Thread the film leader into the slot of the take-up spool. Ensure the film perforations engage with the teeth on the spool.
- Place the take-up spool back into its position on the right side of the camera.
- Ensure the film lies flat across the film gate.
- Replace the base plate and lock it by rotating the key.
- Advance the film two frames by operating the film advance lever and pressing the shutter release. This ensures the exposed leader is wound onto the take-up spool and you are starting on fresh film.
- Set the film counter to '0' or '1' depending on your preference (some prefer to start at 0 for the first usable frame).
4. Operating the Camera
4.1 Setting Film Speed (ISO/ASA)
The Leica M3 does not have a built-in light meter. Film speed is set on an external light meter or remembered for manual exposure calculations. There is a reminder dial on the back of the camera for film type/speed.
4.2 Setting Shutter Speed
Rotate the shutter speed dial on the top plate to select your desired shutter speed. Common speeds range from 1 second to 1/1000th of a second, plus 'B' for bulb (shutter remains open as long as the button is pressed) and 'T' for time (shutter opens on first press, closes on second).
4.3 Setting Aperture
Rotate the aperture ring on the lens to select your desired f-stop. Smaller f-numbers (e.g., f/2.0) indicate a wider aperture, allowing more light and creating shallower depth of field. Larger f-numbers (e.g., f/16) indicate a smaller aperture, allowing less light and creating greater depth of field.
4.4 Focusing
Look through the viewfinder. The Leica M3 features a bright-line rangefinder. You will see a central rectangular patch. Rotate the focusing ring on the lens until the split images within this patch align and merge into a single, clear image. This indicates accurate focus.
4.5 Composing and Shooting
- Compose your shot using the viewfinder. The M3 has automatic parallax correction for its bright-lines.
- Ensure your exposure settings (shutter speed, aperture, and film ISO) are appropriate for the lighting conditions.
- Advance the film using the single-stroke lever until it stops. This cocks the shutter.
- Gently press the shutter release button to take the photograph.
4.6 Rewinding Film
Once all exposures on the film roll have been taken (indicated by the film counter), you must rewind the film back into its cassette before opening the camera back.
- Press the film rewind release button on the top plate (usually a small button near the film advance lever).
- Unfold the rewind crank on the top plate and rotate it clockwise until you feel the tension release, indicating the film leader has fully retracted into the cassette.
- Unlock and remove the base plate.
- Carefully remove the film cassette.
5. Maintenance and Care
Proper care will ensure the longevity and optimal performance of your Leica M3 camera and Summicron-M lens.
- Cleaning the Lens: Use a soft, lint-free microfiber cloth and a specialized lens cleaning solution. Gently wipe the lens surface in a circular motion from the center outwards. Use a blower brush to remove dust before wiping.
- Cleaning the Camera Body: Wipe the camera body with a soft, dry cloth. For stubborn dirt, a slightly damp cloth can be used, but avoid getting moisture into any openings.
- Storage: Store the camera in a cool, dry place, away from direct sunlight and extreme temperatures. Use a desiccant packet if storing in a humid environment. Keep the lens capped when not in use.
- Avoid Force: Never force any controls. If a mechanism feels stiff, do not apply excessive force. Seek professional service.
- Professional Servicing: It is recommended to have your Leica M3 serviced by a qualified technician every few years, especially if it sees regular use, to ensure proper calibration and lubrication.
6. Troubleshooting
| Problem | Possible Cause | Solution |
|---|---|---|
| Shutter not firing | Film not advanced; shutter not cocked. | Advance the film lever fully until it stops. |
| Film advance lever stuck | Film counter at end of roll; film jammed. | Check film counter. If at end, rewind film. If persistent, do not force; seek professional help. |
| Images out of focus | Incorrect focusing; rangefinder misalignment. | Ensure rangefinder images are perfectly aligned. If persistent, rangefinder may need calibration by a technician. |
| Light leaks on film | Improper film loading; worn light seals. | Ensure base plate is securely locked. Inspect light seals around the film door; replace if deteriorated. |
7. Specifications
| Feature | Detail |
|---|---|
| Model Name | Leica M3 Single Stroke |
| Included Lens | Leica 50mm F 2.0 Summicron-M Lens |
| Film Format Type | 35mm |
| Exposure Control Type | Manual |
| Special Features | Timer, Lightweight, Compact |
| Item Weight | 0.01 ounces (approximate, camera body only) |
| ASIN | B00TA4U6U6 |
| UPC | 639738106342 |
8. Warranty and Support
For information regarding warranty coverage, service, and technical support for your Leica M3 camera and Summicron-M lens, please refer to the official Leica website or contact Leica customer service directly. Keep your purchase receipt as proof of purchase for warranty claims.
Leica Official Website: www.leica-camera.com
For repairs or professional cleaning, it is highly recommended to use authorized Leica service centers to ensure genuine parts and expert handling.
Related documentsM3


Ask a question about this manual
Ask about setup, troubleshooting, compatibility, parts, safety, or missing instructions. Manuals+ will review the question and use this page’s manual context to help answer it.