Introduction
Thank you for choosing the Hifonics ZRX1216.2 Zeus Car Audio Amplifier. This manual provides essential information for the proper installation, operation, and maintenance of your amplifier. Please read this manual thoroughly before attempting installation or operation to ensure optimal performance and safety.
Safety Information
Always observe the following safety precautions:
- Disconnect the vehicle's negative battery terminal before starting any installation.
- Ensure all wiring is properly routed and secured to prevent damage or short circuits.
- Use appropriate gauge wiring for power and ground connections as specified in this manual.
- Install the amplifier in a location that allows for adequate ventilation and is protected from moisture and excessive heat.
- Do not operate the amplifier if it is damaged or malfunctioning. Refer to the troubleshooting section or contact qualified service personnel.
- High sound pressure levels can cause permanent hearing loss. Adjust volume levels responsibly.
Package Contents
Verify that your package contains the following items:
- Hifonics ZRX1216.2 Zeus Car Audio Amplifier
- Owner's Manual (this document)
- Mounting Hardware
Product Overview
The Hifonics ZRX1216.2 is a 2-channel car audio amplifier designed to deliver powerful and clear sound. It features robust construction and a range of controls for fine-tuning your audio experience.
Amplifier Top View

This image displays the top surface of the amplifier, featuring the Hifonics brand name and 'ZEUS' model series designation. The brushed silver finish and overall compact design are visible.
Input and Control Panel

This image shows the input and control side of the amplifier. Visible controls include Level, Bass EQ, HPF (High Pass Filter), LPF (Low Pass Filter), X-OVER (Crossover) switch, and Mode switch (Mono/Stereo). RCA input and output jacks, along with a high-level input connector, are also present.
Power and Speaker Terminal Panel
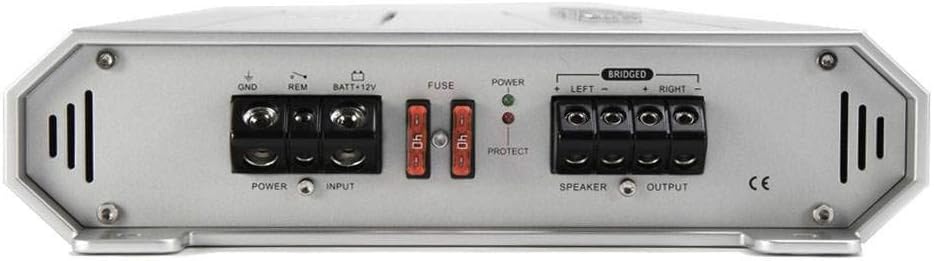
This image illustrates the power and speaker connection side of the amplifier. It includes terminals for GND (Ground), REM (Remote Turn-On), BATT+12V (Power), fuse holders, and speaker output terminals for Left and Right channels, with bridging capability indicated.
Setup and Installation
Proper installation is crucial for the performance and longevity of your amplifier. If you are unsure about any step, consult a professional installer.
Mounting Location
Choose a mounting location that is dry, well-ventilated, and secure. Avoid mounting the amplifier directly on carpet or in enclosed spaces that restrict airflow. Ensure sufficient space around the amplifier for wiring and heat dissipation.
Wiring Connections
All wiring should be done with the vehicle's battery disconnected.
- Power Connection (+12V): Connect a heavy-gauge power cable (e.g., 4-gauge or larger, depending on total system power) directly from the positive terminal of the vehicle's battery to the BATT+12V terminal on the amplifier. Install an in-line fuse holder with a fuse (rated appropriately for the amplifier's total current draw, typically 80A for this model, check amplifier specifications for exact rating) within 18 inches (45 cm) of the battery.
- Ground Connection (GND): Connect a heavy-gauge ground cable (same gauge as power cable) from the GND terminal on the amplifier to a clean, unpainted metal surface of the vehicle's chassis. Ensure a solid, low-resistance connection.
- Remote Turn-On (REM): Connect a smaller gauge wire (e.g., 18-gauge) from the REM terminal on the amplifier to the remote turn-on output of your head unit. This wire signals the amplifier to turn on when the head unit is active.
- Input Signal (RCA or High-Level):
- RCA Inputs: Connect RCA cables from the pre-amp outputs of your head unit to the INPUT L and R RCA jacks on the amplifier.
- High-Level Inputs: If your head unit does not have RCA outputs, use the provided high-level input connector. Connect the speaker wires from your head unit's speaker outputs to the corresponding terminals on the high-level input connector.
- Speaker Connections: Connect your speakers to the SPEAKER OUTPUT terminals. For stereo operation, connect the left speaker to the LEFT terminals and the right speaker to the RIGHT terminals. For bridged mono operation, refer to the "Operating Instructions" section. Ensure correct polarity (+ to + and - to -).
Operating Instructions
Once the amplifier is installed, you can configure its settings for optimal audio performance.
Initial Power-Up
After all connections are made and verified, reconnect the vehicle's negative battery terminal. Turn on your head unit. The POWER indicator light on the amplifier should illuminate (typically green). If the PROTECT light illuminates (typically red), refer to the troubleshooting section.
Control Panel Adjustments
- LEVEL (Gain Control): This control matches the amplifier's input sensitivity to the output voltage of your head unit. Start with the LEVEL control at its minimum setting. Play a familiar music track at about 75% of your head unit's maximum volume. Slowly increase the amplifier's LEVEL control until you hear slight distortion, then back it off slightly.
- BASS EQ: Adjusts the bass boost level. Use sparingly to avoid distortion and speaker damage.
- HPF (High Pass Filter): This filter allows frequencies above the set point to pass through to the speakers. Useful for protecting smaller speakers from low bass frequencies.
- LPF (Low Pass Filter): This filter allows frequencies below the set point to pass through. Typically used for subwoofers to reproduce only bass frequencies.
- X-OVER (Crossover Switch): Selects the type of crossover. Options typically include FULL (full range), HPF, or LPF. Match this to your speaker configuration.
- MODE (Mono/Stereo Switch): Selects between stereo operation (for two speakers) or mono/bridged operation (for a single subwoofer).
Bridged Operation
The ZRX1216.2 amplifier can be bridged to provide higher power output to a single speaker, typically a subwoofer. To bridge the amplifier:
- Set the MODE switch to MONO.
- Connect the positive (+) terminal of your speaker to the RIGHT (+) speaker output terminal of the amplifier.
- Connect the negative (-) terminal of your speaker to the LEFT (-) speaker output terminal of the amplifier.
- Ensure the speaker's impedance is suitable for bridged operation (typically 4 ohms minimum).
Maintenance
Your Hifonics amplifier requires minimal maintenance to ensure long-term performance.
- Cleaning: Periodically wipe the amplifier's exterior with a soft, dry cloth. Do not use harsh chemicals or abrasive cleaners.
- Ventilation: Ensure that the amplifier's cooling fins are free from dust and obstructions. Good airflow is essential for heat dissipation.
- Connections: Occasionally check all power, ground, remote, and speaker connections to ensure they are secure and free from corrosion.
Troubleshooting
If you experience problems with your amplifier, refer to the following common issues and solutions before contacting support.
| Problem | Possible Cause | Solution |
|---|---|---|
| No Power / Amplifier does not turn on |
|
|
| No Sound Output |
|
|
| Distorted Sound |
|
|
| Amplifier Overheats / Goes into Protect Mode |
|
|
Specifications
| Feature | Detail |
|---|---|
| Brand | Hifonics |
| Model Number | ZRX1216.2 |
| Number of Channels | 2 |
| Power Output | 2 x 600W (Stereo), 1 x 1200W (Bridged) |
| Product Dimensions (L x W x H) | 10 x 10 x 10 inches |
| Item Weight | 12 pounds |
| Mounting Type | Surface Mount |
| Color | Silver |
| Batteries Required | 1 12V battery (for vehicle operation) |
Warranty and Support
Hifonics products are designed for reliability and performance. For specific warranty information, please refer to the warranty card included with your product or visit the official Hifonics website. For technical support or service inquiries, please contact Hifonics customer service.
Note: Unauthorized service or modification may void your warranty.


