1. Introduction
This manual provides essential information for the safe and efficient operation, maintenance, and troubleshooting of your Cevik CA-PRO50VX Portable Direct Drive Air Compressor. Please read this manual thoroughly before operating the compressor and retain it for future reference.

Figure 1.1: Cevik CA-PRO50VX Portable Direct Drive Air Compressor. This image shows the complete compressor unit with its black tank, silver motor head, pressure gauges, and wheels for portability.
2. Safety Information
Always observe basic safety precautions to reduce the risk of fire, electric shock, and personal injury. Failure to follow these instructions may result in serious injury or property damage.
2.1 General Safety Rules
- Read all instructions: Familiarize yourself with the controls and proper use of the equipment.
- Electrical Safety: Ensure the power supply matches the compressor's requirements (230 Volts). Use a grounded outlet and avoid using extension cords unless absolutely necessary and rated for the compressor's power.
- Personal Protective Equipment (PPE): Always wear safety glasses or goggles. Hearing protection is recommended due to the noise level (72 dB).
- Work Area: Keep the work area clean, well-lit, and free from obstructions. Do not operate in explosive atmospheres, such as in the presence of flammable liquids, gases, or dust.
- Children and Bystanders: Keep children and bystanders away from the operating compressor.
- Pressure Safety: Never exceed the maximum operating pressure of the compressor or the air tools being used. Do not direct compressed air at people or animals.
- Maintenance: Disconnect the power supply before performing any maintenance or adjustments.
2.2 Specific Warnings
- Hot Surfaces: The compressor head and motor can become hot during operation. Avoid contact to prevent burns.
- Pressure Tank: Do not modify or repair the air tank. Regularly drain condensation from the tank to prevent corrosion.
- Noise Level: The compressor operates at 72 Decibels. Prolonged exposure without hearing protection may cause hearing damage.
3. Setup
Follow these steps to prepare your compressor for initial use.
3.1 Unpacking and Inspection
- Carefully remove the compressor from its packaging.
- Inspect the unit for any shipping damage. If damage is found, do not operate the compressor and contact your supplier.
- Ensure all components listed in the packaging are present, including the air hose and various accessories.
3.2 Assembly (if required)
The Cevik CA-PRO50VX is designed for portability and typically comes with wheels and a handle for easy movement. Ensure these are securely attached if they require assembly.
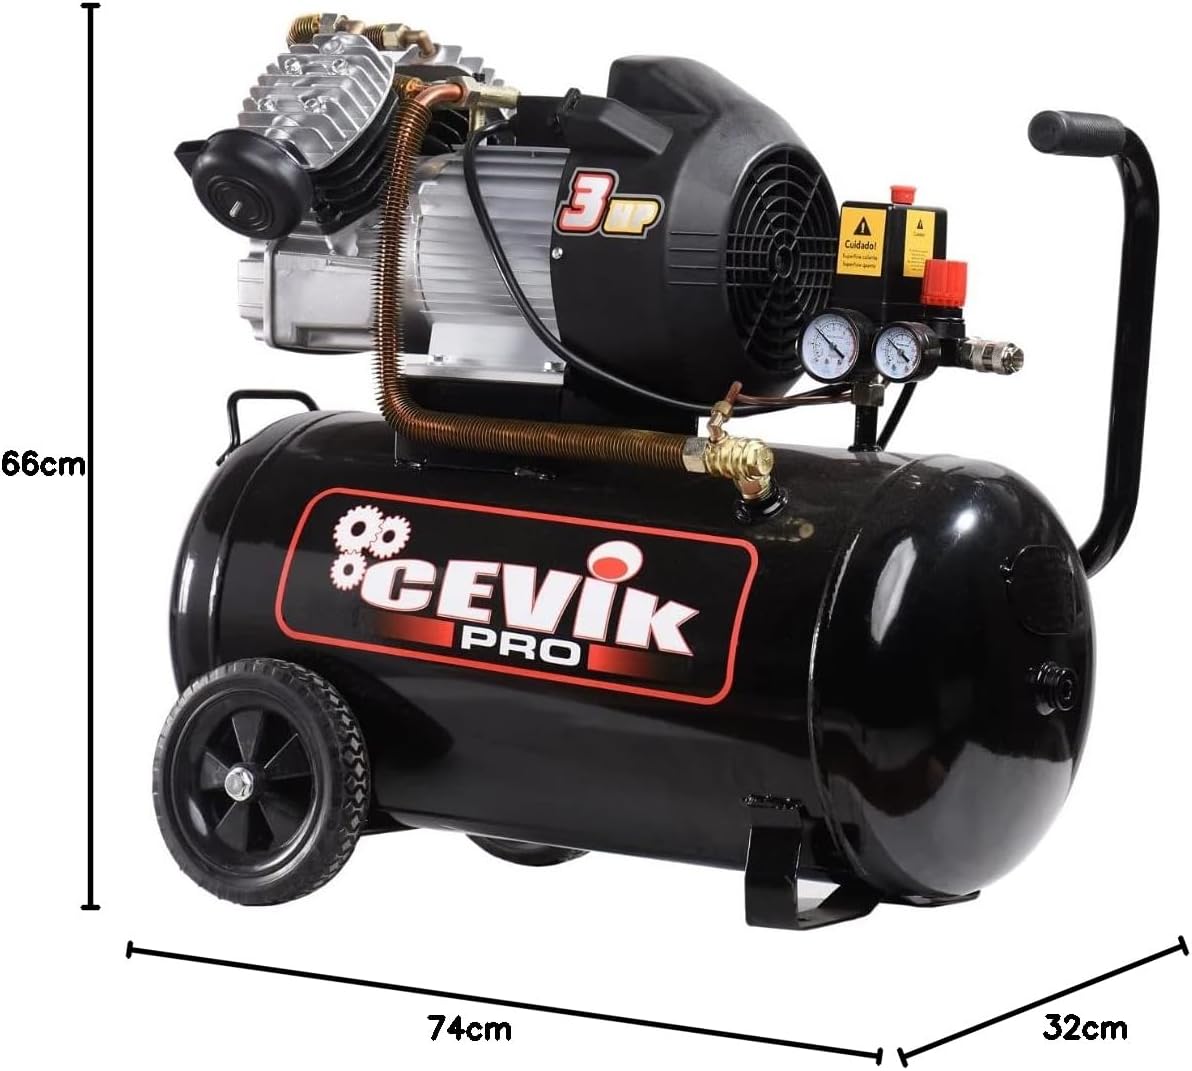
Figure 3.1: Dimensions of the Cevik CA-PRO50VX Air Compressor. The image shows the compressor with its length (74 cm), width (32 cm), and height (66 cm) indicated.
3.3 Electrical Connection
- Connect the compressor to a grounded 230 Volt electrical outlet.
- Ensure the circuit can handle the compressor's 3 HP motor without overloading.
4. Operating Instructions
This section details the steps for operating your air compressor.
4.1 Initial Start-up
- Ensure the drain valve at the bottom of the tank is closed.
- Plug the compressor into a suitable electrical outlet.
- Turn the power switch to the 'ON' position. The compressor will start to build pressure.
- Allow the compressor to reach its maximum pressure and shut off automatically. This indicates the pressure switch is functioning correctly.
4.2 Connecting Air Tools and Adjusting Pressure
- Connect your air hose to the quick-connect coupler on the compressor.
- Attach the desired air tool to the other end of the hose.
- Use the pressure regulator knob (usually red) to adjust the output air pressure to the recommended setting for your tool. The output pressure gauge will display the adjusted pressure.

Figure 4.1: Pressure gauges and regulator. This image shows a close-up of the compressor's control panel, featuring two pressure gauges (tank pressure and regulated output pressure) and a red adjustment knob for the air pressure regulator.

Figure 4.2: Pressure switch and regulator. This image provides a detailed view of the pressure switch, marked with a 'Cuidado!' (Caution!) warning for hot surfaces, and the red pressure regulator knob.
4.3 Operation with Air Tools
- Once the pressure is set, you can begin using your air tool.
- The compressor will cycle on and off automatically to maintain the tank pressure.

Figure 4.3: Compressor in operation. This image shows the Cevik CA-PRO50VX compressor connected via a coiled air hose to a pneumatic nail gun being used on wooden planks.
4.4 Shutting Down
- Turn the power switch to the 'OFF' position.
- Unplug the compressor from the power outlet.
- Bleed any remaining air pressure from the tank by opening the drain valve or by activating an air tool until the pressure gauge reads zero.
5. Maintenance
Regular maintenance ensures the longevity and safe operation of your compressor.
5.1 Draining Condensation
- Daily or After Each Use: Open the drain valve located at the bottom of the air tank to release any accumulated moisture. This prevents rust and corrosion inside the tank.
- Ensure all air pressure is released from the tank before opening the drain valve.
5.2 Air Filter Inspection and Cleaning
- Monthly or as needed: Inspect the air filter for dirt and debris. A clogged filter reduces compressor efficiency.
- Clean the filter element according to the manufacturer's instructions, typically by blowing it with low-pressure compressed air or washing it if it's a washable type. Replace if damaged.
5.3 General Inspection
- Periodically check all nuts, bolts, and fittings for tightness.
- Inspect the power cord for damage. Replace if frayed or cut.
6. Troubleshooting
This section provides solutions to common problems you might encounter.
| Problem | Possible Cause | Solution |
|---|---|---|
| Compressor does not start | No power supply Thermal overload tripped Faulty power switch | Check power connection and outlet Allow motor to cool, then reset Contact qualified service personnel |
| Compressor runs continuously or cycles too frequently | Air leak in system Pressure switch malfunction Clogged air filter | Check hoses, fittings, and drain valve for leaks Contact qualified service personnel Clean or replace air filter |
| Low air pressure at outlet | Regulator set too low Air leak Clogged air filter | Adjust pressure regulator Check for leaks Clean or replace air filter |
| Excessive noise or vibration | Loose components Compressor on uneven surface | Tighten all nuts and bolts Place compressor on a stable, level surface |
7. Specifications
Detailed technical specifications for the Cevik CA-PRO50VX Air Compressor.
| Feature | Specification |
|---|---|
| Model Number | CA-PRO50VX |
| Brand | Cevik |
| Power Source | Corded Electric |
| Voltage | 230 Volts |
| Motor Power | 3 Horsepower |
| Tank Capacity | 50 Liters |
| Maximum Pressure | 8 BAR |
| Air Flow Capacity | 340 Liters per minute |
| Noise Level | 72 Decibels |
| Special Feature | Portable |
| Product Weight | 41 Kilograms |
| Dimensions (L x W x H) | 74 cm x 32 cm x 66 cm |
| Included Components | Air hose, various accessories |
| Recommended Uses | Operation of pneumatic tools, compressed air supply for industrial processes |
| Material Type | Metal |
8. Warranty and Support
For warranty information, technical support, or service inquiries, please contact Cevik directly or refer to the warranty card included with your product. Keep your purchase receipt as proof of purchase.
You can visit the official Cevik store for more information: Cevik Store


