1. Introduction
This user manual provides essential information for the safe and effective operation, setup, maintenance, and troubleshooting of your Makita AC001 Compact Air Compressor. Please read this manual thoroughly before using the product to ensure proper function and to prevent injury or damage.
The Makita AC001 is a lightweight and portable air compressor designed for various applications requiring a reliable air supply. Its compact design and efficient performance make it suitable for both professional and home use, particularly for tasks such as finish nailing, trim work, and tire inflation.
2. Safety Information
WARNING: Always observe basic safety precautions to reduce the risk of fire, electric shock, and personal injury when operating this air compressor.
- Read All Instructions: Familiarize yourself with the compressor's controls and proper usage.
- Electrical Safety: Ensure the power source matches the compressor's voltage. Do not operate in wet conditions.
- Pressure Safety: Never exceed the maximum operating pressure of any air tool or accessory. Always wear eye protection.
- Maintenance: Regularly drain moisture from the tank to prevent corrosion and tank rupture.
- Ventilation: Operate the compressor in a well-ventilated area.
- Moving Parts: Keep hands, hair, and loose clothing away from moving parts.
Refer to the warning labels on the compressor for specific safety instructions.

Figure 1: Front view of the Makita AC001 Compact Air Compressor, showing warning labels.
3. Product Features and Components
The Makita AC001 Compact Air Compressor is engineered for durability and ease of use. Key features include:
- Powerful 1/6 maximum horsepower induction motor providing up to 125 PSI.
- Lightweight design (23.1 lbs.) for increased job site portability.
- Low noise level for operator comfort, suitable for indoor use.
- Low AMP draw to reduce tripped breakers at start-up.
- Lever-handle ball valve tank drain for easier maintenance.
- Roll cage construction for extra protection of pump and motor assembly.
Familiarize yourself with the following components:

Figure 2: Labeled diagram of the Makita AC001, highlighting key components.
- Soft Rubber Carrying Handle: Provides a comfortable grip for transport.
- Pressure Regulator Dial: Used to adjust the output air pressure.
- Quick Connect Outlet: For fast and easy connection of air hoses and tools.
- Tank PSI Gauge: Displays the pressure inside the air tank.
- Regulator PSI Gauge: Displays the regulated output pressure.
- 1 Gallon (4.0 L) Tank: Stores compressed air.
- Tank Drain Valve: Used to release moisture and air from the tank.
- Roll Cage Design: Protects the internal components from damage.

Figure 3: Close-up of the tank and regulator pressure gauges.
4. Setup
4.1 Initial Break-in Procedure
Before initial use, it is recommended to perform a break-in procedure to properly seat the piston and ensure optimal performance:
- Ensure the tank drain valve is fully open.
- Plug the compressor into a suitable power outlet.
- Turn the compressor ON.
- Allow the compressor to run with the drain valve open for approximately 20 minutes. This allows the internal components to lubricate and seat correctly without building pressure.
- After 20 minutes, turn the compressor OFF and unplug it.
- Close the tank drain valve. The compressor is now ready for normal operation.
4.2 Placement and Electrical Connection
- Place the compressor on a stable, level surface in a well-ventilated area.
- Ensure the power switch is in the OFF position before plugging the unit into a standard 120V AC outlet.
- Avoid using excessively long extension cords, as this can lead to voltage drop and affect compressor performance. If an extension cord is necessary, use a heavy-duty, grounded cord rated for outdoor use.
5. Operating Instructions
5.1 Connecting Air Tools
To connect an air tool:
- Ensure the compressor is OFF and unplugged.
- Attach your air hose to the quick connect outlet.
- Connect your air tool to the other end of the hose.

Figure 4: Connecting an air hose to the quick connect outlet.
5.2 Powering On and Adjusting Pressure
- Plug in the compressor and turn the power switch ON. The compressor will begin to build pressure.
- Monitor the Tank PSI gauge to see the internal tank pressure.
- Use the Pressure Regulator Dial to set the desired output pressure for your air tool. Turn the dial clockwise to increase pressure and counter-clockwise to decrease it.
- Monitor the Regulator PSI gauge to confirm the set output pressure.

Figure 5: Adjusting the pressure regulator dial.
5.3 Using the Compressor
Once the desired pressure is set, you can operate your air tool. The compressor will cycle on and off automatically to maintain pressure in the tank.

Figure 6: The compressor connected to a finish nailer.

Figure 7: Worker using the compressor for finish nailing.
6. Maintenance
6.1 Draining the Air Tank
Moisture accumulates in the air tank during operation. To prevent corrosion and ensure safe operation, drain the tank daily or after each use:
- Turn the compressor OFF and unplug it.
- Place a suitable container under the tank drain valve.
- Slowly open the tank drain valve to release air and moisture.
- Once all air and moisture have been expelled, close the drain valve.

Figure 8: Operating the tank drain valve.
6.2 General Cleaning
Keep the compressor clean and free of dust and debris. Use a dry cloth to wipe down the exterior. Do not use solvents or harsh chemicals.
7. Troubleshooting
If you encounter issues with your Makita AC001, refer to the following common problems and solutions:
- Compressor not supplying enough air: This can occur due to prolonged excessive air usage or if the compressor is not adequately sized for the air requirement of the accessory. Check the accessory's air requirement (SCFM or pressure) and ensure it does not exceed the compressor's capacity (0.58 CFM at 40 PSI, 0.45 CFM at 90 PSI). Consider reducing air usage or using a larger compressor for demanding tasks.
- Air leaks: Inspect all fittings, hoses, and connections for leaks. Tighten any loose connections. A soapy water solution can help identify small leaks.
- Compressor runs continuously or frequently: This may indicate an air leak in the system or a faulty pressure switch. Check for leaks first.
- Compressor does not start: Ensure the power cord is securely plugged in and the power switch is ON. Check for tripped circuit breakers.
For issues not covered here, contact Makita customer support.
8. Specifications
| Specification | Value |
|---|---|
| Brand | Makita |
| Model Name | AC001 |
| Voltage | 12 Volts |
| Power Source | Corded Electric |
| Maximum Power | 0.17 Horsepower |
| Tank Volume | 1.2 Gallons |
| Air Flow Capacity | 0.58 CFM at 40 PSI, 0.45 CFM at 90 PSI |
| Noise Level | 79 dB |
| Item Weight | 23.1 Pounds |
| Product Dimensions | 14"L x 15"W x 15"H |
| Included Components | Makita - Compact Air Compressor (AC001) |
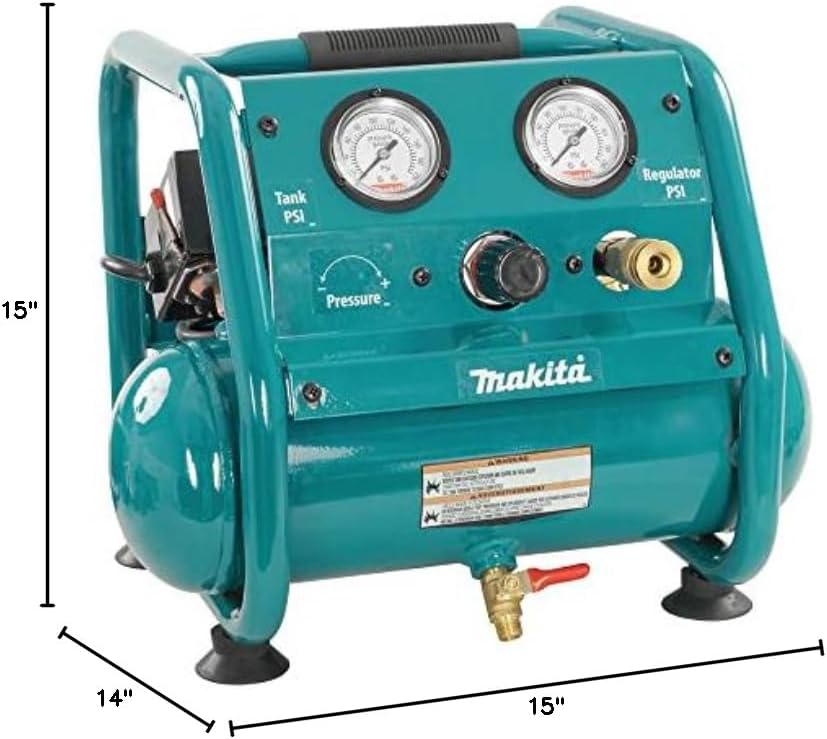
Figure 9: Dimensions of the Makita AC001 Compact Air Compressor.
9. Warranty and Support
The Makita AC001 Compact Air Compressor comes with a 1-Year Manufacturer Warranty. For complete details regarding warranty coverage, terms, and conditions, please refer to the official owner's manual included with your product or visit the official Makita website.
For technical assistance, parts, or warranty claims, please contact Makita customer support directly. Keep your purchase receipt as proof of purchase for warranty purposes.


