1. Introduction
This manual provides detailed instructions for the installation, operation, and maintenance of your CISA Smart Plus 2 Door Closer. Please read these instructions carefully before installation and use to ensure proper function and longevity of the product.
The CISA Smart Plus 2 is a high-quality door closer designed for various door materials, offering adjustable closing force and speed, along with a hold-open function for convenience.
Key Features:
- Suitable for installation on doors of any material.
- Adjustable closing force EN 2-4, suitable for doors up to 80 kg and 1100 mm wide.
- Independent valves for regulating closing speed and final snap force.
- Stable hold-open position thanks to the adjustable steel arm.
- Rounded ABS casing design.
2. Safety Information
Always observe the following safety precautions during installation and operation:
- Ensure the door closer is installed by a qualified professional if you are unsure about the process.
- Use appropriate tools and personal protective equipment (PPE) during installation.
- Do not attempt to modify the door closer or its components.
- Keep children and pets away from the door during installation and adjustment.
- Verify that all screws and fasteners are securely tightened after installation.
3. Included Components
Before beginning installation, ensure all components are present in the package:
- CISA Smart Plus 2 Door Closer unit
- Arm with hold-open function
- Mounting screws
- Drilling template
- Installation instructions (this manual)

Figure 3.1: CISA Smart Plus 2 Door Closer with its main components.
4. Setup and Installation
The CISA Smart Plus 2 door closer can be installed in various configurations (standard, parallel arm, top jamb). Refer to the drilling template for precise hole placement based on your chosen installation type and door swing.
Installation Steps:
- Prepare the Door and Frame: Determine the mounting position on the door or frame. Use the provided drilling template to mark the screw holes accurately.
- Drill Pilot Holes: Drill pilot holes at the marked positions. Ensure the drill bit size is appropriate for the mounting screws to prevent stripping or cracking.
- Mount the Door Closer Body: Secure the main body of the door closer to the door or frame using the provided mounting screws. Ensure it is firmly attached and level.
- Attach the Arm Assembly:

Figure 4.1: Detail of the adjustable steel arm with hold-open.
Attach the main arm to the door closer spindle. Then, attach the forearm to the door frame (for standard installation) or to the door (for parallel arm installation). Ensure the arm is correctly oriented according to the installation diagram in the drilling template.
- Connect the Arm Sections: Connect the two sections of the arm using the provided fasteners. Adjust the length of the arm if necessary to ensure it is perpendicular to the door frame when the door is closed.
- Initial Adjustment: Perform initial adjustments for closing speed and final snap as described in the "Operating Instructions" section.
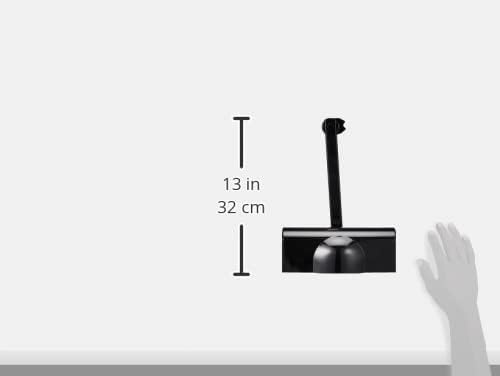
Figure 4.2: Approximate dimensions of the CISA Smart Plus 2 Door Closer for installation planning.
5. Operating Instructions and Adjustments
The CISA Smart Plus 2 door closer features independent valves for precise control over door closing behavior and a hold-open function.
Adjusting Closing Speed and Final Snap:

Figure 5.1: Location of the adjustment valves on the door closer body.
- Valve 1 (Closing Speed): This valve controls the main closing speed of the door from its fully open position until approximately 15 degrees from closed. Turn clockwise to decrease speed (slower closing) and counter-clockwise to increase speed (faster closing). Make small adjustments and test the door's movement.
- Valve 2 (Final Snap/Latching Speed): This valve controls the speed of the door for the last 10-15 degrees of closing, providing a "snap" to ensure the latch engages. Turn clockwise to decrease the final snap force and counter-clockwise to increase it. Adjust this to ensure the door closes securely without slamming.
Adjusting the Hold-Open Function:
The adjustable steel arm allows the door to be held open at a desired position. This is typically adjusted using a screw or mechanism on the arm itself. Refer to the specific diagram on your drilling template for the exact adjustment point.
- To engage the hold-open, open the door to the desired angle.
- Tighten the hold-open mechanism on the arm to secure the door in that position.
- To release, simply push the door further open or pull it slightly closed, depending on the mechanism type.
- If the hold-open function becomes weak or unreliable, check the tightness of the adjustment screw on the arm.
6. Maintenance
Regular maintenance ensures the optimal performance and longevity of your CISA Smart Plus 2 Door Closer.
- Cleaning: Periodically wipe the door closer body and arm with a soft, damp cloth to remove dust and dirt. Avoid abrasive cleaners.
- Lubrication: The internal mechanism is factory-lubricated and generally does not require additional lubrication. If the arm joints become stiff, a small amount of silicone-based lubricant can be applied to the pivot points.
- Inspection: Annually inspect all mounting screws and fasteners for tightness. Re-tighten if necessary. Check the arm for any signs of wear or damage.
- Functionality Check: Periodically test the closing speed, final snap, and hold-open function to ensure they are operating correctly and adjust if needed.
7. Troubleshooting
Here are some common issues and their potential solutions:
| Problem | Possible Cause | Solution |
|---|---|---|
| Door closes too fast or too slow. | Incorrect closing speed adjustment (Valve 1). | Adjust Valve 1 (Closing Speed) as described in Section 5. Turn clockwise for slower, counter-clockwise for faster. |
| Door slams shut or doesn't latch properly. | Incorrect final snap adjustment (Valve 2). | Adjust Valve 2 (Final Snap) as described in Section 5. Turn clockwise to reduce snap, counter-clockwise to increase. |
| Hold-open function is weak or not working. | Hold-open mechanism loose or worn. | Check and tighten the adjustment screw on the hold-open arm. If worn, consider replacing the arm. |
| Door closer leaks oil. | Internal seal damage. | This indicates a fault. Contact customer support for assistance or replacement. Do not attempt to repair internally. |
| Door closer makes excessive noise. | Loose mounting, worn arm, or internal issue. | Check all mounting screws for tightness. Inspect the arm for wear. If noise persists, contact customer support. |
8. Specifications
| Brand: | CISA |
| Model Number: | 1C141603044 |
| Material: | Aluminum, Steel Alloy |
| Color: | Black |
| External Finish: | Aluminum |
| Product Dimensions (LxWxH): | 28.7L x 10.9W x 8.9H cm |
| Closing Force: | Adjustable EN 2-4 |
| Max Door Weight: | 80 kg |
| Max Door Width: | 1100 mm |
| Installation Method: | Surface Mount |
| Country of Origin: | China |
9. Warranty Information
The CISA Smart Plus 2 Door Closer comes with a 12-month warranty from the date of purchase. This warranty covers manufacturing defects and material faults under normal use and service conditions.
The warranty does not cover damage resulting from improper installation, misuse, abuse, unauthorized modifications, or normal wear and tear. Please retain your proof of purchase for warranty claims.
10. Customer Support
If you encounter any issues not covered in this manual or require further assistance, please contact CISA customer support. For the most up-to-date contact information, please visit the official CISA website or refer to the packaging.
When contacting support, please have your product model number (1C141603044) and proof of purchase readily available.