1. Introduction
This manual provides essential information for the safe installation, operation, and maintenance of your XtremepowerUS 1.75 HP Variable Speed Swimming Pool Pump. Please read all instructions carefully before installation and use to ensure proper function and to prevent injury or damage. Keep this manual for future reference.
1.1 Safety Information
- Always disconnect power to the pump before performing any service or maintenance.
- Installation must be performed by a qualified professional and comply with all local and national electrical and plumbing codes.
- Do not operate the pump if it is damaged or malfunctioning.
- Ensure proper grounding to prevent electrical shock.
2. Product Overview
The XtremepowerUS 1.75 HP Variable Speed Swimming Pool Pump is designed for efficient water circulation in in-ground pools and spas. Its variable speed motor allows for customized operation, optimizing energy consumption and performance for various tasks such as filtering, cleaning, heating, and operating spa jets or waterfalls. The pump body is constructed from commercial-grade reinforced thermoplastic for durability and corrosion resistance.
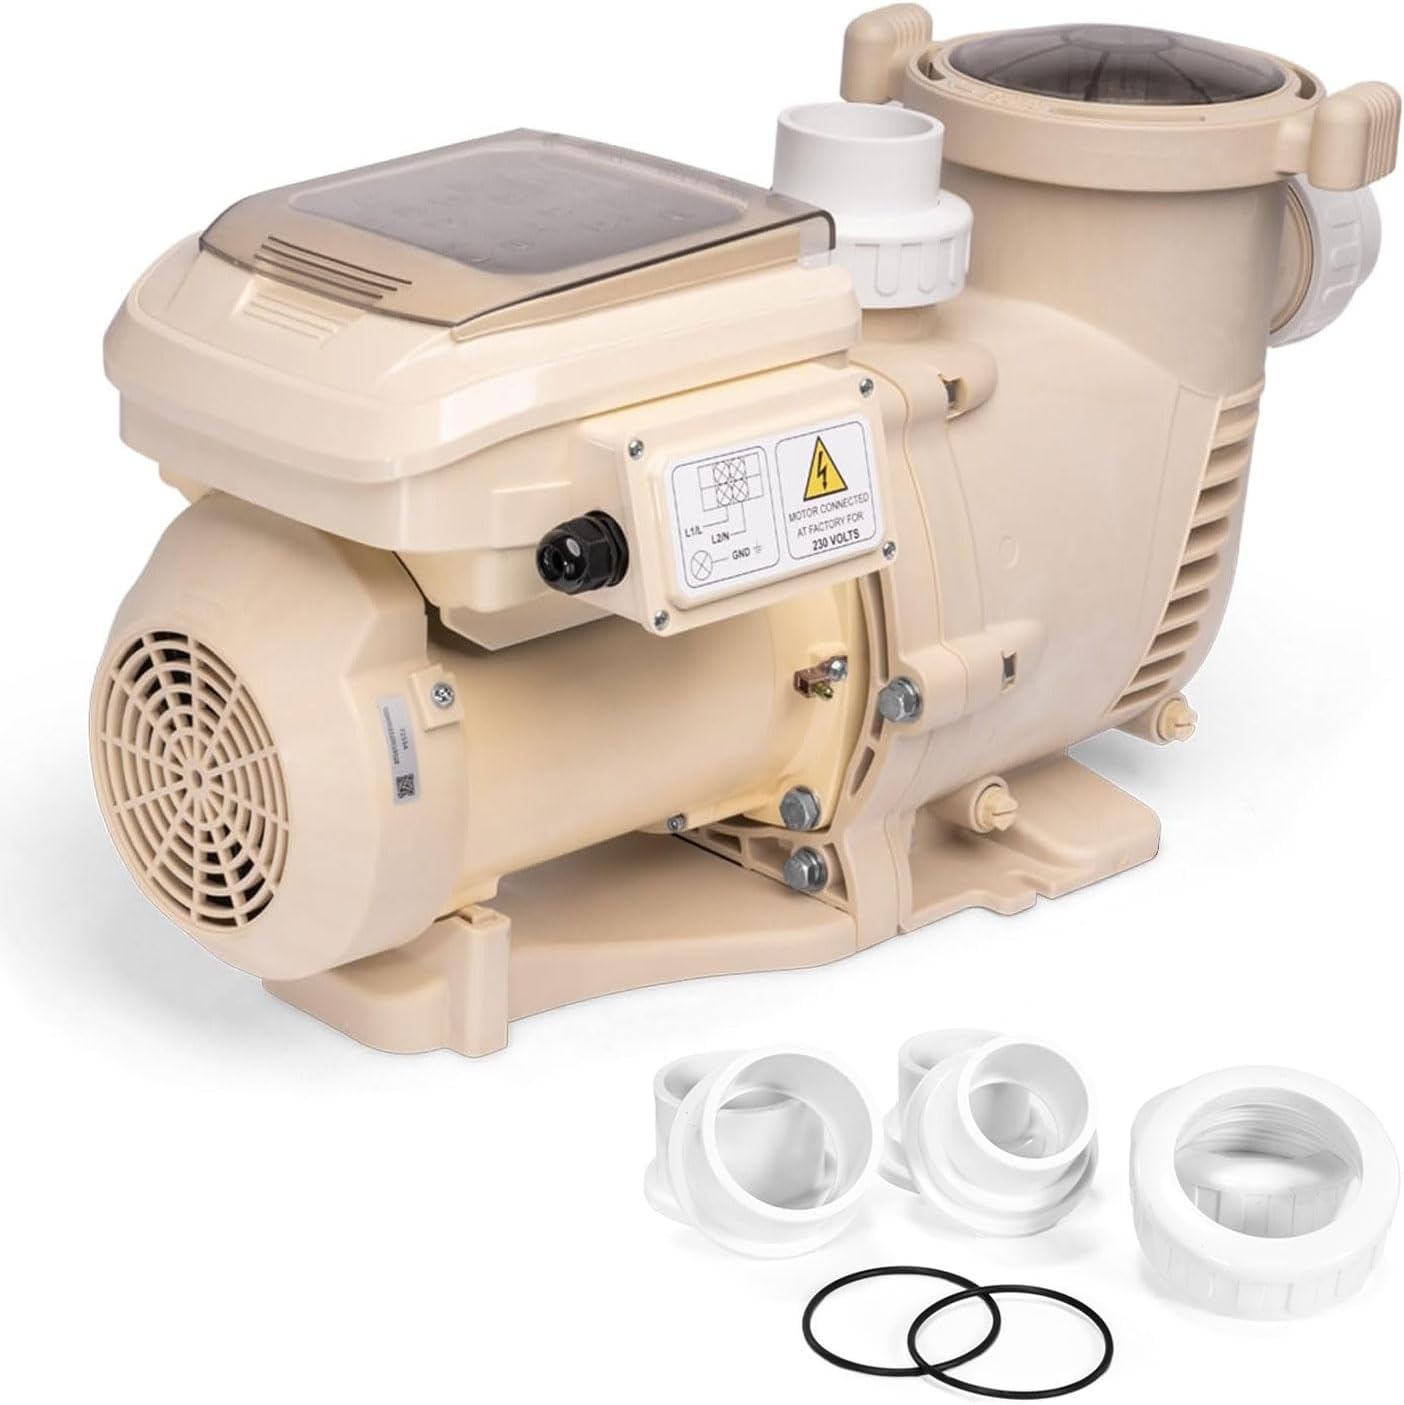
Figure 2.1: XtremepowerUS 1.75 HP Variable Speed Swimming Pool Pump with included fittings.
3. Setup and Installation
3.1 Site Selection
- Install the pump as close to the pool as possible to minimize friction loss from plumbing.
- Ensure the location is well-ventilated and protected from excessive moisture and direct sunlight.
- Provide adequate space around the pump for maintenance and service.
3.2 Plumbing Connections
The pump is designed with 2-inch inlet and outlet ports. It includes additional 1.5-inch adapters for flexible installation with various plumbing sizes. Use appropriate PVC fittings and primer/cement for secure, leak-free connections. Ensure all connections are tight to prevent air leaks, which can affect pump performance.

Figure 3.1: Flexible installation options with 2-inch fittings and 1.5-inch adapters.
3.3 Electrical Connections
This pump operates on 230V, 60Hz power. Electrical wiring should be performed by a licensed electrician in accordance with all local and national electrical codes. Ensure the power supply is properly grounded and protected by a Ground Fault Circuit Interrupter (GFCI). Connect the pump to a dedicated circuit if possible. The pump typically comes pre-wired for a specific voltage; verify the wiring configuration matches your power supply before connecting.
3.4 Priming the Pump
Before starting the pump for the first time, or after draining the system, the pump must be primed. Open the lid of the strainer basket and fill the basket with water until the water level is above the pump's inlet. Replace the lid securely. Turn on the pump and allow it to run until a steady stream of water flows from the return jets. If the pump does not prime within a few minutes, turn it off, recheck for air leaks, and repeat the priming process.
4. Operating Instructions
The pump features an easy-to-use programmable touch pad interface for customizing operation.
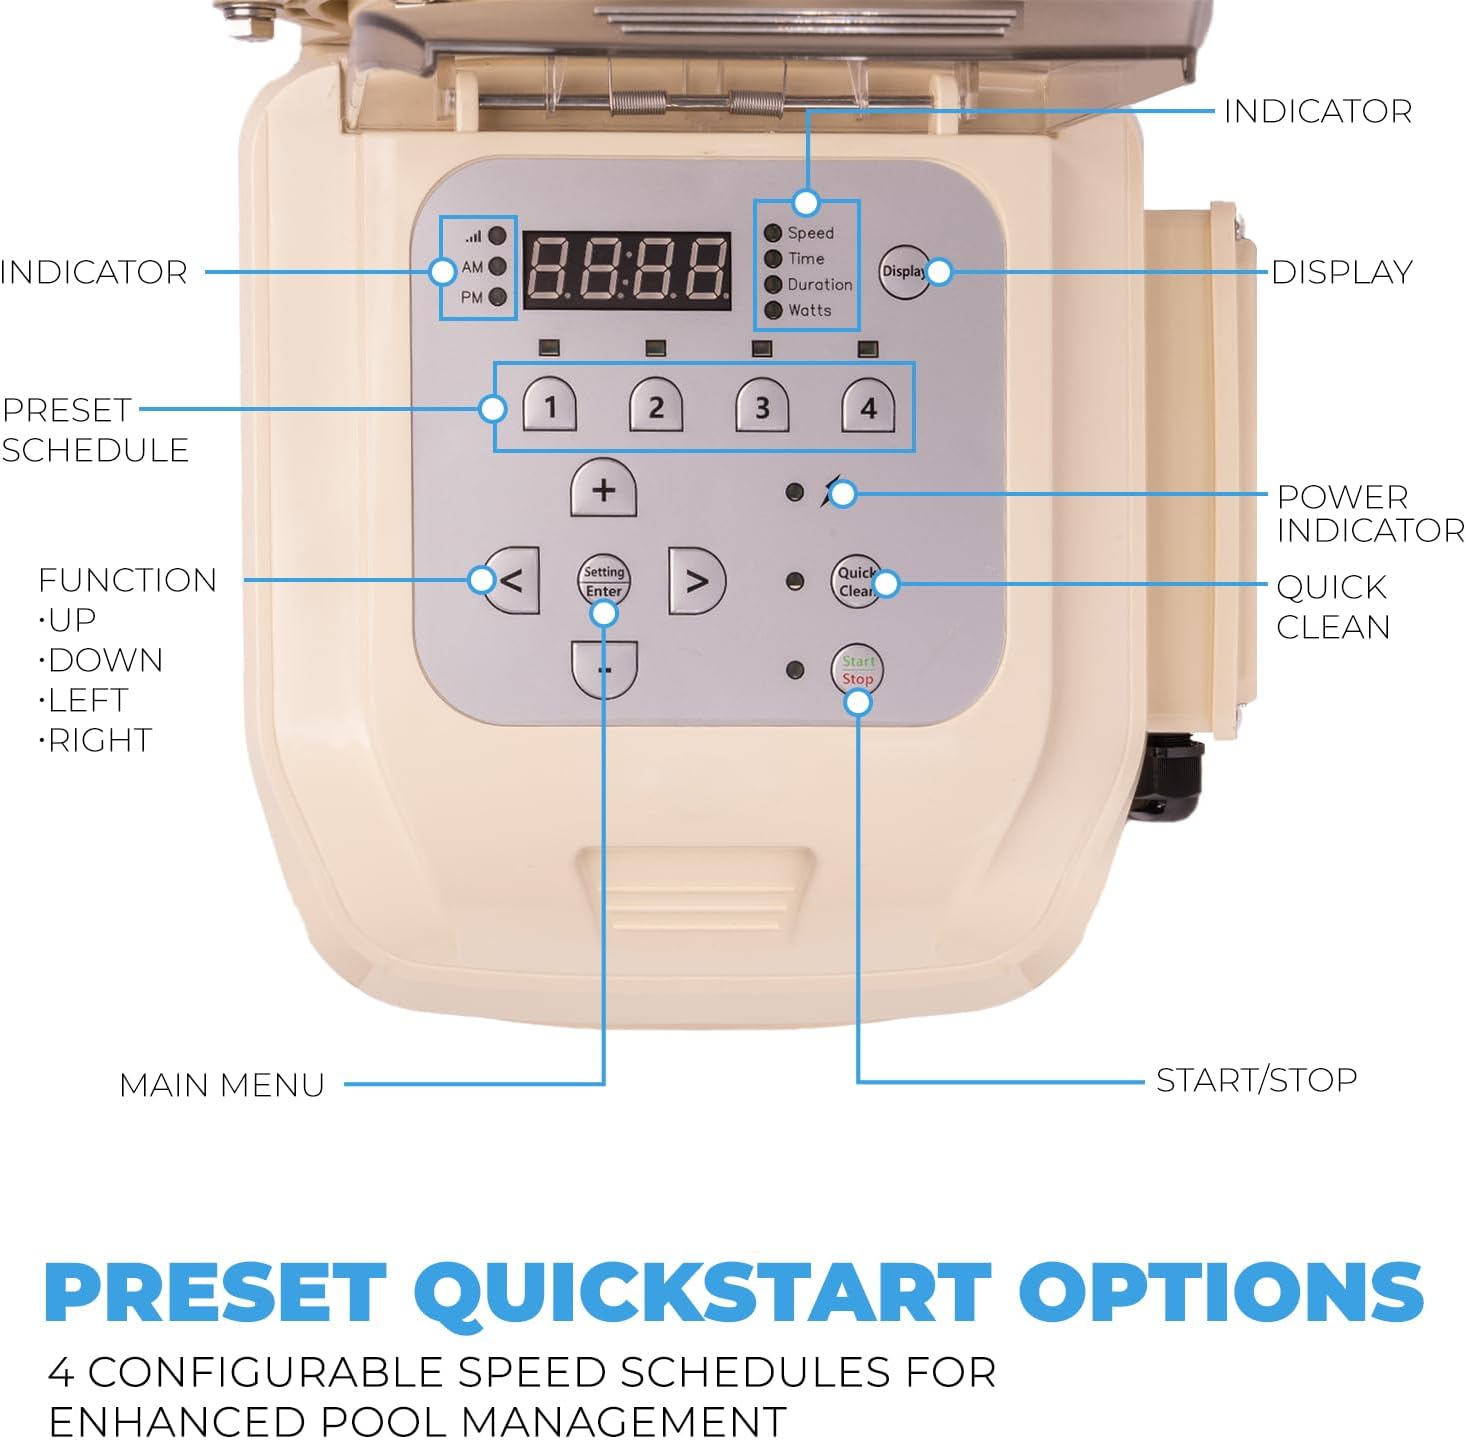
Figure 4.1: Control Panel Layout and Functions.
4.1 Control Panel Functions
- Display: Shows current speed, time, duration, or watts.
- Indicator Lights: Show AM/PM, Speed, Time, Duration, Watts.
- Preset Schedule Buttons (1-4): Configure and select up to four different speed schedules.
- Function Buttons (<, >, Up, Down, Setting/Enter): Navigate menus and adjust settings.
- Power Indicator: Indicates pump power status.
- Quick Clean: Initiates a quick cleaning cycle.
- Start/Stop: Turns the pump on or off.
4.2 Programming Speed Schedules
The pump offers 4 configurable speed schedules for enhanced pool management. These can be customized for specific tasks like filtering, cleaning, or operating water features. Refer to the control panel diagram (Figure 4.1) for button locations.
- Press the 'Setting/Enter' button to enter programming mode.
- Use the 'Up' or 'Down' arrows to select a preset schedule (1-4) you wish to configure.
- Press 'Setting/Enter' again to adjust the speed (RPM) and duration (hours) for the selected schedule.
- Use the arrow buttons to change values and 'Setting/Enter' to confirm.
- Repeat for all desired schedules.
Example Pre-set Speeds:
- 2,850 RPM for 2 Hours
- 1,730 RPM for 10 Hours
- 2,300 RPM for 2 Hours
- 1,150 RPM for 8 Hours

Figure 4.2: Customizable 4-Speed Operation.
5. Maintenance
Regular maintenance ensures the longevity and efficient operation of your pool pump.
5.1 Strainer Basket Cleaning
The pump's strainer basket collects debris and should be cleaned regularly to maintain optimal flow and prevent damage to the pump. The frequency depends on pool usage and debris levels.
- Turn off the pump and disconnect power.
- Rotate the clear lid counter-clockwise to remove it.
- Remove the basket and empty any debris.
- Rinse the basket thoroughly with water.
- Inspect the lid O-ring for cracks or wear; replace if necessary.
- Place the basket back into the pump and secure the lid by rotating clockwise until tight.

Figure 5.1: Accessing the strainer basket for cleaning.
5.2 Seal and O-Ring Inspection
Periodically inspect all seals and O-rings for signs of wear, cracking, or damage. Worn seals can lead to air leaks, reducing pump efficiency and potentially causing motor damage. Replace any damaged components promptly.
5.3 Winterization
In regions subject to freezing temperatures, the pump must be properly winterized to prevent damage. Consult a pool professional for specific winterization procedures for your pool system.
6. Troubleshooting
This section addresses common issues you might encounter with your pool pump.
| Problem | Possible Cause | Solution |
|---|---|---|
| Pump does not start | No power, tripped breaker, motor issue | Check power supply, reset breaker, consult electrician if motor is faulty. |
| Low water flow | Clogged strainer basket, air leak, clogged impeller, closed valves | Clean basket, check plumbing for leaks, inspect impeller, open all valves. |
| Pump loses prime | Air leak in suction line, low water level, clogged basket | Check and seal all suction side connections, ensure adequate pool water level, clean strainer basket. |
| Unusual noise from pump | Cavitation (air in pump), worn bearings, debris in impeller | Check for air leaks, ensure proper water flow, inspect impeller for debris. Worn bearings may require professional service. |
| Impeller damage | Debris passing through pump, manufacturing defect | Inspect impeller for damage. Replacement may be necessary. Ensure proper filtration to prevent debris entry. |
| Inlet/Outlet thread size mismatch | Internal threads may be 1.5" despite 2" external ports | Use appropriate adapters (e.g., 1.5" male threaded adapter) for plumbing connections. |
7. Specifications
Detailed technical specifications for the XtremepowerUS 1.75 HP Variable Speed Swimming Pool Pump.
| Feature | Specification |
|---|---|
| Model Number | 75408 |
| Horsepower | 1.75 HP |
| Input Voltage | 230 Volts, 60 Hz |
| Amperage | 6.47 Amps |
| Maximum Flow Rate | 6660 GPH (Gallons Per Hour) / 73.75 GPM (Gallons Per Minute) |
| Minimum Flow Rate | 1870 GPH |
| Inlet/Outlet Size | 2 inches (with included 1.5 inch adapters) |
| Product Dimensions (L x W x H) | 25.5" x 11.3" x 14" |
| Item Weight | 43.5 Pounds |
| Material | Metal, PPGF30 (Reinforced Thermoplastic) |
| UPC | 840166545591 |
8. Warranty and Support
For warranty information, please refer to the warranty card included with your product or contact XtremepowerUS customer support directly. Warranty periods and terms may vary. Keep your proof of purchase for warranty claims.
8.1 Customer Support
If you have any questions regarding the installation, operation, or maintenance of your XtremepowerUS pool pump, please contact the manufacturer's customer support. Contact details can typically be found on the product packaging or the official XtremepowerUS website.


