1. Introduction
Thank you for choosing the Lominie 400W Hydroponic LED Grow Light System. This manual provides essential information for the safe and efficient operation of your new grow lights and master controller. Please read this manual thoroughly before installation and use, and retain it for future reference.
This system includes two Lumini 450R1 grow lights and one Master Controller, designed to provide optimal lighting for various plant growth stages, including vegetative, flowering, and UVB cycles.
2. Safety Information
WARNING: To prevent fire, electric shock, or injury, always follow these safety precautions.
- Always disconnect power before installation, maintenance, or cleaning.
- Do not operate the grow light in wet or damp conditions. Ensure the environment is dry.
- Do not look directly into the LED lights when they are operating, as this may cause eye damage.
- Ensure proper ventilation around the grow lights to prevent overheating.
- Do not modify the product in any way. Unauthorized modifications may void the warranty and pose safety risks.
- Keep out of reach of children and pets.
- In case of fan malfunction, the lights will dim by 20% as a safety measure. Address the fan issue promptly.
- If individual LEDs burn out due to a power surge, the remaining LEDs will continue to function.
3. Package Contents
Verify that all items listed below are present in your package:
- 2 x Lumini 450R1 LED Grow Lights
- 1 x Lumini Smart Master Controller
- 2 x Power Cords
- 2 x Hanging Kits (chains/ropes)
- 2 x Data Cables (for connecting lights to controller)
- 1 x User Manual (this document)

Image 1: Contents of the Lominie 400W Hydroponic LED Grow Light System package, showing two grow light units and the smart controller.
4. Product Overview
4.1 Lumini 450R1 LED Grow Light
Each Lumini 450R1 grow light features 8 Super High Flux 5W LED diodes and 154 3W LEDs, providing a full spectrum light output comparable to a 1000W MH or HPS bulb while consuming significantly less power. It includes a power switch, data input, and data output ports for connection to the Master Controller and other lights.
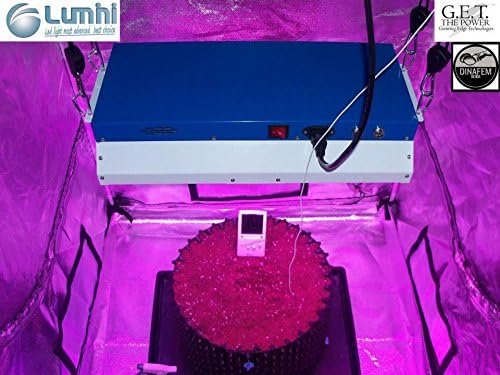
Image 2: A Lumini 450R1 LED Grow Light suspended inside a grow tent, illuminating a plant. The light unit is blue and white, with cables connected.
4.2 Lumini Smart Master Controller
The Master Controller allows centralized control of up to 10 Lumini grow lights. It features a built-in timer and four saved modes (Vegetative, Flowering, UVB, and Custom) for easy adjustment of color temperature and timing. The controller has a digital display and five control buttons: M (Mode), S (Set), Mo (Move), E (Enter), and a power button.

Image 3: Close-up view of the Lumini Smart Controller. It is a white rectangular device with a blue digital display showing "AUTO SETUP CH1" and five circular buttons labeled M, S, Mo, E.
5. Setup
- Unpacking: Carefully remove all components from the packaging. Inspect for any damage.
- Mounting the Grow Lights:
- Attach the provided hanging kits to the designated points on each Lumini 450R1 grow light.
- Suspend the grow lights securely above your plants. Ensure adequate clearance for heat dissipation. The recommended coverage area is 4.5'x5.5' during vegetative growth and 3.5'x4.5' during flowering.
- Connecting the Master Controller:
- Connect one end of a data cable to the "DATA IN" port of the first grow light.
- Connect the other end of this data cable to the Master Controller.
- For the second grow light, connect a data cable from the "DATA OUT" port of the first grow light to the "DATA IN" port of the second grow light. This creates a daisy-chain connection.
- The Master Controller can manage up to 10 lights in this configuration.
- Power Connection:
- Ensure the power switches on both grow lights are in the "OFF" position.
- Connect the power cords to each grow light.
- Plug the power cords into a grounded electrical outlet.
6. Operating Instructions
6.1 Initial Power On
- Turn on the power switches on both Lumini 450R1 grow lights.
- Press the power button on the Master Controller to turn it on. The display will illuminate.
6.2 Using the Master Controller
The Master Controller allows you to select pre-set modes or customize your own lighting schedule and spectrum.
- Mode (M) Button: Cycles through available modes (Vegetative, Flowering, UVB, Custom).
- Set (S) Button: Enters the setting menu for the selected mode.
- Move (Mo) Button: Navigates through options within the setting menu.
- Enter (E) Button: Confirms selections and saves settings.
6.2.1 Selecting Pre-set Modes
- Press the M button to cycle through "Vegetative", "Flowering", and "UVB" modes.
- Once the desired mode is displayed, press the E button to activate it. The lights will adjust to the pre-programmed spectrum and timer settings for that stage.
6.2.2 Creating a Custom Mode
- Press the M button until "Custom" mode is displayed.
- Press the S button to enter the custom settings menu.
- Use the Mo button to navigate through parameters such as light intensity, spectrum ratios (if adjustable), and timer settings (ON/OFF duration).
- Use the E button to confirm each setting.
- After setting all parameters, press E again to save and activate your custom mode.
6.2.3 Timer Function
The Master Controller has a built-in timer. When a mode (pre-set or custom) is selected, its associated timer settings will be applied. You can adjust the timer settings within the "Set" menu for each mode.
7. Maintenance
- Cleaning: Ensure the lights are off and unplugged before cleaning. Use a soft, dry cloth to wipe dust from the light housing and LEDs. Do not use liquid cleaners directly on the LEDs or electrical components.
- Fan Inspection: Periodically check the cooling fans on the grow lights for dust buildup. Clean gently with compressed air if necessary. A malfunctioning fan will cause the light to dim by 20% as a safety indicator.
- Modular Design: The Lumini system features a modular design, allowing for easy replacement of parts. If any component breaks, contact customer support for replacement parts. These parts are designed to be replaceable with a screwdriver.
8. Troubleshooting
| Problem | Possible Cause | Solution |
|---|---|---|
| Light does not turn on. | No power, loose connection, power switch off. | Check power cord connection, ensure outlet has power, verify light's power switch is ON. |
| Lights dim by 20%. | Cooling fan malfunction. | Inspect cooling fan for obstructions or damage. Clean if necessary. Contact support if issue persists. |
| Some LEDs are not working. | Individual LED burnout (e.g., due to power surge). | The system is designed for remaining LEDs to function. For full repair, contact customer support for modular replacement parts. |
| Master Controller not responding. | Loose data cable, controller power off. | Ensure data cables are securely connected. Press the controller's power button. |
| Lights not changing modes. | Incorrect controller settings, data cable issue. | Review "Operating Instructions" for correct mode selection. Check data cable connections between controller and lights. |
9. Specifications
| Feature | Detail |
|---|---|
| Model Number | 450R1 (per light unit) |
| Light Source Type | LED (8x 5W Super High Flux, 154x 3W LEDs) |
| Equivalent Output | 1000W MH/HPS |
| Coverage Area (Vegetative) | 4.5' x 5.5' |
| Coverage Area (Flowering) | 3.5' x 4.5' |
| Product Dimensions (per light) | 19 x 11 x 4.3 inches |
| Item Weight (per light) | 11 pounds |
| Master Controller Capacity | Controls up to 10 lights |
| Special Features | Full Cycle (Veg, Flower, UVB), Built-in Timer, Modular Design, Safety Dimming (fan issue), Redundant LED Functionality |
10. Warranty and Support
Lominie products are designed for durability and ease of maintenance. The modular design allows for easy replacement of components. If you encounter any issues or require replacement parts, please contact Lominie customer support. Provide your product model number (450R1) and a description of the issue for prompt assistance.
For support, please visit the official Lominie store or contact their customer service channels. (Specific contact details are not provided in the product data.)
Note: Unauthorized modifications to the product will void the warranty.