1. Introduction
The OHM Kaise KG-75 Digital Illuminometer is a precision instrument designed for measuring illuminance (light intensity) in various environments. It features a wide measurement range, a clear digital display with backlight, and convenient functions such as maximum/minimum value recording and display hold. This manual provides essential information for the safe and effective operation, setup, and maintenance of your device.
2. Safety Information
- Do not attempt to open or modify the device. Internal components may be sensitive.
- Do not expose the device to extreme temperatures, humidity, or direct sunlight for prolonged periods.
- Avoid dropping the device or subjecting it to strong impacts.
- Remove the battery if the device will not be used for an extended period to prevent leakage.
- Dispose of batteries according to local regulations.
3. Package Contents
Please check the package for the following items:
- 1 x OHM Kaise KG-75 Digital Illuminometer
- 1 x 9V 6F22 Battery (pre-installed)
- 1 x User Manual (this document)
4. Product Overview
The KG-75 features a compact design with a non-slip rubber grip for comfortable handling. The large LCD provides clear readings, and the silicone photo diode sensor ensures accurate light measurement.
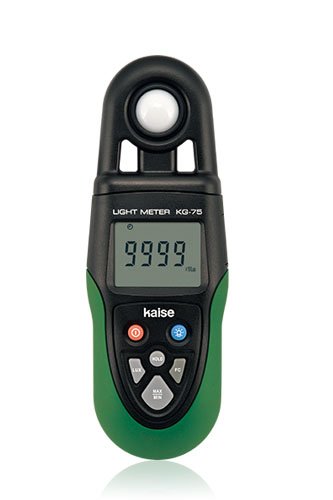
Figure 1: Front view of the OHM Kaise KG-75 Digital Illuminometer, showing the display, control buttons, and sensor area. The device has a dark casing with a clear LCD screen.
Key Components:
- LCD Display: Shows illuminance readings, units, and function indicators.
- Sensor: Silicone photo diode for light detection.
- Control Buttons: For power, backlight, mode selection, and data hold.
- Battery Compartment: Located at the rear for 9V 6F22 battery.
- Non-slip Rubber Grip: Enhances handling and durability.
5. Setup
5.1 Battery Installation
The KG-75 comes with a 9V 6F22 battery pre-installed. If you need to replace the battery:
- Locate the battery compartment cover on the rear of the device.
- Slide or unscrew the cover to open the compartment.
- Carefully remove the old battery and disconnect it from the terminal.
- Connect a new 9V 6F22 battery, ensuring correct polarity (+/-).
- Place the new battery into the compartment and close the cover securely.
6. Operating Instructions
6.1 Power On/Off
- Press the POWER button to turn the device on.
- Press and hold the POWER button for a few seconds to turn the device off.
- The device features an Auto Power Off function to conserve battery life. It will automatically shut down after a period of inactivity.
6.2 Taking Measurements
- Turn on the illuminometer.
- Point the sensor towards the light source or the area where you wish to measure illuminance.
- The current illuminance value will be displayed on the LCD in Lux. The device uses Auto Range switching to adjust to the appropriate measurement scale.
6.3 Backlight Function
For easy reading in dark environments, the KG-75 is equipped with a backlight.
- Press the BACKLIGHT button (if available, or a dedicated button for backlight) to activate the display backlight.
- Press the button again to turn off the backlight.
6.4 Maximum and Minimum Measurement Function
This function allows you to record the highest and lowest illuminance values during a measurement session.
- While measuring, press the MAX/MIN button (or similar) once to display the maximum recorded value.
- Press it again to display the minimum recorded value.
- Press it a third time to return to real-time measurement.
6.5 Display Hold Function
The display hold function allows you to freeze the current reading on the screen for easier recording.
- While measuring, press the HOLD button (or similar) to freeze the current reading. An indicator (e.g., "HOLD") may appear on the display.
- Press the HOLD button again to release the reading and return to real-time measurement.
7. Maintenance
- Cleaning: Use a soft, dry cloth to clean the device. Do not use abrasive cleaners or solvents. Ensure the sensor is kept clean and free from dust.
- Storage: Store the illuminometer in a cool, dry place, away from direct sunlight and extreme temperatures. If storing for extended periods, remove the battery.
- Battery Replacement: Replace the 9V 6F22 battery when the low battery indicator appears on the display.
8. Troubleshooting
- Device does not power on: Check if the battery is correctly installed and has sufficient charge. Replace the battery if necessary.
- Inaccurate readings: Ensure the sensor is clean and unobstructed. Verify that the measurement environment is stable and free from flickering light sources.
- Display is blank or flickering: The battery may be low. Replace the 9V battery.
9. Specifications
| Feature | Specification |
|---|---|
| Display | LCD, Letter Height: 11 mm (0.4 inches) |
| Sensor | Silicone photo diode |
| Measurement Range | 0 - 99990 Lux |
| Sampling Rate | 2.5 times per second |
| Range Switching | Auto range |
| Power Supply | 1 x 9V 6F22 battery |
| Functions | Backlight, Max/Min measurement, Display Hold, Auto Power Off |
| Material | ABS |
| Item Weight | 0.2 Kilograms |
| Country of Origin | China |
10. Warranty and Support
For warranty information or technical support, please refer to the documentation provided at the point of purchase or contact your local distributor. Keep your purchase receipt as proof of purchase for any warranty claims.