Bosch Professional GLM 40
Bosch GLM 40 Laser Measure User Manual
Model: GLM 40
Introduction
This user manual provides detailed instructions for the safe and efficient operation of your Bosch GLM 40 Laser Measure. Please read this manual thoroughly before using the device to ensure proper handling and to maximize its performance. The Bosch GLM 40 is a compact and versatile laser distance meter designed for quick and accurate measurements of distances, areas, and volumes, suitable for various professional and DIY applications.
Safety Information
Always observe the following safety precautions to prevent injury and damage to the device.
Laser Safety
- CAUTION: Do not stare directly into the laser beam. The laser beam is Class 2 according to IEC 60825-1:2014.
- Do not intentionally direct the laser beam at people or animals.
- Avoid pointing the laser beam at reflective surfaces, as the reflected beam can also be harmful.
- Do not modify the laser device. Unauthorized modifications can increase the laser radiation.
- Ensure the laser is switched off when not in use.
General Safety
- Keep the device out of reach of children and unauthorized persons.
- Do not operate the device in explosive atmospheres, such as in the presence of flammable liquids, gases, or dust.
- Use only the specified battery type (AAA). Ensure correct polarity when inserting batteries.
- Protect the device from moisture and direct sunlight.
- Do not open the device housing. Repairs should only be performed by authorized service personnel.
Package Contents
Your Bosch GLM 40 package should include the following items:
- 1 x Bosch GLM 40 Laser Measure
- 1 x Protective Pouch
- 2 x AAA Batteries
- 1 x User Manual (this document)
- 1 x Manufacturer's Certificate

Image: The Bosch GLM 40 Laser Measure, its protective pouch, and two AAA batteries, as typically included in the package.
Product Overview
Familiarize yourself with the components of your GLM 40 Laser Measure:
- Laser Beam Exit Aperture
- Receiver Lens
- Display Screen
- Measurement Button (Red Triangle) / ON/OFF Button
- Plus Button (+) / Area/Volume Function
- Minus Button (-) / Indirect Height Function
- Function Button (Func) / Measurement Reference Point
- Clear/OFF Button (C/O)
- Battery Compartment

Image: A detailed view of the Bosch GLM 40's front panel, highlighting the display and control buttons.
Setup
Inserting/Replacing Batteries
The Bosch GLM 40 requires two 1.5V AAA batteries. Ensure correct polarity when inserting.
- Open the battery compartment cover on the back of the device.
- Insert the two AAA batteries, matching the (+) and (-) symbols inside the compartment.
- Close the battery compartment cover securely.
If the battery symbol appears on the display, the batteries are low and should be replaced soon.
Operating Instructions
Turning On/Off
- To Turn On: Press the Red Triangle button. The laser will activate immediately.
- To Turn Off: Press and hold the C/O button for approximately 2 seconds. The device will also automatically turn off after 5 minutes of inactivity to save battery.
Setting Measurement Reference Point
The GLM 40 can measure from the front edge or the rear edge of the device. The default is the rear edge.
- Press the Func button to toggle between front edge and rear edge measurement. An icon on the display will indicate the current reference point.
Single Distance Measurement
- Turn on the device.
- Point the laser beam at the target surface.
- Press the Red Triangle button once. The measured distance will appear on the display.

Image: Demonstrating a single distance measurement, with the laser measure held against a wall and the red laser beam extending to the target.
Continuous Measurement (Tracking)
This mode allows you to see real-time distance updates as you move the device.
- Turn on the device.
- Press and hold the Red Triangle button for approximately 2 seconds. The device will start continuous measurement.
- Move the device slowly towards or away from the target. The display will update the distance continuously.
- Press the Red Triangle button again to stop continuous measurement and hold the last value.
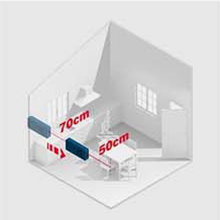
Image: A diagram showing how continuous measurement works, with the laser measure tracking distance as it moves.
Area Calculation
To calculate the area of a surface (e.g., a wall or floor):
- Press the + button once. The area icon (square) will appear on the display.
- Measure the first length (e.g., width) by pressing the Red Triangle button.
- Measure the second length (e.g., height) by pressing the Red Triangle button again.
- The calculated area in square meters (m²) will be displayed.
Volume Calculation
To calculate the volume of a space (e.g., a room):
- Press the + button twice. The volume icon (cube) will appear on the display.
- Measure the length by pressing the Red Triangle button.
- Measure the width by pressing the Red Triangle button.
- Measure the height by pressing the Red Triangle button.
- The calculated volume in cubic meters (m³) will be displayed.
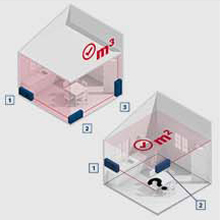
Image: A diagram illustrating the steps for calculating area (m²) and volume (m³) using sequential measurements.
Indirect Height Measurement (Pythagoras Function)
This function allows you to measure heights that are difficult to access directly, using the Pythagorean theorem.
- Press the - button once. The indirect height icon (triangle with question mark) will appear.
- Measure the hypotenuse (distance from the device to the top of the object) by pressing the Red Triangle button. Ensure the device is level with the base of the object.
- Measure the horizontal distance (from the device to the base of the object) by pressing the Red Triangle button again.
- The calculated height will be displayed.

Image: A person demonstrating indirect height measurement, aiming the laser from a distance to the top of a structure.
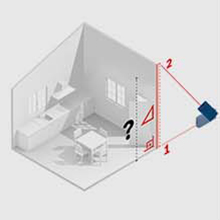
Image: A diagram explaining the principle of indirect height measurement, showing the hypotenuse and horizontal distance used to calculate vertical height.
Accessing Measurement History
The GLM 40 stores the last 10 measurements.
- To view previous measurements, repeatedly press the Func button until the history icon appears.
- Use the + and - buttons to scroll through the stored values.
Maintenance
Cleaning
- Keep the device clean to ensure optimal performance.
- Wipe the device with a soft, damp cloth. Do not use harsh cleaning agents or solvents.
- Pay special attention to the laser exit aperture and receiver lens. Clean them gently with a soft, lint-free cloth, similar to cleaning camera lenses.
Storage
- Store the device in its protective pouch when not in use.
- If storing for extended periods, remove the batteries to prevent leakage.
- Store in a dry, dust-free environment, away from extreme temperatures.
Troubleshooting
| Problem | Possible Cause | Solution |
|---|---|---|
| Device does not turn on. | Batteries are dead or incorrectly inserted. | Check battery polarity. Replace batteries with new AAA batteries. |
| Inaccurate measurements. | Dirty laser lens/aperture; Unstable surface; Measurement reference point incorrect. | Clean the laser lens and aperture. Ensure the device is stable. Verify the correct measurement reference point (front/rear). |
| Laser beam is not visible. | Bright ambient light; Laser is off. | Use in lower light conditions if possible. Ensure the device is turned on and the laser is activated. |
| Error message on display. | Measurement out of range; Obstruction; Internal error. | Ensure target is within 0.15m to 40m. Clear any obstructions. Turn off and restart the device. If error persists, contact customer support. |
Specifications
| Feature | Detail |
|---|---|
| Model | GLM 40 |
| Manufacturer | Robert Bosch Ltda |
| Measuring Range | 0.15 m - 40 m |
| Measurement Accuracy | Typically ±1.5 mm |
| Laser Class | 2 |
| Laser Type | 635 nm, < 1 mW |
| Power Supply | 2 x 1.5 V LR03 (AAA) batteries |
| Automatic Deactivation | Laser: 20 s; Device: 5 min |
| Units of Measurement | m / cm / mm / ft / inch |
| Memory | Last 10 measurements |
| Dimensions (L x W x H) | 10.5 cm x 4.1 cm x 2.4 cm |
| Weight (with batteries) | Approx. 70 g |
| Material | Plastic |
| Color | Blue |

Image: A technical drawing illustrating the compact dimensions of the GLM 40 Laser Measure.
Warranty and Support
Warranty Information
Bosch Professional products are manufactured to the highest quality standards. For specific warranty terms and conditions applicable to your region, please refer to the warranty card included with your product or visit the official Bosch Professional website.
Customer Support
Should you have any questions, require technical assistance, or need to arrange for service, please contact Bosch Professional customer support. Contact details can typically be found on the official Bosch Professional website or on the product packaging.
You can visit the official Bosch Professional store for more information: Bosch Professional Store