
1. Introduction
This manual provides essential information for the installation, operation, and maintenance of the Lennox X9953 Harmony 3 4-Zone Control Panel. The Harmony 3 system is designed to manage and optimize the heating and cooling distribution across up to four independent zones within a building, enhancing comfort and energy efficiency. Please read this manual thoroughly before attempting any installation or operation.
2. Important Safety Information
- Always disconnect power to the HVAC system before installing, servicing, or cleaning the control panel. Failure to do so may result in electrical shock, property damage, or personal injury.
- Installation and servicing must be performed by a qualified HVAC technician. Improper installation can lead to system malfunction or safety hazards.
- Ensure all wiring connections comply with local and national electrical codes.
- Do not operate the control panel with damaged wiring or components.
- Keep the control panel dry and away from sources of moisture.
3. Product Overview
The Lennox X9953 Harmony 3 is a central control unit for a multi-zone HVAC system. It integrates with thermostats and dampers to regulate airflow and temperature in different zones.
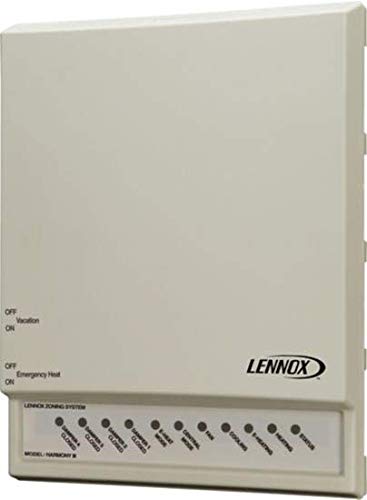
Image 1: Lennox Harmony 3 Zone Control Panel. This image displays the front of the control panel, which is off-white in color. On the left side, there are two toggle switches: one for 'Vacation' mode (OFF/ON) and another for 'Emergency Heat' (OFF/ON). At the bottom, a row of indicator lights is visible, labeled for 'Damper 1 Closed', 'Damper 2 Closed', 'Damper 3 Closed', 'Damper 4 Closed', 'E-Heat Mode', 'Central Mode', 'Fan', 'Cooling', 'E-Heating', and 'Status'. The Lennox logo is prominently displayed on the right side of the panel.
Key Features:
- Supports up to four independent HVAC zones.
- Integrated Vacation mode for energy savings during extended absences.
- Emergency Heat mode for supplemental heating when primary heat is insufficient or unavailable.
- LED indicator lights for quick status checks of dampers, operating modes, and system status.
- Centralized control for simplified system management.
4. Installation and Setup
Installation of the Harmony 3 control panel requires specialized knowledge of HVAC systems and electrical wiring. It is strongly recommended that installation be performed by a certified Lennox technician or a qualified HVAC professional.
4.1 Pre-Installation Checklist
- Verify that the control panel model (X9953 Harmony 3) is compatible with your existing HVAC system and thermostats.
- Ensure all necessary tools and wiring are available.
- Confirm that the power supply to the HVAC system is disconnected at the circuit breaker.
- Review the detailed wiring diagrams provided in the complete Lennox installation guide (not included in this user manual).
4.2 Mounting the Control Panel
Mount the control panel in an accessible location, typically near the main HVAC unit, ensuring it is protected from extreme temperatures and moisture. Use appropriate fasteners to secure it firmly to a wall or suitable surface.
4.3 Wiring Connections
Connect the control panel to the HVAC unit, zone thermostats, and zone dampers according to the specific wiring diagrams for your system. Pay close attention to terminal labels and voltage requirements. Incorrect wiring can damage the unit or other system components.
4.4 Initial Power-Up and Configuration
- After all wiring is complete and verified, restore power to the HVAC system.
- Observe the indicator lights on the control panel. The 'Status' light should illuminate, indicating proper power.
- Follow the specific configuration steps outlined in the full installation manual to set up zones and test system functionality.
5. Operating the Harmony 3 Control Panel
5.1 Understanding the Indicator Lights
The Harmony 3 control panel features a series of LED indicator lights to provide visual feedback on the system's operational status:
| Indicator Light | Description |
|---|---|
| Damper 1-4 Closed | Illuminates when the corresponding zone's damper is fully closed. |
| E-Heat Mode | Indicates that the system is operating in Emergency Heat mode. |
| Central Mode | Indicates the system is operating in a central, non-zoned mode (if applicable). |
| Fan | Illuminates when the system fan is active. |
| Cooling | Indicates the system is actively cooling. |
| E-Heating | Indicates the system is actively providing electric heating. |
| Status | Provides general system status; refer to the full manual for specific error codes or patterns. |
5.2 Vacation Mode
The 'Vacation' switch allows you to put the entire system into an energy-saving mode when the building is unoccupied for an extended period.
- To Activate: Flip the 'Vacation' switch to the ON position. This typically sets all zones to a predefined setback temperature.
- To Deactivate: Flip the 'Vacation' switch to the OFF position. The system will return to its normal programmed operation.
5.3 Emergency Heat Mode
The 'Emergency Heat' switch activates a secondary, often electric, heating source. This mode is typically used when the primary heating system (e.g., heat pump) is not functioning or when outdoor temperatures are extremely low, making the primary heat source less efficient.
- To Activate: Flip the 'Emergency Heat' switch to the ON position. The 'E-Heat Mode' indicator light will illuminate.
- To Deactivate: Flip the 'Emergency Heat' switch to the OFF position. The system will revert to its primary heating source.
5.4 Zone Control
Individual zone temperatures are controlled by the thermostats located in each zone. The Harmony 3 panel coordinates the operation of the HVAC unit and zone dampers based on the demands from these thermostats. Ensure each zone's thermostat is set to the desired temperature and operating mode (Heat, Cool, Auto, Off).
6. Maintenance
The Lennox X9953 Harmony 3 control panel is designed for reliable operation with minimal maintenance. However, periodic checks can help ensure optimal performance.
- Cleaning: Gently wipe the exterior of the control panel with a soft, dry cloth. Do not use abrasive cleaners or solvents.
- Visual Inspection: Periodically inspect the panel for any signs of damage, loose connections, or unusual wear.
- Professional Check-up: It is recommended to have your entire HVAC zoning system, including the control panel, inspected by a qualified technician annually.
7. Troubleshooting Guide
This section addresses common issues you might encounter with your Harmony 3 control panel. For more complex problems, contact a qualified HVAC technician.
| Problem | Possible Cause | Solution |
|---|---|---|
| No power to control panel | Blown fuse or tripped circuit breaker; loose wiring connection. | Check circuit breaker and fuses. Verify all power connections are secure. |
| Zone not responding to thermostat | Thermostat issue; damper malfunction; wiring problem. | Check thermostat settings and battery. Inspect damper operation. Contact technician for wiring check. |
| Indicator light flashing or off unexpectedly | System fault; sensor error; communication issue. | Note which light is affected and its pattern. Refer to the full installation manual for specific error codes or contact support. |
| System constantly running or not reaching setpoint | Incorrect thermostat settings; damper stuck open/closed; system undersized/oversized. | Verify thermostat settings. Check dampers for obstructions. Consult with an HVAC professional. |
8. Technical Specifications
- Model: X9953 Harmony 3
- Brand: Lennox Corporation
- Number of Zones: 4
- Compatibility: Designed for use with compatible Lennox HVAC systems and zone thermostats.
- Power Requirements: Refer to the product label or full installation manual for specific voltage and current ratings.
- Dimensions: Refer to the product packaging or full installation manual.
- Weight: Approximately 0.01 ounces (as per product specifications, actual shipping weight may vary).
9. Warranty Information
The Lennox X9953 Harmony 3 4-Zone Control Panel is covered by a manufacturer's limited warranty. Specific warranty terms and conditions, including duration and coverage details, are provided with the product documentation at the time of purchase. Please retain your proof of purchase for warranty claims. For detailed warranty information, please refer to the official Lennox website or contact your authorized Lennox dealer.
10. Customer Support
For technical assistance, troubleshooting beyond this guide, or to schedule service, please contact a qualified HVAC technician or your authorized Lennox dealer. You can also visit the official Lennox website for additional resources and contact information: