Introduction
The Snow Peak Recta Tarp M Set is designed to provide durable protection from sun and precipitation for outdoor activities. Its HD construction is engineered for efficient rainfall channeling and wind resistance. The fabric features Shield processing for enhanced UV protection and shading, offering a cooler environment compared to tarps without this treatment.
Components
The Recta Tarp M Set includes the following items:
- Recta Tarp HD in Medium
- Wing Pole 240cm Aluminum x 2
- Aluminum Pole 170cm x 4
- Copper Head Peg Hammer
- Solid Stake #30 x 4
- Solid Stake #40 x 4
- Peg & Hammer Case
Materials:
- Tarp: 210D Polyester Ox, Light-Shielding Pigment PU Coating 3,000mm, UV Cut Processing, Teflon Water Repellent Processing
- Poles: Aluminum Alloy
- Stakes: S55c Steel
- Hammer: Copper, Steel, Oak, Nylon

Figure 1: Illustration of various Wing Pole and Aluminum Pole lengths, demonstrating their modular design for adjustable height and configuration. The image shows poles ranging from 120cm to 280cm, with details on how segments connect using a push-button mechanism.

Figure 2: Detailed view of the pole connection mechanism. Poles are joined by inserting one segment into another and securing it with a push-button lock, ensuring a stable and secure connection.

Figure 3: This diagram illustrates 12 different pole combinations using 60cm and 70cm Wing Pole segments, allowing for various tarp heights and configurations. It also shows examples of tarp setups with different pole arrangements, including Recta M with 2x 240cm Wing Poles and 4x 170cm Aluminum Poles.

Figure 4: A schematic showing the Recta Tarp's dimensions and recommended pole placement. It indicates the use of 240cm Wing Poles and 170cm Aluminum Poles to achieve the optimal tarp shape and coverage.

Figure 5: This image compares the shade provided by a tarp with standard PU coating versus one with Shield (light-shielding pigment PU coating). The Shield-treated tarp casts a significantly darker and more effective shadow, indicating superior sun protection.
Setup Instructions
- Unpack Components: Lay out all tarp components on a clear, flat area.
- Assemble Poles: Connect the Wing Poles and Aluminum Poles to achieve the desired height and configuration. Ensure the push-button locks engage securely. Refer to Figure 1 and Figure 3 for pole assembly options.
- Position Tarp: Lay the tarp flat on the ground in the desired location.
- Insert Poles: Insert the top end of the main Wing Poles into the designated grommets or reinforced loops at the tarp's peak points. Refer to Figure 8 and Figure 13.
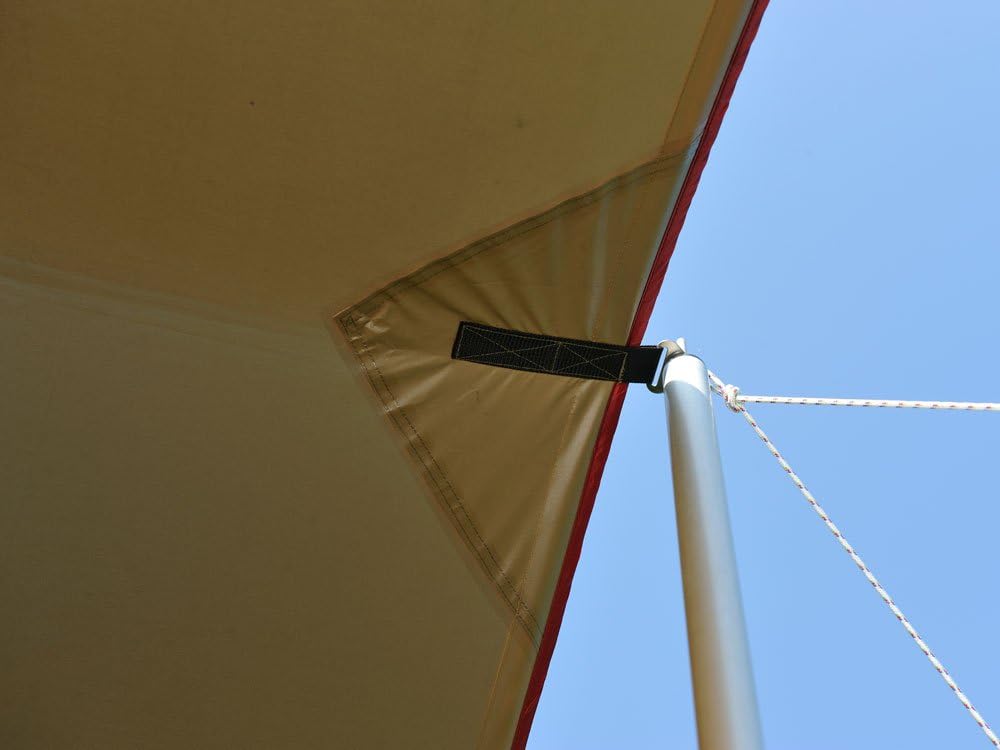
Figure 6: A close-up of a tarp corner showing the reinforced strap and grommet where a pole is inserted. This design ensures stability and durability at key tension points.

Figure 7: A hand demonstrating the correct method of inserting a pole into the tarp's reinforced strap and grommet. Ensure the pole tip is fully seated for stability.
- Secure Main Poles: Attach guylines to the top of the main poles and stake them firmly into the ground at an appropriate angle to create tension.
- Raise Tarp: Carefully raise the main poles, ensuring the tarp lifts evenly.
- Install Secondary Poles: Place the Aluminum Poles at the desired support points along the tarp's edges or interior, inserting them into grommets or loops.
- Stake Out Tarp: Use the Solid Stakes to secure all remaining guylines and tarp corners to the ground. Ensure all lines are taut to prevent sagging and improve wind resistance. Refer to Figure 14, Figure 15, and Figure 16.

Figure 8: A tarp grommet positioned on the ground, ready for a stake to be driven through it to secure the tarp.

Figure 9: A reinforced tarp strap with a D-ring on the ground, providing a secure attachment point for guylines and stakes.

Figure 10: A close-up of a tarp corner featuring a reinforced grommet, designed for robust staking and tensioning.
- Adjust Tension: Fine-tune the tension of all guylines to ensure the tarp is stable and sheds water effectively.

Figure 11: An exploded view diagram showing the interaction of the tarp, poles, ropes, and pegs during setup. It highlights key tension points and the overall structural integrity when properly assembled.
Operating Instructions (Usage)
The Recta Tarp M Set is designed for versatile use as a shelter from sun and rain. Its robust construction and specialized fabric provide a comfortable outdoor experience.
- Sun Protection: The Shield processing on the tarp fabric significantly reduces UV penetration and provides a cooler shaded area. Position the tarp to maximize shade during peak sun hours. Refer to Figure 17 and Figure 18 for visual comparison of shade effectiveness.

Figure 12: This image shows the difference in light intensity and quality under a standard tarp (left) versus a Shield-treated tarp (right). The Shield tarp provides a noticeably darker and more protective shade.

Figure 13: A practical comparison demonstrating the superior shading capability of the Shield-treated tarp (right) over a normal tarp (left). Items under the Shield tarp are in deeper shade, indicating better protection from direct sunlight.

Figure 14: A graph illustrating temperature readings over time under direct sunlight, a normal tarp, and a Shield-treated tarp. The Shield tarp consistently maintains a lower temperature, demonstrating its effectiveness in reducing heat.
- Rain Protection: The 3,000mm PU coating and Teflon water repellent processing ensure the tarp is waterproof. Ensure proper tension and angle during setup to allow water to run off efficiently and prevent pooling.
- Wind Resistance: Proper staking and tensioning of all guylines are crucial for wind stability. In strong winds, consider lowering the tarp height or adding additional anchor points if possible.
Maintenance
- Cleaning: After each use, clean the tarp with a soft brush or sponge and mild soap if necessary. Rinse thoroughly with water. Do not use harsh detergents or bleach.
- Drying: Always ensure the tarp is completely dry before packing it away. Packing a wet or damp tarp can lead to mildew, odor, and damage to the fabric's coatings.
- Storage: Store the tarp and poles in their respective carry cases in a cool, dry place, away from direct sunlight and extreme temperatures.
- Pole Care: Inspect poles for any bends or damage. Clean any dirt or debris from the pole segments and connection points.
- Stake Care: Clean stakes after use. Remove any dirt or mud. Store them in the Peg & Hammer Case.
Troubleshooting
- Tarp Sagging:
Cause: Insufficient tension on guylines or improperly placed poles.
Solution: Re-tension all guylines, ensuring they are taut. Adjust pole positions to create optimal canopy shape. Ensure stakes are firmly anchored.
- Water Pooling on Tarp:
Cause: Tarp is not pitched with enough slope, or guylines are too loose.
Solution: Increase the angle of the tarp by adjusting pole heights or stake positions to promote water runoff. Ensure all guylines are tight.
- Poles Not Connecting Securely:
Cause: Debris in pole segments or push-button mechanism not fully engaged.
Solution: Inspect pole ends for dirt or obstructions and clean if necessary. Ensure the push-button fully extends into the corresponding hole when connecting segments.
- Difficulty Driving Stakes:
Cause: Hard ground or incorrect hammering technique.
Solution: Use the Copper Head Peg Hammer to drive stakes. For very hard ground, try to find softer spots or use a rock to pre-loosen the soil if permitted.
Specifications
| Feature | Detail |
|---|---|
| Model Number | TP-841S |
| Brand | Snow Peak |
| Tarp Dimensions (L x W) | 144"L x 141.6"W (365.8cm L x 359.7cm W) |
| Tarp Height (Max) | 7.8' (237.7cm) - Note: Actual height depends on pole configuration. |
| Item Weight | 26.0 lbs (11.8 kg) |
| Capacity | 6 Person |
| Water Resistance Level | Waterproof (3,000mm PU Coating) |
| UV Protection | Yes (UV Cut Processing, Light-Shielding Pigment PU Coating) |
| Tarp Fabric | 210D Polyester Ox, Teflon Water Repellent Processing |
| Poles Material | Aluminum Alloy |
| Stakes Material | S55c Steel |
| GTIN | 04960589161140 |
Warranty and Support
Specific warranty details are not provided within this manual. For warranty information, product support, or replacement parts, please contact Snow Peak customer service directly or visit their official website.
You can find more information about Snow Peak products and support at the Snow Peak Store on Amazon.