WC-H01JE, WH-H01JE, WC-H01EE, WH-H01EE, WC-H03JE, WH-H03JE, WC-H04JE, WH-H04JE, WH-H05JE, WH-H06JE, WH-H07JE
Generic Replacement Air Conditioner Remote Control User Manual
Models: WC-H01JE, WH-H01JE, WC-H01EE, WH-H01EE, WC-H03JE, WH-H03JE, WC-H04JE, WH-H04JE, WH-H05JE, WH-H06JE, WH-H07JE
Introduction
This user manual provides detailed instructions for the operation and maintenance of your Generic Replacement Air Conditioner Remote Control. Please read this manual thoroughly before using the remote control to ensure proper functionality and to extend the life of your device.

Image: Front view of the Generic Replacement Air Conditioner Remote Control, showing its display screen and various control buttons.
Setup and Preparation
1. Loading the Remote Control Batteries
The remote control requires two new AAA batteries. Ensure correct polarity (+/-) when inserting.
- Slide off the battery cover on the back of the remote control.
- Insert two AAA batteries, matching the polarity indicators inside the compartment.
- Replace the battery cover.
- Press the RESET button using a thin, pointed object (e.g., a toothpick) to initialize the remote. The clock indicator will flash.
- Adjust the clock after resetting.
Battery Replacement: If the remote control does not function correctly or the display dims, replace both batteries simultaneously. Do not mix old and new batteries or different types of batteries. Remove batteries if the remote will not be used for an extended period to prevent leakage.

Image: Diagram illustrating the battery compartment, showing how to insert AAA batteries and the location of the RESET button.
2. Setting the Clock
Set the current time on the remote control for accurate timer operations.
- Press the ON button. The clock indicator will flash.
- Press the ON button repeatedly to set the current time in one-minute increments.
- Hold down the ON button to change the time in ten-minute increments.
- Press the SET button to confirm the time. The current time will be displayed.

Image: Visual guide demonstrating the steps to set the clock, including button presses and display changes.
Operating Instructions
Remote Control Functions and Indicators
Familiarize yourself with the buttons and display indicators for effective use.
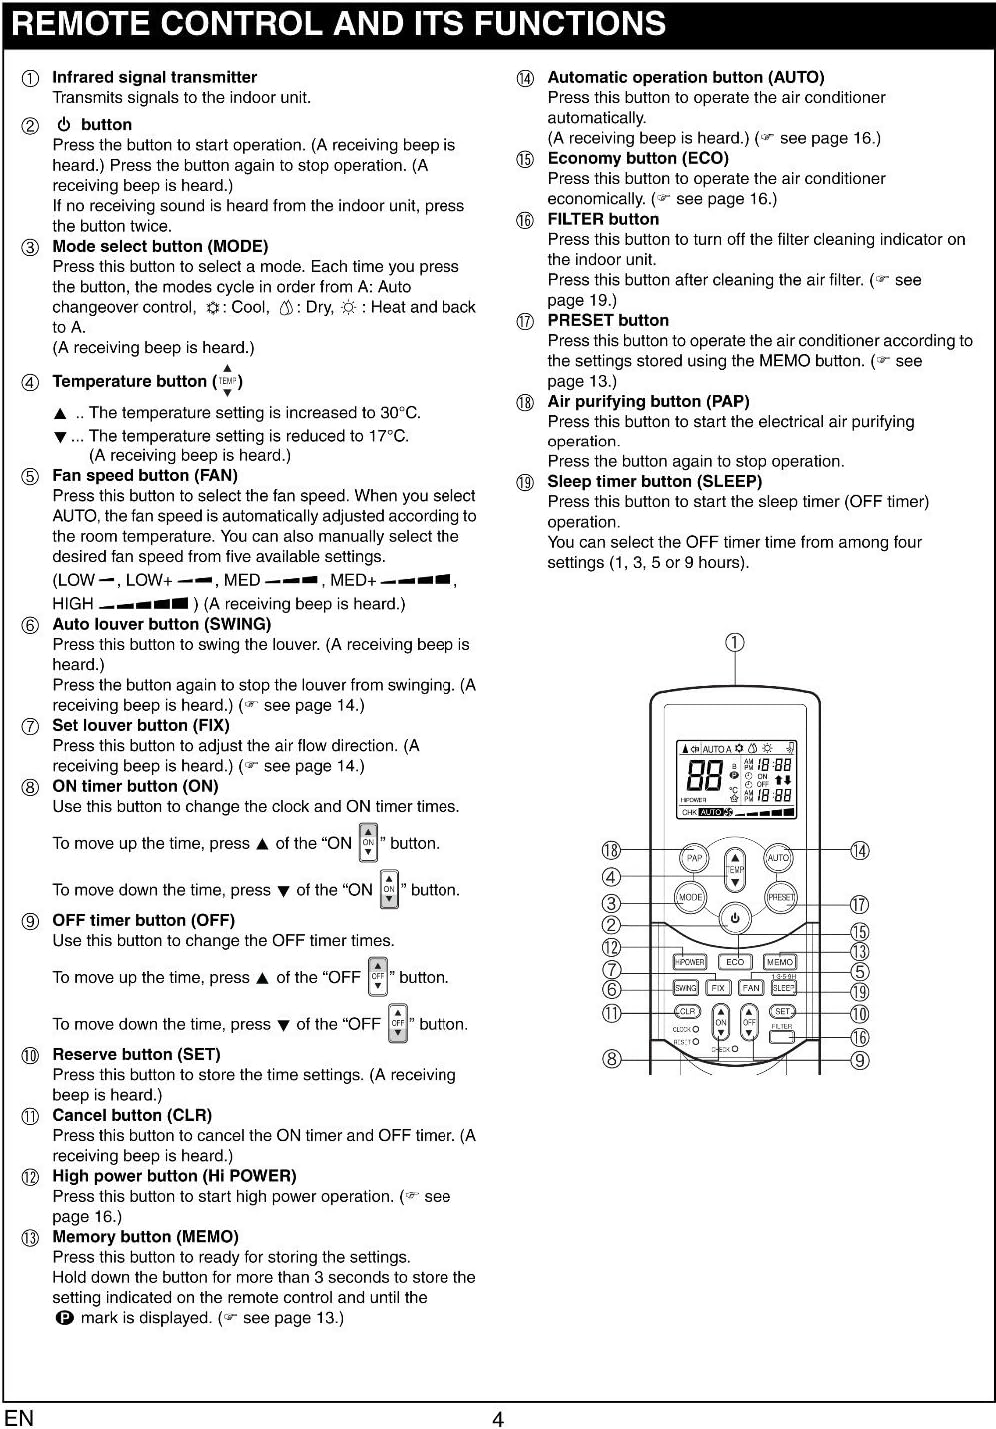
Image: Detailed diagram labeling each button on the remote control and providing a brief description of its function.
Image: Diagram illustrating the various icons and indicators that appear on the remote control's display screen, along with their corresponding meanings.
1. Automatic Operation (AUTO)
The AUTO mode automatically selects cooling, heating, or fan operation based on the room temperature.
- Press the ON button to start the air conditioner.
- Press the AUTO button.
- The operation indicator (green or orange) on the display panel of the indoor unit lights up. The operating mode is selected according to the room temperature and operation starts after approximately 3 minutes.
- To stop, press the OFF button.

Image: Visual representation of the remote control display during automatic operation, showing the AUTO indicator and temperature setting.
2. Cooling/Heating Operation
Manually select cooling or heating mode and adjust temperature and fan speed.
- Press the ON button to start.
- Press the MODE button to select COOL (snowflake icon) or HEAT (sun icon).
- Use the Temperature buttons (▲ / ▼) to set the desired temperature.
- Press the FAN button to select fan speed (LOW, MED, HIGH, AUTO).
- To stop, press the OFF button.

Image: Remote control display showing cooling/heating mode settings, including temperature and fan speed indicators.
3. Dry Operation
This mode helps to dehumidify the room.
- Press the ON button to start.
- Press the MODE button to select DRY (drop icon).
- Use the Temperature buttons (▲ / ▼) to set the desired temperature.
- To stop, press the OFF button.
Image: Remote control display showing dry mode settings, including temperature and the dry mode indicator.
4. Air Purifying Operation (PAP)
Activates the Plasma Air Purifying (PAP) function.
- Press the PAP button to start PAP operation. The PLASMA indicator (blue) on the indoor unit turns on.
- To stop, press the PAP button again. The PLASMA indicator turns off.

Image: Remote control display showing the PAP indicator during air purifying operation.
5. Hi Power Operation
This mode quickly cools or heats the room to the desired temperature.
- Press the HI POWER button. The HI POWER mark will appear on the remote control display.
- To cancel, press the HI POWER button again.

Image: Remote control display showing the HI POWER indicator during high power operation.
6. Timer Operation
Set the ON timer to automatically start the air conditioner or the OFF timer to automatically stop it.
Setting the ON Timer
- Press the ON button. The clock indicator will flash.
- Press the ON button repeatedly to set the desired time in ten-minute increments.
- Press the SET button to confirm. The timer is displayed.
- To cancel, press the CLR button.
Setting the OFF Timer
- Press the OFF button. The clock indicator will flash.
- Press the OFF button repeatedly to set the desired time in ten-minute increments.
- Press the SET button to confirm. The timer is displayed.
- To cancel, press the CLR button.
Image: Remote control display showing timer settings for both ON and OFF operations.
Remote Control Installation
Installing the Remote Control Holder
The remote control holder can be mounted on a wall or other suitable surface.
- Before you actually install the remote control holder on a wall or pillar, check whether the remote control signals can be received by the indoor unit from the desired location.
- To mount the remote control, hold it parallel to the remote control holder and push it in fully.
- To remove the remote control, slide the remote control upwards and out from the holder.

Image: Diagrams showing how to install the remote control into its wall-mounted holder and how to remove it.
Maintenance
Preparing the Filters (Air Conditioner Unit)
Regular cleaning of the air conditioner filters is essential for optimal performance and air quality. This remote control can remind you when to clean the filter.
- Open the air inlet grille of your air conditioner unit.
- Remove the air filters.
- Clean the filters according to your air conditioner's specific instructions.
- Attach the supplied Zeolite-plus filter and Zeolite-3G filter (if applicable to your AC model).
- After cleaning, reset the filter indicator on your air conditioner unit if it has one.
Image: Illustration of an air conditioner unit with its front panel open, showing the location and removal process for air filters, including Zeolite-plus and Zeolite-3G filters.
Troubleshooting and Cautions
General Cautions for Remote Control Use
- Obstructions: The air conditioner will not operate if curtains, doors, or other objects block the signals from the remote control to the indoor unit.
- Liquid Spills: Be careful that liquids do not spill onto the remote control.
- Direct Sunlight/Heat: Do not expose the remote control to direct sunlight or heat.
- Infrared Receiver: If the infrared signal receiver on the indoor unit is exposed to direct sunlight, the air conditioner may not function properly. Use curtains to prevent sunlight from reaching the receiver.
- Signal Interference: Signals may not be properly received if the room using the air conditioner has fluorescent lighting with electronic starters. If you are planning on using fluorescent lamps, consult your local dealer.
- Other Appliances: If other electrical appliances are activated by the remote control, move these appliances or consult your local dealer.
Location of the Remote Control
- Signal Range: Keep the remote control where its signals can reach the receiver of the indoor unit (a distance of up to 7 m is allowed).
- Timer Operation: When you select timer operation, the remote control automatically transmits a signal to the indoor unit at the specified time. If you keep the remote control in a location where proper signal transmission is blocked, a time lag of up to 15 minutes may occur.
Image: Diagram showing the effective range of the remote control signal to the air conditioner unit and examples of objects that can obstruct the signal.
Specifications
| Feature | Detail |
|---|---|
| Brand | Generic |
| Compatible Models | Toshiba WC-H** series, WH-H** series (e.g., WC-H01JE, WH-H01JE, WC-H01EE, WH-H01EE, WC-H03JE, WH-H03JE, WC-H04JE, WH-H04JE, WH-H05JE, WH-H06JE, WH-H07JE) |
| Item Weight | 3.52 ounces |
| Product Dimensions | 6.3 x 2.36 x 0.79 inches |
| Power Source | 2 x AAA Batteries (not included) |
| Special Features | Ergonomic design |
| Max Number of Supported Devices | 1 (Air Conditioner) |
Support and Contact
For any questions regarding this replacement remote control or if you encounter issues not covered in this manual, please contact the seller or manufacturer for assistance.
Manufacturer: Home Appliances Inc Of ShenZhen
Ask a question about this manual
Ask about setup, troubleshooting, compatibility, parts, safety, or missing instructions. Manuals+ will review the question and use this page’s manual context to help answer it.