1. Introduction
This manual provides detailed instructions for the installation, operation, and maintenance of your Velamp MS002 Outdoor PIR Motion Detector. This device utilizes Passive Infrared (PIR) technology to detect changes in infrared radiation within its detection zone, automatically activating connected devices such as lights, air conditioning units, or fans. Designed for both indoor and outdoor use with an IP44 rating, it offers enhanced comfort, convenience, and energy efficiency by activating devices only when motion is detected.

Image: Velamp MS002 motion detector installed on a house, illustrating its wide detection angle and range.
2. Safety Information
- Always disconnect power before installation or maintenance to prevent electric shock.
- Installation should be performed by a qualified electrician if you are unsure about electrical wiring.
- Ensure the product is securely mounted to prevent it from falling.
- The IP44 rating protects against splashing water and dust. Do not submerge the device in water.
- Do not attempt to modify or repair the device yourself. Contact qualified personnel for service.
- Keep children away from the device during installation and operation.
3. Product Overview
3.1 Features
- Passive Infrared (PIR) Technology: Detects motion by sensing changes in infrared radiation.
- Wide Detection Range: Up to 12 meters with a 180° detection angle.
- Adjustable Sensor Head: Allows optimization of the detection angle for customized coverage.
- Programmable Settings: Adjustable time delay and ambient light sensitivity (LUX).
- Energy Saving: Activates connected devices only when necessary, reducing power consumption.
- IP44 Weatherproof Rating: Suitable for reliable performance in both indoor and outdoor environments, protected against splashing water and dust.
- High Load Capacity: Supports a maximum load of 1KW.
- Versatile Automation: Can control lights, air conditioning systems, fans, and other switch-controlled utilities.
3.2 Components
The Velamp MS002 motion detector package includes:
- Velamp MS002 Motion Detector Unit
- Mounting Screws and Wall Plugs
- Instruction Manual

Image: Front view of the Velamp MS002 motion detector.
4. Setup and Installation
The Velamp MS002 is designed for easy wall mounting. Please follow these steps carefully.
4.1 Mounting the Device
- Choose a Location: Select a suitable wall location, ensuring it provides the desired detection coverage (up to 12m / 180°). Avoid mounting near heat sources or direct sunlight, which can interfere with PIR detection.
- Separate the Base: Gently detach the mounting base from the main sensor unit.
- Mark Drill Holes: Use the mounting base as a template to mark the positions for drilling on the wall.
- Drill Holes: Drill holes at the marked positions and insert the provided wall plugs.
- Secure the Base: Fasten the mounting base to the wall using the provided screws.

Image: Step-by-step diagram for wall mounting the motion detector.
4.2 Electrical Wiring
WARNING: Ensure the main power supply is switched off before performing any wiring. Incorrect wiring can cause damage to the device or lead to electric shock.
- Access Wiring Terminals: Open the wiring compartment on the mounting base.
- Connect Power Input: Connect the Live (L) and Neutral (N) wires from your power supply to the corresponding input terminals on the detector.
- Connect Load Output: Connect the Live wire of your load (e.g., light fixture) to the output terminal (often marked 'OUT' or with a load symbol). The Neutral wire of the load should be connected directly to the main Neutral supply.
- Secure Connections: Ensure all wire connections are tight and secure.
- Reattach Sensor Unit: Once wiring is complete, carefully reattach the main sensor unit to the mounted base.
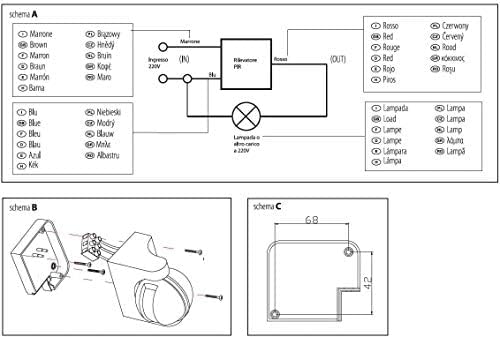
Image: Electrical wiring diagram for the motion detector.
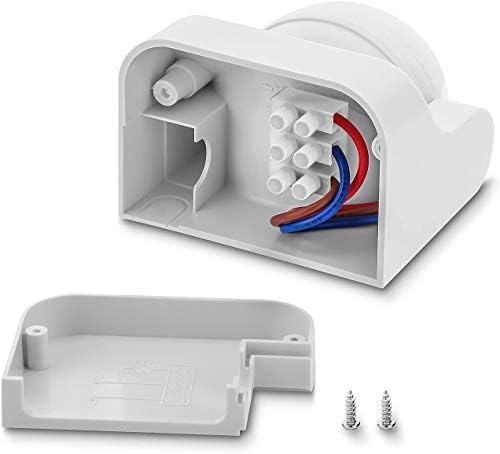
Image: Internal view of the wiring compartment.
5. Operating Instructions
The Velamp MS002 motion detector features two adjustable dials for customizing its operation: TIME and LUX.
5.1 Adjusting Time Delay (TIME)
The TIME dial controls how long the connected device remains active after motion is last detected.
- Rotate the dial to set the desired duration. Options typically include: 10 seconds, 30 seconds, 90 seconds, 3 minutes, 7 minutes, and 15 minutes.
- Choose a shorter duration for high-traffic areas or longer for areas where extended illumination is needed.
5.2 Adjusting Ambient Light Sensitivity (LUX)
The LUX dial determines the ambient light level at which the sensor will become active.
- Rotate the dial towards the "sun" icon for the sensor to operate in both daylight and darkness.
- Rotate the dial towards the "moon" or lower LUX values (e.g., 3 LUX) for the sensor to activate only when the ambient light is low (i.e., at dusk or in darkness).
- Common settings include: 3 LUX (darkness only), 30 LUX, 300 LUX (daylight and darkness).
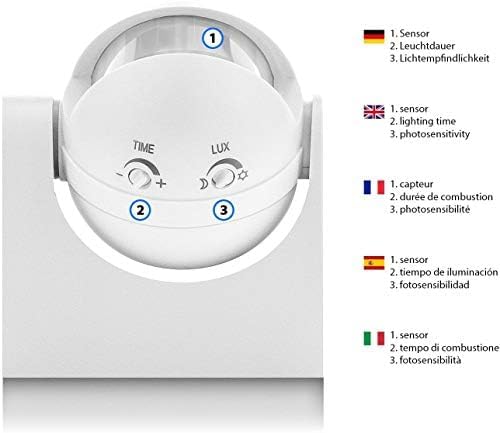
Image: Adjustment dials for TIME and LUX settings.
6. Maintenance
- Cleaning: Periodically wipe the sensor lens with a soft, dry cloth to remove dust or dirt that may obstruct detection. Do not use abrasive cleaners or solvents.
- Inspection: Regularly check the mounting and wiring connections for any signs of wear, damage, or looseness.
- Environmental Factors: Ensure no new obstructions (e.g., growing plants, new furniture) are blocking the sensor's field of view.
7. Troubleshooting
| Problem | Possible Cause | Solution |
|---|---|---|
| Device does not activate when motion is detected. |
|
|
| Device remains ON constantly. |
|
|
| Detection range is too short or inconsistent. |
|
|
8. Specifications
| Brand | Velamp |
| Model | MS002 |
| Color | White |
| Power Source | Wired Electric |
| Maximum Range | 12 Meters |
| Detection Angle | 180° |
| Mounting Type | Wall Mount |
| IP Rating | IP44 |
| Maximum Load | 1KW |
| Compatible Devices | Light, Air Conditioner, Fan |
| Dimensions (D x W x H) | 8P x 5l x 2H cm |
| Country of Origin | China |
9. Warranty and Support
The Velamp MS002 Motion Detector comes with a 2-year warranty from the date of purchase. This warranty covers defects in materials and workmanship under normal use.
For warranty claims, technical support, or any questions regarding your product, please contact Velamp customer service through their official website or your retailer. Please have your proof of purchase and product model number (MS002) ready when contacting support.