D-Link G403/E
D-Link EAGLE PRO AI N300 4G Smart Router (Model G403/E) User Manual
Comprehensive Guide for Setup, Operation, and Maintenance
1. Introduction
This manual provides detailed instructions for the installation, configuration, and operation of your D-Link EAGLE PRO AI N300 4G Smart Router, Model G403/E. Please read this manual thoroughly before using the device to ensure proper setup and optimal performance.
The D-Link G403/E is a versatile 4G LTE Router designed to provide high-speed internet access via a SIM card, offering Cat 4 150 Mbps LTE speeds and WiFi N 300 Mbps for your local network. It includes multiple LAN ports and a WAN port for flexible connectivity.
2. Package Contents
Before proceeding with the installation, please verify that your package contains the following items:
- D-Link EAGLE PRO AI N300 4G Smart Router (Model G403/E)
- Power Adapter
- Ethernet Cable
- Quick Installation Guide (This manual serves as a detailed guide)
- SIM Card Adapter (if applicable)
If any items are missing or damaged, please contact your retailer or D-Link support immediately.
3. Hardware Overview
3.1 Front Panel

Figure 3.1: Front view of the D-Link G403/E router, showing the D-Link logo and LED indicators for Power, Internet, Wi-Fi, and Signal Strength.
The front panel of the router features several LED indicators that provide real-time status information:
- Power LED: Indicates the power status of the device.
- Internet LED: Shows the status of the internet connection (4G LTE or WAN).
- Wi-Fi LED: Indicates the status of the wireless network.
- Signal Strength LEDs: Displays the strength of the 4G LTE signal.
3.2 Rear Panel

Figure 3.2: Rear view of the D-Link G403/E router, displaying the SIM card slot, LAN ports, WAN port, power input, and power button.
The rear panel provides all the necessary connection ports and buttons:
- SIM Card Slot: Insert your 4G LTE SIM card here.
- LAN Ports (LAN1-LAN4): Four Fast Ethernet ports for connecting wired devices.
- WAN Port: One Fast Ethernet port for connecting to a traditional broadband modem (e.g., DSL/Cable) if not using 4G LTE.
- Power Input (12V 1A): Connect the provided power adapter here.
- Power On/Off Button: Used to turn the router on or off.
- Reset Button: A small pinhole button to restore factory default settings.
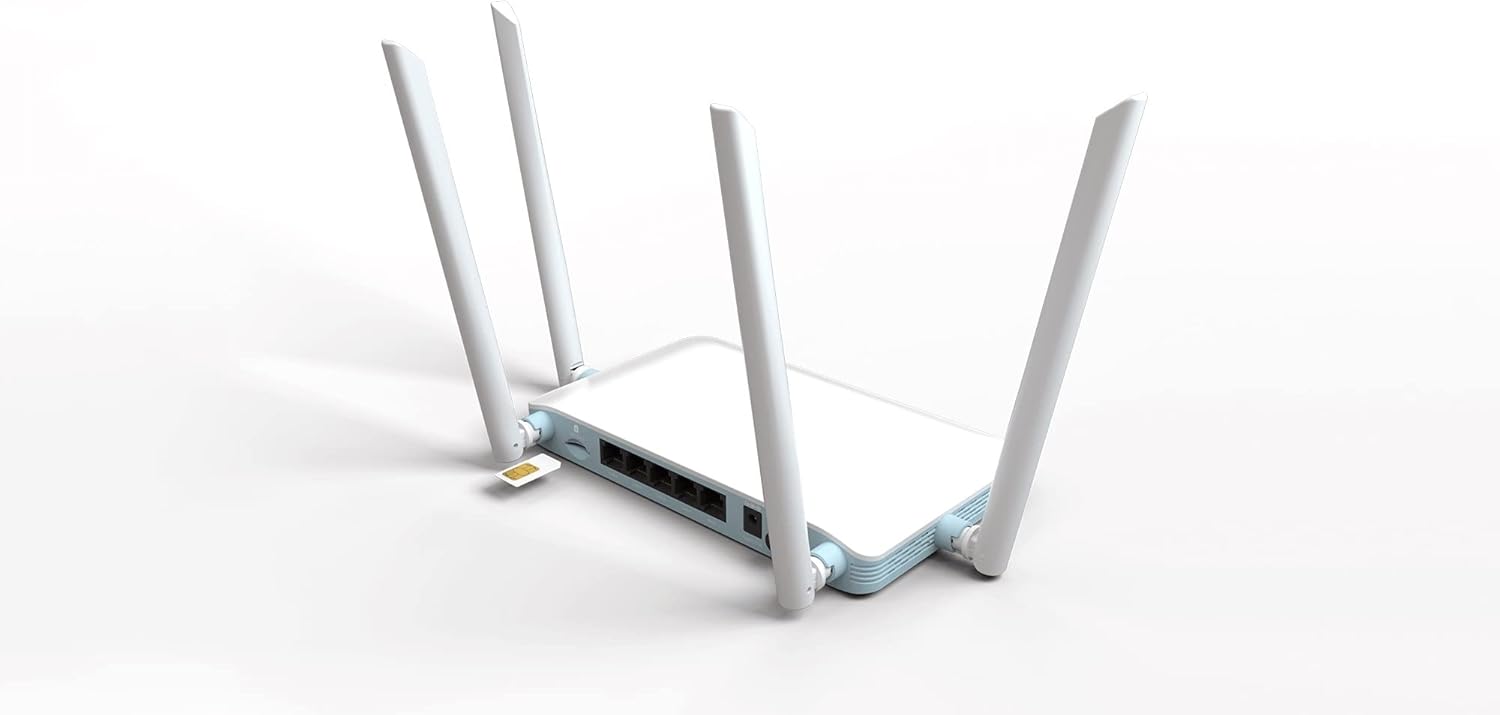
Figure 3.3: Detailed view of the SIM card slot on the D-Link G403/E router, showing how a SIM card is inserted.
4. Setup and Installation
4.1 SIM Card Installation
- Ensure the router is powered off.
- Locate the SIM card slot on the rear panel.
- Insert your standard-sized 4G LTE SIM card into the slot with the gold contacts facing down and the notched corner oriented correctly. Push until it clicks into place. If using a Nano or Micro SIM, ensure it is placed in a suitable adapter before insertion.
- To remove the SIM card, gently push it in until it clicks, then release, and it will eject.
4.2 Powering On the Router
- Connect the provided power adapter to the Power Input port on the rear of the router.
- Plug the other end of the power adapter into a wall outlet or power strip.
- Press the Power On/Off button. The Power LED on the front panel should illuminate.
4.3 Initial Configuration (Web Interface)
After powering on, you can access the router's web-based management interface for detailed configuration.
- Connect to the Router:
- Wired Connection: Connect an Ethernet cable from one of the LAN ports (LAN1-LAN4) on the router to your computer's Ethernet port.
- Wireless Connection: On your computer or mobile device, connect to the default Wi-Fi network name (SSID) printed on the label on the bottom of the router. The default Wi-Fi password (WPA/WPA2 Key) is also on this label.
- Access the Web Interface: Open a web browser (e.g., Chrome, Firefox, Edge) and type the default IP address of the router into the address bar. This is typically
192.168.0.1or192.168.1.1. Refer to the label on the bottom of your router for the exact IP address and default login credentials. - Login: Enter the default username and password. The default username is usually
admin, and the password might beadmin,password, or blank. It is highly recommended to change the default password immediately after your first login for security purposes. - Follow Setup Wizard: The first time you log in, a setup wizard may guide you through basic configurations such as changing the administrator password, setting up the time zone, and configuring your internet connection (4G LTE or WAN).
- Configure 4G LTE Connection: If using a SIM card, the router should automatically detect your mobile network and configure the APN settings. If not, you may need to manually enter the APN, username, and password provided by your mobile network operator.
- Configure Wi-Fi Settings: Change the default Wi-Fi network name (SSID) and password to something unique and secure.
5. Operating the Router
5.1 Internet Connectivity
Once configured, the router will establish an internet connection via the inserted 4G LTE SIM card or the WAN port. The Internet LED on the front panel will indicate the connection status.
- Green/Solid: Connected to the internet.
- Red/Blinking: No internet connection or connection error.
5.2 Wireless Network (Wi-Fi)
The router broadcasts a Wi-Fi signal for wireless devices. You can connect smartphones, tablets, laptops, and other Wi-Fi enabled devices to this network using the configured SSID and password.
- The router supports Wi-Fi N 300 Mbps, compatible with 802.11n, 802.11b, and 802.11g standards.
- For optimal performance, ensure your devices are within the router's Wi-Fi range.
5.3 Wired Network (LAN)
Use the four Fast Ethernet LAN ports to connect wired devices such as desktop computers, smart TVs, gaming consoles, or network printers for stable and high-speed local network access.
5.4 Access Point Mode
The D-Link G403/E router supports Access Point (AP) mode. In AP mode, the device extends an existing wired network wirelessly. This is useful if you already have a router and want to add Wi-Fi capabilities or extend your current Wi-Fi coverage.
To configure AP mode, access the web interface and navigate to the operating mode settings. Connect the router's WAN port to a LAN port on your existing router.
6. Maintenance
6.1 Firmware Updates
Regularly check for and install firmware updates from the official D-Link website. Firmware updates can improve performance, add new features, and address security vulnerabilities.
- Visit the D-Link support website for your region.
- Search for your model (G403/E) and download the latest firmware.
- Access the router's web interface and navigate to the firmware upgrade section (usually under System or Administration).
- Upload the downloaded firmware file and follow the on-screen instructions. Do not power off the router during the update process.
6.2 Router Placement
For optimal Wi-Fi coverage and signal strength, place the router in a central location, away from obstructions, metal objects, and devices that emit radio frequency interference (e.g., microwaves, cordless phones).
6.3 Cleaning
Keep the router clean and free from dust. Use a soft, dry cloth to wipe the exterior. Do not use liquid cleaners or aerosols.
6.4 Resetting to Factory Defaults
If you encounter persistent issues or forget your login password, you can reset the router to its factory default settings. This will erase all custom configurations.
- With the router powered on, locate the small pinhole Reset button on the rear panel.
- Use a paperclip or a similar pointed object to press and hold the Reset button for approximately 10 seconds.
- Release the button when the Power LED blinks or the router reboots.
- The router will restart with factory default settings. You will need to reconfigure it.
7. Troubleshooting
7.1 No Internet Connection
- Check SIM Card: Ensure the SIM card is correctly inserted and active with your mobile network provider.
- Signal Strength: Check the Signal Strength LEDs on the front panel. If the signal is weak, try repositioning the router.
- APN Settings: Verify that the APN settings in the router's web interface match those provided by your mobile network operator.
- WAN Connection: If using the WAN port, ensure the Ethernet cable is securely connected to your modem and the modem is working correctly.
- Reboot: Power cycle the router (turn off, wait 10 seconds, turn on).
7.2 Wi-Fi Connection Issues
- Check Wi-Fi LED: Ensure the Wi-Fi LED on the front panel is illuminated.
- Correct Password: Verify you are entering the correct Wi-Fi password.
- Signal Range: Move closer to the router to check if it's a range issue.
- Interference: Reduce interference from other electronic devices.
- Router Reboot: Reboot the router.
7.3 Cannot Access Web Interface
- IP Address: Ensure you are using the correct IP address (e.g.,
192.168.0.1). - Connection: Verify your device is connected to the router via Wi-Fi or Ethernet.
- Browser Cache: Clear your web browser's cache and cookies, or try a different browser.
- Firewall/Antivirus: Temporarily disable any firewall or antivirus software on your computer that might be blocking access.
- Reset Router: If all else fails, perform a factory reset (see Section 6.4).
8. Specifications
| Feature | Description |
|---|---|
| Model Name | EAGLE PRO AI N300 4G Smart Router |
| Model Number | G403/E |
| Brand | D-Link |
| 4G LTE Category | Cat 4 (Up to 150 Mbps Download) |
| Wi-Fi Standard | 802.11n/b/g (Wi-Fi N 300 Mbps) |
| Frequency Band Class | Dual-Band |
| Ethernet Ports | 4 x LAN Fast Ethernet, 1 x WAN Fast Ethernet |
| Special Features | Access Point Mode |
| Dimensions (L x W x H) | 26 x 25 x 6 cm (approx.) |
| Weight | 290 g (approx.) |
| Power Input | 12V 1A |
9. Warranty and Support
For warranty information and technical support, please refer to the warranty card included with your product or visit the official D-Link support website for your region. The D-Link website provides up-to-date drivers, firmware, and troubleshooting resources.
D-Link Official Website: www.dlink.com
Please have your product model number (G403/E) and serial number ready when contacting support.