
1. Introduction
This manual provides comprehensive instructions for the proper setup, operation, and maintenance of your Sherwood RX4208 AM/FM Stereo Receiver. The RX4208 is designed to deliver high-quality stereo audio output, featuring a 100W per channel amplifier, AM/FM tuner, and multiple audio inputs for various components. Please read this manual thoroughly before using the receiver to ensure optimal performance and safety.
2. Safety Information
To reduce the risk of electric shock, fire, or damage to the unit, observe the following safety precautions:
- Do not expose this appliance to rain or moisture.
- Do not remove the cover. No user-serviceable parts are inside. Refer all servicing to qualified service personnel.
- Ensure proper ventilation. Do not block ventilation openings.
- Place the unit on a stable, level surface.
- Unplug the unit from the wall outlet during lightning storms or when unused for long periods.
- Do not place objects filled with liquids, such as vases, on the apparatus.
- Do not install near any heat sources such as radiators, heat registers, stoves, or other apparatus (including amplifiers) that produce heat.
3. Package Contents
Verify that your package contains the following items:
- Sherwood RX4208 AM/FM Stereo Receiver
- Remote Control
- AM Loop Antenna
- FM Wire Antenna
- User Manual (this document)
4. Product Overview
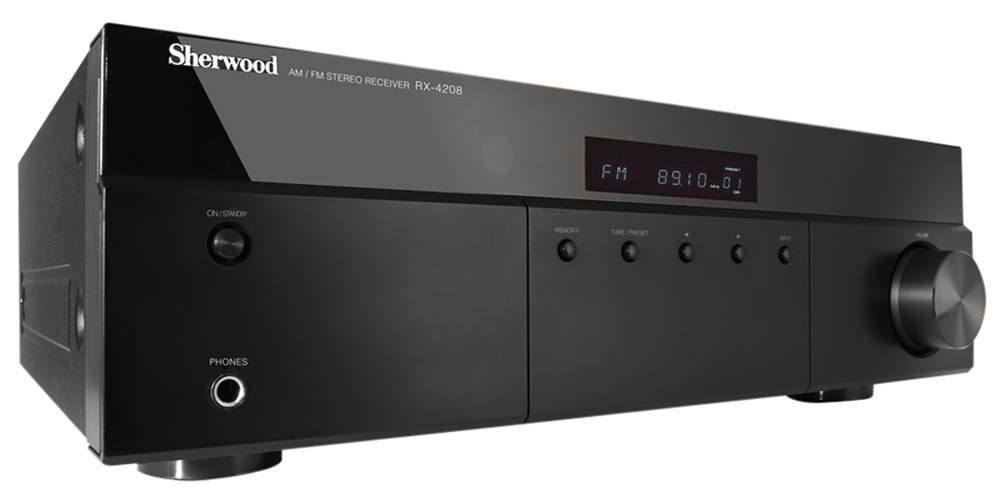
Figure 4.1: Front view of the Sherwood RX4208 AM/FM Stereo Receiver. This image displays the main unit with its black finish, indicating the general layout of controls and display.
4.1 Front Panel Controls and Display
The front panel provides access to essential functions and displays operational status:
- Power Button: Turns the receiver on or off.
- Input Selector: Cycles through available audio inputs (CD, AUX, Phono, Tuner).
- Volume Control Knob: Adjusts the overall output volume.
- Tone Controls (Bass/Treble): Adjusts low and high frequency response.
- Tone Direct Button: Bypasses tone control circuits for a flat frequency response.
- Tuner Controls: Buttons for tuning, auto scan, and preset station selection.
- Display: Shows current input, radio frequency, and other status indicators.
- Headphone Jack: For private listening.
4.2 Rear Panel Connections
The rear panel houses all input and output terminals:
- Speaker Terminals: Connects to passive speakers (5-way binding posts).
- Audio Inputs (RCA): Three sets of stereo RCA inputs for external audio sources (e.g., CD player, auxiliary devices).
- Phono Input (RCA): Dedicated input for a turntable.
- Audio Outputs (RCA): Two sets of stereo RCA outputs for recording devices or other audio components.
- AM/FM Antenna Terminals: Connections for the included AM loop and FM wire antennas.
- AC Power Cord: Connects to a wall outlet.
5. Setup
5.1 Speaker Connections
The RX4208 features 5-way binding posts for speaker connections, allowing for bare wire, spade connectors, pin connectors, or banana plugs.
- Ensure the receiver is powered off and unplugged from the AC outlet.
- Connect the positive (+) terminal of your left speaker to the LEFT (+) terminal on the receiver.
- Connect the negative (-) terminal of your left speaker to the LEFT (-) terminal on the receiver.
- Repeat steps 2 and 3 for the right speaker, connecting it to the RIGHT (+) and (-) terminals.
- Ensure all connections are secure and that no stray wire strands are touching other terminals, which could cause a short circuit.
5.2 Audio Source Connections
Connect your audio components using RCA cables.
- Connect the RCA output cables from your CD player to the 'CD' input jacks on the receiver (Red to Red, White to White).
- For other auxiliary devices (e.g., media player, cassette deck), connect their RCA outputs to the 'AUX' input jacks.
- For a turntable, connect its RCA output cables to the 'PHONO' input jacks. If your turntable has a built-in pre-amplifier, it is generally recommended to connect it to an 'AUX' input to avoid potential signal overload and distortion.
5.3 Antenna Connections
Connect the supplied antennas for AM and FM reception.
- FM Antenna: Connect the supplied FM wire antenna to the 'FM ANTENNA' terminal. Extend the wire for best reception.
- AM Antenna: Assemble the supplied AM loop antenna and connect its two wires to the 'AM ANTENNA' terminals. Position the loop for optimal AM reception.
6. Operating Instructions
6.1 Basic Operation
- Power On/Off: Press the Power button on the front panel or remote control.
- Input Selection: Use the Input Selector knob or buttons on the front panel/remote to choose your desired audio source (CD, AUX, Phono, Tuner).
- Volume Adjustment: Rotate the Volume knob or use the Volume +/- buttons on the remote to adjust the sound level. Start at a low volume and increase gradually.
6.2 Tone Controls
Adjust the sound characteristics to your preference:
- Bass/Treble: Use the respective knobs on the front panel or buttons on the remote to increase or decrease bass and treble frequencies.
- Tone Direct: Press the 'Tone Direct' button to bypass the bass and treble control circuits. This provides a flat frequency response, often preferred for pure audio reproduction.
6.3 AM/FM Tuner Operation
The RX4208 features a Quartz PLL Synthesized Digital Tuning system with 30 station presets.
- Selecting Tuner: Select 'Tuner' as the input source.
- Band Selection: Switch between AM and FM bands using the 'Band' button.
- Manual Tuning: Use the tuning buttons to manually adjust the frequency.
- Auto Scan: Press and hold the tuning buttons to automatically scan for the next strong station.
- Preset Stations: To store a station, tune to the desired frequency, then press 'Memory' followed by a preset number button (1-30). To recall a preset, simply press the corresponding preset number button.
7. Maintenance
Proper care ensures the longevity of your receiver.
- Cleaning: Wipe the exterior surfaces with a soft, dry cloth. Do not use abrasive cleaners, waxes, or solvents.
- Ventilation: Ensure the ventilation openings on the top and sides of the receiver are not blocked. Adequate airflow prevents overheating.
- Power Cord: Regularly inspect the power cord for any damage. If damaged, discontinue use and contact qualified service personnel.
8. Troubleshooting
If you experience issues with your receiver, consult the following table before seeking professional service.
| Problem | Possible Cause | Solution |
|---|---|---|
| No power | Power cord disconnected; Power outlet fault; Internal fuse blown. | Check power cord connection; Test outlet with another device; Contact service for fuse replacement. |
| No sound from speakers | Incorrect input selected; Volume too low; Speaker wires disconnected/shorted; Headphones connected. | Select correct input; Increase volume; Check speaker wire connections; Disconnect headphones. |
| Poor radio reception | Antenna not connected or poorly positioned; Interference. | Connect and adjust AM/FM antennas for optimal signal; Move receiver away from other electronic devices. |
| Loud cracking/popping from Phono input | Turntable with built-in pre-amp connected to Phono input. | Connect the turntable to an 'AUX' input instead of 'PHONO'. The 'PHONO' input is designed for turntables without a built-in pre-amp. |
| Remote control not working | Batteries depleted; Obstruction between remote and receiver; Incorrect remote mode. | Replace batteries; Remove obstructions; Ensure remote is pointed at the receiver's sensor. |
9. Specifications
The following specifications are for the Sherwood RX4208 Stereo Receiver:
- Power Output: 2 Channel: 100W + 100W (40-20kHz/8Ω/1% THD)
- Amplifier Type: Analog Discrete 2ch
- Audio Inputs: 3 (RCA)
- Audio Outputs: 2 (RCA)
- Phono Input: Yes
- Tuner: AM/FM Quartz PLL Synthesized Digital Tuning with 30 Presets
- Tone Controls: Bass/Treble, Tone Direct
- Speaker Connections: 5-way binding posts
- Color: Black
- Item Weight: Approximately 19.8 pounds (9 kg)
- Model Number: RX4208
- Manufacturer: Sherwood
10. Warranty and Support
For warranty information and technical support, please refer to the warranty card included with your product or visit the official Sherwood website. Keep your purchase receipt as proof of purchase for warranty claims.
If you require further assistance or encounter issues not covered in this manual, please contact Sherwood customer support.


