Yescom 06SAF016-KEY245DK-07
Yescom 245 Key Safe Cabinet Instruction Manual
Model: 06SAF016-KEY245DK-07
Introduction
Thank you for choosing the Yescom 245 Key Safe Cabinet. This electronic digital keypad storage case is designed to provide secure and organized storage for a large number of keys. Its robust steel construction and advanced security features make it ideal for various applications, including car repair shops, hotels, valet services, and property management.
This manual provides detailed instructions for the proper installation, operation, and maintenance of your key safe to ensure optimal performance and security.
Safety Information
- Read all instructions carefully before operating the safe.
- Keep backup keys in a secure location away from the safe. Do not store them inside the safe.
- Ensure the safe is securely mounted to a wall or stable surface to prevent unauthorized removal.
- Do not expose the safe to extreme temperatures or humidity.
- Keep the keypad clean and dry. Avoid using abrasive cleaners.
- Replace batteries promptly when the low battery indicator appears.
Package Contents
Please verify that all components are present in your package:
- 1x Key Storage Safe Case
- 2x Backup Keys
- 4x Mounting Screws
- 1x Instruction Manual
Note: 2 AA batteries for the code box are not included and must be purchased separately.
Setup
1. Battery Installation
The electronic keypad requires 2 AA batteries (not included) for operation. Locate the battery compartment on the back of the keypad unit inside the safe door.
- Open the safe door using the backup key if it is currently locked.
- Locate the battery compartment cover on the inside of the safe door, typically on the back of the keypad assembly.
- Remove the battery compartment cover.
- Insert 2 new AA batteries, ensuring correct polarity (+/-).
- Replace the battery compartment cover.

Image: Electronic keypad and backup key slot for access.
2. Wall Mounting
The safe is designed for wall mounting to enhance security. Ensure you choose a sturdy wall location, preferably into wall studs, that can support the weight of the safe and its contents.
- Identify the pre-drilled mounting holes on the back of the safe.
- Position the safe against the desired wall location and mark the drilling points through the pre-drilled holes.
- Drill pilot holes at the marked locations using an appropriate drill bit for your wall material.
- Align the safe with the drilled holes and secure it to the wall using the provided mounting screws. Ensure the screws are tightened firmly.

Image: Illustration of pre-drilled holes for easy installation.
Operating Instructions
1. Setting/Changing the PIN Code
The safe uses an 8-number PIN code for digital entry. You can set your personal PIN code following these steps:
- With the safe door open, press the red reset button located on the inside of the safe door, near the hinge. A beep will sound, and the yellow LED light will illuminate.
- Within 5 seconds, enter your desired 8-digit PIN code on the keypad.
- Press the '#' button to confirm. A green LED light will flash, and a beep will sound, indicating successful code setting.
- Test the new PIN code with the door open before closing it.

Image: Front view of the safe, showing the electronic keypad.
2. Opening the Safe
You can open the safe using either the digital PIN code or the backup keys.
Using the Digital PIN Code:
- Enter your 8-digit PIN code on the keypad.
- Press the '#' button. The green LED light will illuminate, and the safe will unlock.
- Turn the knob clockwise to open the door.
Using Backup Keys:
- Insert one of the backup keys into the keyhole located on the keypad panel.
- Turn the key clockwise while simultaneously turning the knob clockwise to open the door.
3. Smart LED Indicators
The keypad features LED indicators to provide status feedback:
- Green Light: Indicates correct password entry and successful unlocking.
- Yellow Light with Beeps: Indicates incorrect password entry.
- Automatic Lockout: If an incorrect password is entered 3 consecutive times, access will be disabled for 20 minutes for enhanced security.

Image: The safe interior with 245 key hooks for organized storage.
Maintenance
- Cleaning: Wipe the exterior of the safe with a soft, damp cloth. Do not use harsh chemicals or abrasive cleaners.
- Battery Replacement: Replace the AA batteries when the low battery indicator (if present) illuminates or if the keypad becomes unresponsive. It is recommended to replace batteries annually, even if not fully depleted, to ensure consistent performance.
- Key Hooks: Periodically check the key hooks for any damage or bending and ensure keys are securely placed.
Troubleshooting
| Problem | Possible Cause | Solution |
|---|---|---|
| Keypad not responding. | Dead or low batteries. | Replace with new AA batteries. |
| Safe does not open with PIN code. | Incorrect PIN entered; keypad locked out. | Ensure correct 8-digit PIN is entered. Wait 20 minutes if locked out. Use backup key. |
| Door does not open after correct PIN. | Knob not turned quickly enough after PIN entry. | Enter PIN, press '#', and turn the knob clockwise immediately while the green light is on. |
| Safe is making beeping sounds. | Low battery warning; incorrect code entry. | Replace batteries. Re-enter correct code. |
Specifications
| Feature | Detail |
|---|---|
| Overall Dimensions (LxWxH) | 14 9/16" x 8 11/16" x 21 1/16" (37 x 22 x 53.5 cm) |
| Internal Dimensions (LxWxH) | 14 3/8" x 7 7/8" x 20 11/16" (36.5 x 20 x 52.5 cm) |
| Material | Cold-rolled Steel |
| Key Hooks | 245 (across 3 interlayers) |
| Lock Type | Electronic Digital Keypad, Key |
| PIN Code Length | 8 numbers |
| Battery Type | 2 x AA Batteries (not included) |
| Net Weight | 48 Lbs (21.5 kg) |
| Mounting Type | Wall Mount |
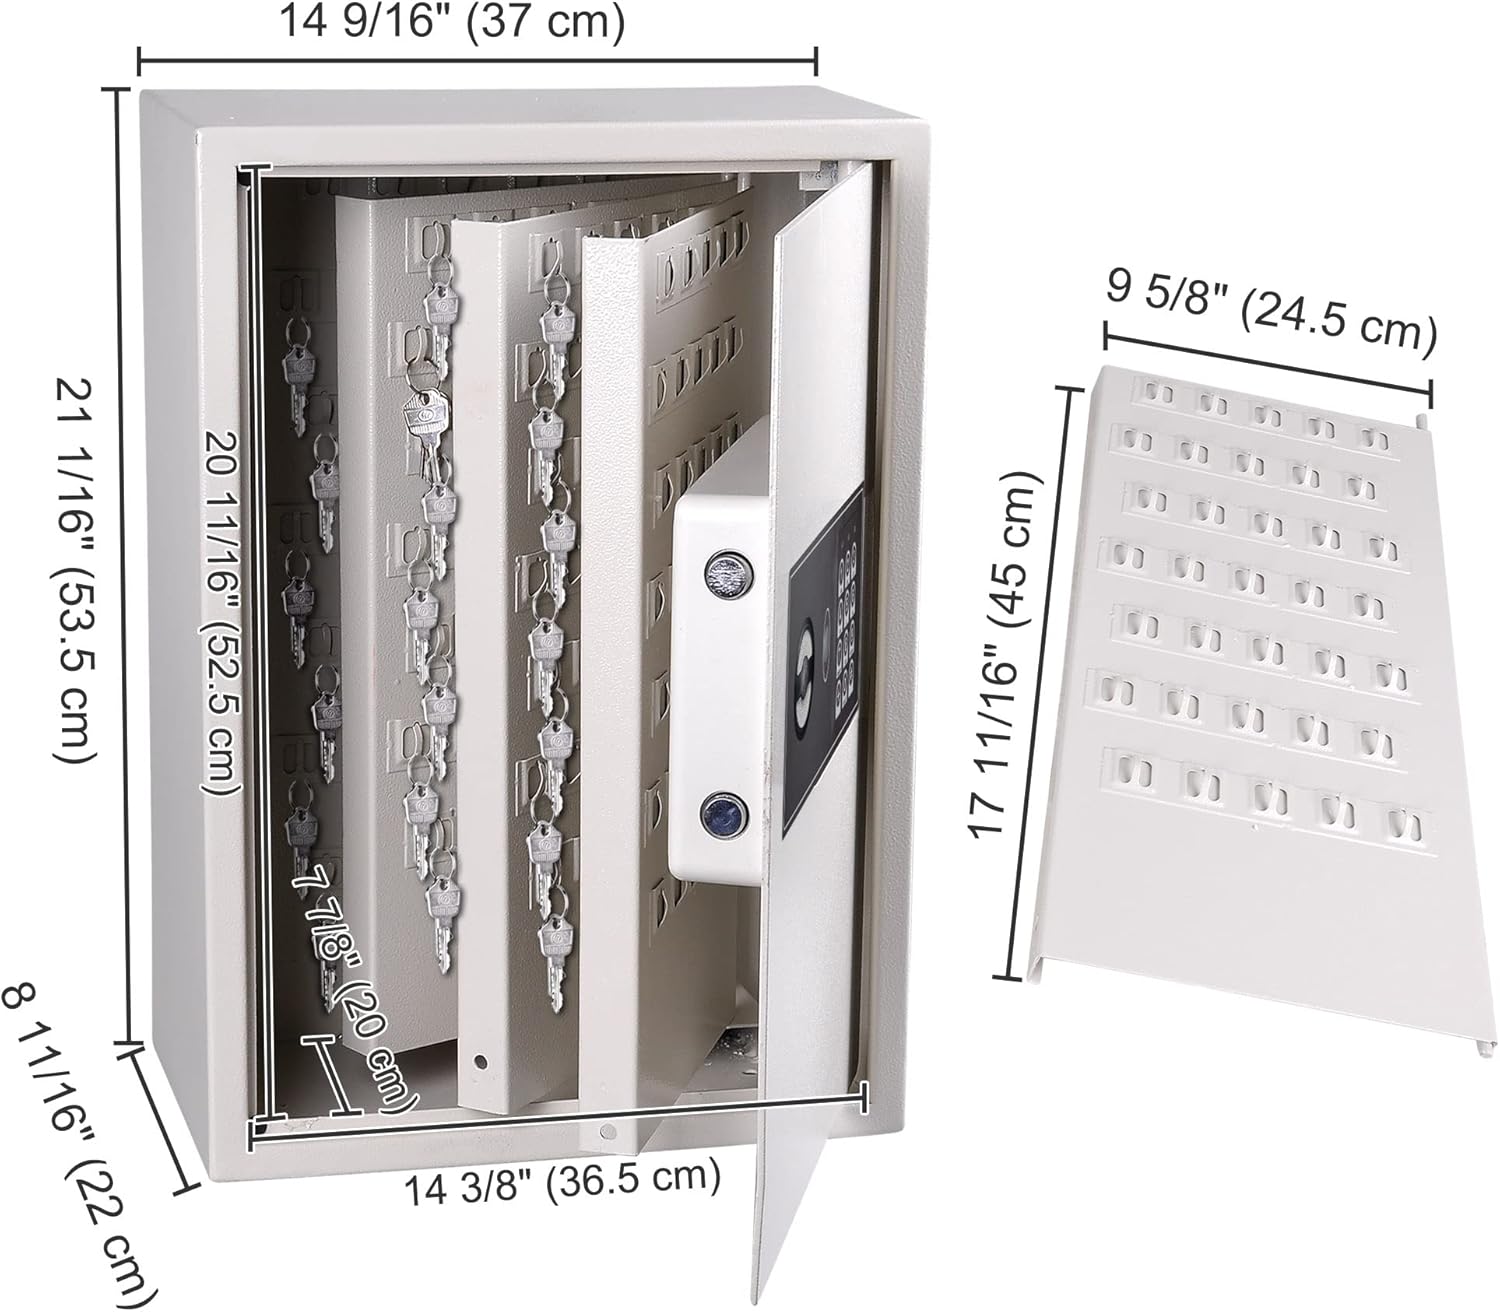
Image: Detailed dimensions of the key safe.
Warranty and Support
For warranty information or technical support, please contact Yescom customer service. Refer to the contact details provided on the product packaging or the official Yescom website.
Please have your model number (06SAF016-KEY245DK-07) and purchase date ready when contacting support.
Ask a question about this manual
Ask about setup, troubleshooting, compatibility, parts, safety, or missing instructions. Manuals+ will review the question and use this page’s manual context to help answer it.