Introduction
This manual provides detailed instructions for the installation, operation, maintenance, and troubleshooting of your Soundstream R3.10 10-inch Reference R3 Series Dual 2 Ohm Subwoofer. Please read this manual thoroughly before installation and use to ensure proper function and longevity of your product.
Safety Information
Always observe the following safety precautions during installation and operation:
- Disconnect the vehicle's battery negative terminal before beginning any electrical work.
- Ensure all wiring is properly insulated to prevent short circuits.
- Use appropriate gauge wiring for power and speaker connections.
- Mount the subwoofer securely to prevent movement during vehicle operation.
- Avoid exposing the subwoofer to excessive moisture or extreme temperatures.
- Consult a professional installer if you are unsure about any part of the installation process.
Product Overview
The Soundstream R3.10 is a 10-inch subwoofer designed for car audio applications, featuring a dual 2 Ohm voice coil configuration. Key features include:
- 10" Dual 2 Ohm Reference R3 Series Subwoofer
- Power Handling: RMS: 700 watts
- Oversized concave IMPP primary cone
- Die-cast aluminum Soundstream Reference R1 frame
- Inverted roll polyether foam surround

Figure 1: Front and top view of the Soundstream R3.10 subwoofer, showcasing the cone and surround.

Figure 2: Rear view of the Soundstream R3.10 subwoofer, highlighting the dual voice coil terminals.
Setup and Installation
Enclosure Selection
The performance of your subwoofer is highly dependent on the enclosure. The R3.10 can be used in both sealed and ported enclosures. Consult a car audio specialist or use a reputable enclosure design software for optimal results based on your vehicle and listening preferences.
Mounting
Ensure the mounting surface is rigid and free from obstructions. The subwoofer requires a cutout diameter of approximately 9.6 inches (verify actual measurement before cutting) and a top-mount depth of 6 inches. Secure the subwoofer using appropriate screws, ensuring a tight seal to the enclosure.
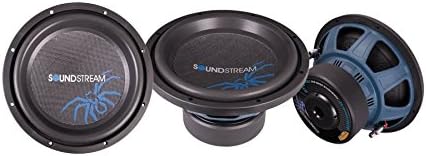
Figure 3: Angled view of the Soundstream R3.10 subwoofer, showing the robust construction.
Wiring Configurations
The R3.10 features dual 2 Ohm voice coils. Proper wiring is crucial for matching the subwoofer's impedance to your amplifier's capabilities. Common configurations include:
- 1 Ohm Load (Parallel Wiring): Connect both voice coils in parallel. This configuration presents a 1 Ohm load to the amplifier. Ensure your amplifier is stable at 1 Ohm.
- 4 Ohm Load (Series Wiring): Connect both voice coils in series. This configuration presents a 4 Ohm load to the amplifier.
Refer to your amplifier's manual for compatible impedance loads. Incorrect wiring can damage both the subwoofer and the amplifier.

Figure 4: Top view of the Soundstream R3.10 subwoofer, illustrating the cone and spider assembly.
Operating Instructions
Initial Power-Up and Break-in
After installation, gradually introduce power to the subwoofer. It is recommended to operate the subwoofer at moderate volumes for the first 20-30 hours of use. This "break-in" period allows the suspension components (surround and spider) to loosen and reach their optimal compliance, improving long-term performance and reliability.
Amplifier Settings
- Gain Setting: Set the amplifier gain to match the output voltage of your head unit. Avoid setting the gain too high, as this can lead to clipping and damage the subwoofer.
- Low-Pass Filter (LPF): Engage the low-pass filter on your amplifier or head unit. A typical setting for a 10-inch subwoofer is between 60Hz and 100Hz, with a slope of 12dB or 24dB per octave. This ensures the subwoofer only reproduces low frequencies.
- Subsonic Filter (High-Pass Filter): If available, set the subsonic filter slightly below your enclosure's tuning frequency (for ported enclosures) or around 20-25Hz (for sealed enclosures) to protect the subwoofer from playing frequencies below its operational range.
Maintenance
The Soundstream R3.10 subwoofer requires minimal maintenance. Periodically inspect the following:
- Wiring Connections: Ensure all speaker wire connections are secure and free from corrosion.
- Mounting Hardware: Check that the subwoofer is still securely mounted in its enclosure.
- Cone and Surround: Inspect the cone and surround for any signs of damage, tears, or deterioration. Keep the cone free from dust and debris.
Troubleshooting
If you experience issues with your subwoofer, refer to the following common problems and solutions:
| Problem | Possible Cause | Solution |
|---|---|---|
| No Sound | No power to amplifier, loose wiring, incorrect amplifier settings, damaged voice coil. | Check amplifier power and ground connections. Verify all speaker wires are securely connected. Review amplifier gain and filter settings. Test voice coil continuity with a multimeter. |
| Distorted Sound | Amplifier clipping, incorrect gain setting, improper crossover settings, damaged subwoofer. | Reduce amplifier gain. Adjust LPF and subsonic filter settings. Ensure the amplifier is not being overdriven. Inspect subwoofer cone and surround for damage. |
| Weak Bass Output | Incorrect wiring impedance, insufficient amplifier power, improper enclosure, phase issues. | Verify wiring configuration matches amplifier impedance. Ensure amplifier provides adequate RMS power. Check enclosure design. Experiment with phase switch on amplifier/head unit. |
Specifications
| Feature | Specification |
|---|---|
| Model Number | R3.10 |
| Speaker Type | Subwoofer |
| Subwoofer Diameter | 10 Inches |
| Power Handling (RMS) | 700 Watts |
| Impedance | Dual 2 Ohms |
| Frequency Response | 34.58 Hz (Note: This value may represent a specific measurement point. Refer to full T/S parameters for detailed response.) |
| Top-Mount Depth | 6 Inches |
| Enclosure Material (Frame) | Aluminum (Die-cast) |
| Cone Material | IMPP (Injection Molded Polypropylene) |
| Surround Material | Polyether Foam (Inverted Roll) |
| Item Weight | 4.5 Kilograms |
Warranty Information
This Soundstream R3.10 subwoofer comes with a limited warranty. The warranty period is 1 Year from the date of purchase. Please retain your proof of purchase for any warranty claims. The warranty covers manufacturing defects but typically does not cover damage caused by improper installation, abuse, or accidental damage. For full warranty terms and conditions, please refer to the official Soundstream warranty statement or contact Soundstream customer support.
Support
For technical assistance, troubleshooting beyond this manual, or warranty inquiries, please contact Soundstream customer support. Visit the official Soundstream website for contact information and additional resources.
Note: Product specifications and features are subject to change without notice.


