
1. Product Overview
The Industrial Air C151I is a 15-gallon portable electric air compressor designed for various applications requiring high-pressure air. It features an oil-free UMC motor and pump for quiet operation and reduced maintenance. The unit delivers a maximum of 225 PSI, ensuring extended air tool run times. Its compact design includes an integrated control panel and 8-inch semi-pneumatic wheels for enhanced portability.
Key Features:
- High-performance pump providing 225 maximum PSI for longer air tool operation.
- Compact design offering the power and performance of larger compressors.
- Conveniently located control panel with regulator, gauges, and quick connect.
- 8-inch semi-pneumatic wheels for easy portability.
2. Safety Information
Read and understand all instructions before operating this air compressor. Failure to follow all instructions listed below may result in electric shock, fire, and/or serious injury.
General Safety Rules:
- Electrical Safety: Ensure the power source matches the compressor's voltage (120V AC). Do not operate in wet conditions.
- Pressure Safety: Never exceed the maximum operating pressure of any air tool or accessory. Always wear eye protection.
- Ventilation: Operate the compressor in a well-ventilated area.
- Maintenance: Disconnect power before performing any maintenance or adjustments.
- Children and Bystanders: Keep children and bystanders away from the operating compressor.
- Hot Surfaces: The compressor pump and motor can become hot during operation. Avoid contact.
Proposition 65 Warning: This product may contain chemicals known to the State of California to cause cancer and birth defects or other reproductive harm.
3. Components and Controls

Figure 3.1: Front view of the Industrial Air C151I air compressor, showing the tank, motor housing, handle, and control panel.
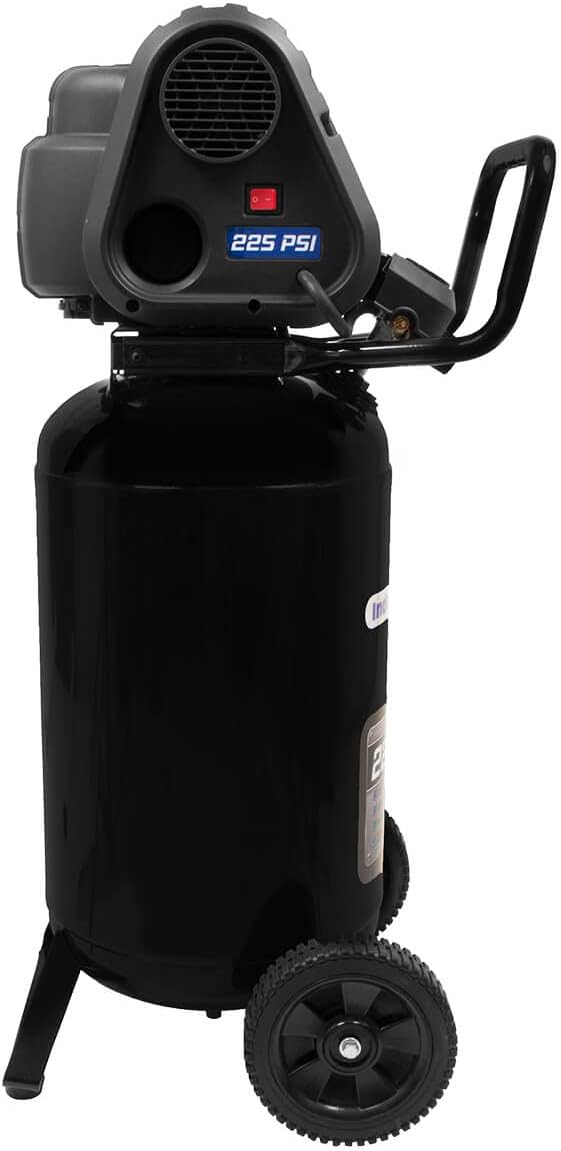
Figure 3.2: Side view of the compressor, highlighting the motor housing and power switch location.

Figure 3.3: Close-up of the control panel, featuring the tank pressure gauge, regulated pressure gauge, pressure regulator knob, and quick connect coupler.

Figure 3.4: Detailed view of the quick connect coupler and the pressure regulator knob for adjusting output air pressure.

Figure 3.5: Location of the tank drain valve at the bottom of the air tank, used for moisture removal.

Figure 3.6: Close-up of one of the 8-inch semi-pneumatic wheels, designed for portability.
Component Identification:
- Air Tank: Stores compressed air. Capacity: 15 Gallons.
- Motor/Pump Assembly: Generates compressed air. Oil-free design.
- Control Panel: Centralized interface for operation.
- Tank Pressure Gauge: Displays the pressure inside the air tank.
- Regulated Pressure Gauge: Displays the pressure of the air being supplied to the tool.
- Pressure Regulator Knob: Adjusts the output air pressure to the tool.
- Quick Connect Coupler: For attaching air hoses and tools.
- On/Off Switch: Controls power to the compressor.
- Drain Valve: Located at the bottom of the tank, used to drain condensation.
- Wheels: 8-inch semi-pneumatic wheels for mobility.
- Handle: For easy transport.
4. Setup
Before initial use, ensure the compressor is properly assembled and placed in a suitable location.
Unpacking and Assembly:
- Remove the compressor and all components from the packaging.
- Attach the handle and wheels if they are not pre-assembled. Refer to the assembly diagram in your packaging for specific instructions.
- Inspect the compressor for any shipping damage. Do not operate if damage is present.
Placement and Electrical Connection:
- Place the compressor on a firm, level surface in a clean, well-ventilated area.
- Ensure the power switch is in the "OFF" position.
- Connect the power cord to a grounded 120V AC outlet. Avoid using extension cords if possible; if necessary, use a heavy-duty, grounded extension cord rated for the compressor's power requirements.
5. Operating Instructions
Initial Start-up:
- Ensure the drain valve at the bottom of the tank is closed.
- Turn the pressure regulator knob counter-clockwise to the lowest setting.
- Flip the On/Off switch to the "ON" position. The compressor will begin to fill the air tank.
- Allow the compressor to run until it reaches its maximum pressure (225 PSI) and automatically shuts off. This may take several minutes.
- Check for any unusual noises or leaks during this initial run.
Connecting and Using Air Tools:
- With the compressor running and the tank full, attach your air hose to the quick connect coupler.
- Attach your air tool to the other end of the hose.
- Slowly turn the pressure regulator knob clockwise to increase the output pressure to the desired setting for your tool. Monitor the regulated pressure gauge.
- Begin using your air tool. The compressor will cycle on and off automatically to maintain tank pressure.
Shutting Down:
- When finished, turn the On/Off switch to the "OFF" position.
- Disconnect the air hose and tool.
- Slowly open the drain valve at the bottom of the tank to release all air pressure and drain any accumulated moisture. Close the valve once the tank is empty.
- Store the compressor in a clean, dry location.
6. Maintenance
Regular maintenance ensures optimal performance and extends the life of your air compressor. Always disconnect the power supply before performing any maintenance.
Daily Maintenance:
- Drain Tank: After each use, drain the moisture from the air tank by opening the drain valve. This prevents rust and corrosion.
- Inspect for Leaks: Check all connections and hoses for air leaks.
Periodic Maintenance:
- Clean Exterior: Wipe down the compressor's exterior with a damp cloth to remove dust and debris.
- Check Power Cord: Inspect the power cord for any damage or fraying.
- Air Filter: While this model is oil-free, some compressors have air intake filters. Consult your specific model's diagram if unsure.
7. Troubleshooting
This section addresses common issues you might encounter with your air compressor.
| Problem | Possible Cause | Solution |
|---|---|---|
| Compressor does not start or stops unexpectedly. |
|
|
| Low air pressure or compressor runs continuously. |
|
|
| Excessive noise or vibration. |
|
|
If you encounter problems not listed here or if solutions do not resolve the issue, contact Industrial Air customer support.
8. Specifications
| Feature | Detail |
|---|---|
| Brand | Industrial Air |
| Model Number | C151I |
| Tank Capacity | 15 Gallons |
| Maximum Operating Pressure | 225 PSI |
| Power Source | Electric |
| Voltage | 120 Volts (AC) |
| Motor Horsepower | 0.25 HP (Rated), 1.70 HP (Peak) |
| Noise Level | 80 Decibels |
| Item Weight | 99 Pounds |
| Product Dimensions | 24 x 20 x 43.5 inches |
| Special Feature | Portable |
| Recommended Uses | Air Brushing, Drilling, Nailing, Spraying |
9. Warranty and Support
This Industrial Air compressor comes with a 2-year limited warranty. For warranty claims, technical assistance, or to purchase replacement parts, please contact Industrial Air customer support.
Please have your model number (C151I) and date of purchase available when contacting support.