1. Introduction
This manual provides detailed instructions for the installation, operation, and maintenance of your Crimestopper RS1-G5 1-Way Single Button Remote Start System. The RS1-G5 is designed to offer convenient remote engine starting and vehicle unlocking from a distance of up to 1500 feet. It is compatible with a wide range of vehicles, including those with gas, diesel, or hybrid engines, and supports both automatic and manual transmissions.
Please read this manual thoroughly before attempting any installation or operation to ensure proper functionality and to avoid potential damage to your vehicle or the system.
2. Safety Information
- Professional Installation Recommended: Installation of this remote start system involves complex automotive electrical wiring. It is highly recommended that installation be performed by a qualified and experienced automotive electronics technician. Improper installation can lead to vehicle damage, electrical fires, or system malfunction.
- Vehicle Compatibility: Ensure the system is compatible with your specific vehicle make, model, and year. Consult a professional installer or the manufacturer's website for detailed compatibility information.
- Exhaust Fumes: Never remote start your vehicle in an enclosed or poorly ventilated area, such as a garage. Exhaust fumes contain carbon monoxide, which is a colorless, odorless, and deadly gas.
- Children and Pets: Never leave children or pets unattended in a remote-started vehicle.
- Manual Transmission Vehicles: If installing in a manual transmission vehicle, ensure the system is properly configured with the safety features (e.g., neutral safety switch, hood pin switch) to prevent accidental starting while in gear.
- Maintenance: Regularly check the system's components and wiring for any signs of wear or damage. Address any issues promptly.
3. System Components
The Crimestopper RS1-G5 system typically includes the following components:
- RS1-G5 Control Module
- Two (2) 1-Button Remote Transmitters
- Main Wiring Harness
- Antenna with Cable
- User Manual (this document)


4. Setup & Installation
Installation of the Crimestopper RS1-G5 system requires a thorough understanding of automotive electrical systems. It is strongly recommended that this system be installed by a certified professional to ensure correct operation and to prevent damage to your vehicle's electrical system.
4.1 General Installation Guidelines
- Wiring Diagrams: Always refer to your vehicle's specific wiring diagrams in conjunction with the RS1-G5 installation guide (provided separately to installers).
- Power Disconnection: Disconnect the vehicle's battery before beginning any wiring work.
- Secure Connections: Ensure all electrical connections are secure, properly insulated, and protected from moisture and abrasion.
- Module Placement: Mount the control module in a secure, hidden location within the vehicle's interior, away from excessive heat, moisture, and moving parts.
- Antenna Placement: Position the antenna for optimal signal reception, typically on the windshield or dashboard, away from metal obstructions.

4.2 Key Features for Installation
- Engine Compatibility: Designed to work with gas, diesel, or hybrid engines. Specific programming may be required for diesel (wait-to-start) or hybrid vehicles.
- Engine Sense Modes: Features programmable tach, tactless, or hybrid tactless connections for engine sensing.
- Output Flexibility: Offers positive and negative ignition, accessory, and starter outputs for broad vehicle compatibility.
- Transmission Compatibility: Supports both automatic and manual transmission vehicles with appropriate safety interlocks.
- Programmable Features: The system includes 31 programmable features to customize its operation to specific vehicle requirements and user preferences.

5. Operating Instructions
The Crimestopper RS1-G5 utilizes a simple one-button remote control for all primary functions.

5.1 Remote Starting Your Vehicle
- Ensure the vehicle is in a safe, well-ventilated area and the parking brake is engaged (especially for manual transmission vehicles).
- From a distance of up to 1500 feet, press and hold the single button on your remote transmitter for approximately 3 seconds.
- The vehicle's parking lights will flash to confirm the remote start command has been received.
- The engine will start after a brief delay. For diesel engines, there may be an additional pre-heat delay before cranking.
- The engine will run for a pre-programmed duration (typically 15 minutes) or until the remote stop command is issued.
5.2 Remote Unlocking (After Remote Start)
If the vehicle is currently running via remote start, a single press of the remote button will unlock the vehicle's doors. This feature is useful when approaching the vehicle after it has been remote started.
5.3 Remote Stopping Your Vehicle
To turn off the engine after it has been remote started:
- Press and hold the single button on your remote transmitter for approximately 3 seconds.
- The engine will shut down, and the parking lights may flash to confirm the stop command.
5.4 Entering the Vehicle While Remote Started
To enter and drive the vehicle after it has been remote started:
- Use the remote to unlock the doors (if not already unlocked).
- Enter the vehicle and insert the ignition key.
- Turn the ignition key to the 'ON' or 'RUN' position (do not turn to 'START').
- Press the brake pedal. The remote start system will disengage, and the vehicle will transfer to normal key operation.
6. Maintenance
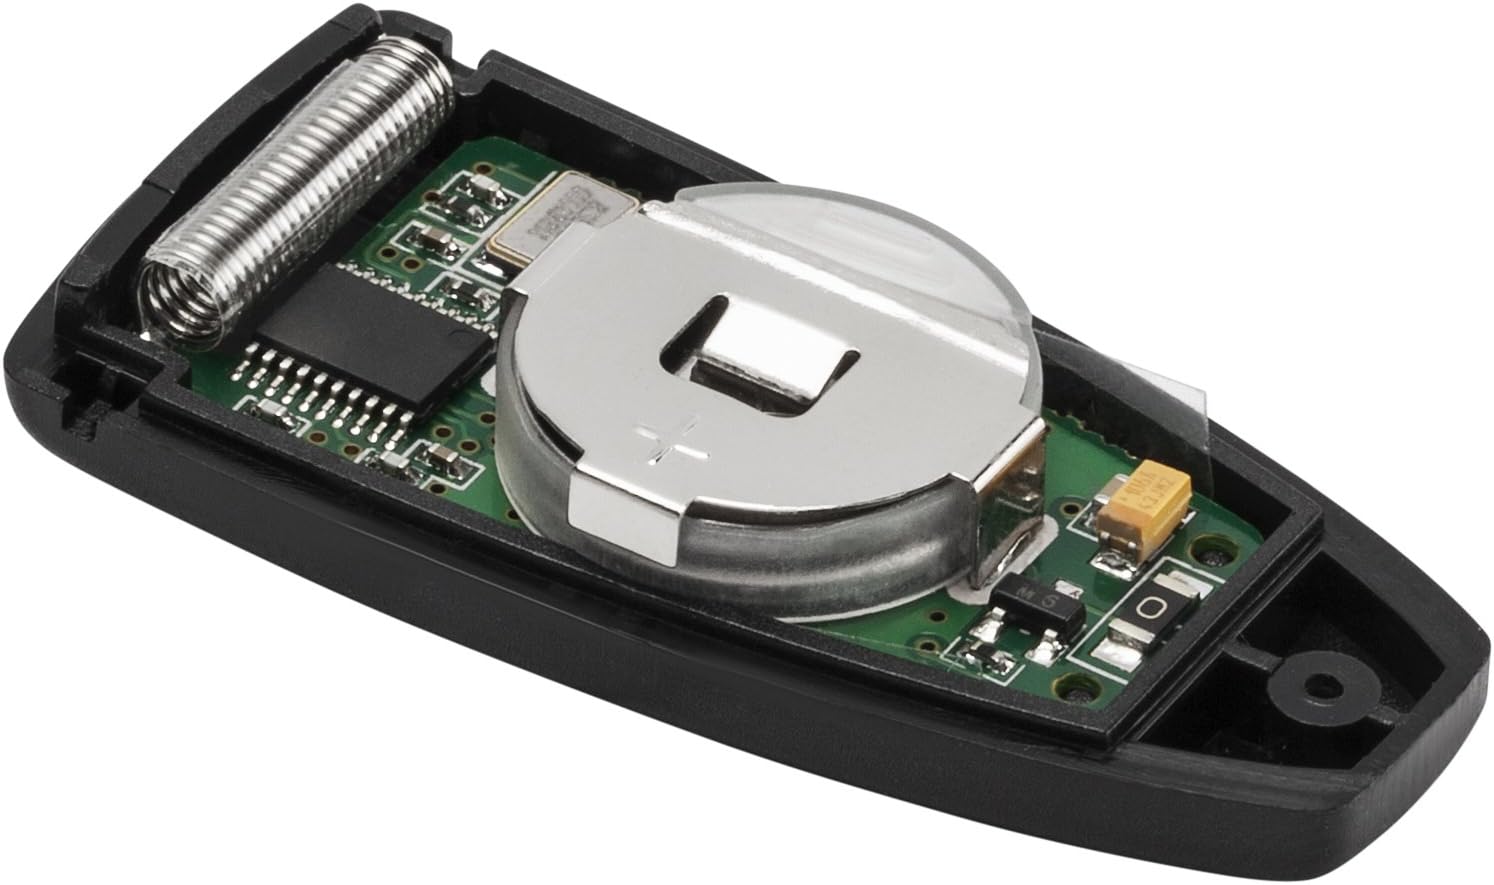
6.1 Remote Transmitter Battery Replacement
The remote transmitters are powered by a small coin-cell battery. If the remote's range decreases significantly or it stops responding, the battery may need replacement.
- Locate the small notch or seam on the remote casing.
- Carefully pry open the remote casing using a small flat-head screwdriver or a coin.
- Note the orientation of the existing battery (positive (+) side up or down).
- Remove the old battery and insert a new, identical coin-cell battery (e.g., CR2032), ensuring correct polarity.
- Snap the remote casing back together securely.
6.2 General Care
- Keep remote transmitters dry and away from extreme temperatures.
- Avoid dropping the remote transmitters or subjecting them to strong impacts.
- Periodically inspect wiring connections for any signs of corrosion or looseness.
7. Troubleshooting
If you experience issues with your Crimestopper RS1-G5 system, refer to the following common problems and solutions. For complex issues, professional assistance is recommended.
| Problem | Possible Cause | Solution |
|---|---|---|
| Remote start does not activate. |
|
|
| Remote range is poor. |
|
|
| Vehicle starts but immediately shuts off. |
|
|
| Doors do not unlock after remote start. |
|
|
If these steps do not resolve the issue, please contact your authorized Crimestopper dealer or a professional automotive electronics technician for further assistance.
8. Specifications
| Feature | Detail |
|---|---|
| Model Number | RS1-G5 |
| Remote Type | 1-Way, Single Button |
| Maximum Range | 1500 Feet |
| Compatible Devices | Gas, Diesel, Hybrid Engines |
| Transmission Compatibility | Automatic and Manual |
| Programmable Features | 31 (e.g., engine sense, run time, door unlock) |
| Product Dimensions | 7.5 x 5.5 x 6 inches (Control Module) |
| Item Weight | 1.6 pounds (Total Package) |
| What's in the Box | Alarm Module, (2) Remotes, Wiring Harness, Manual |
9. Warranty and Support
9.1 Manufacturer's Warranty
Crimestopper products are covered by a manufacturer's warranty against defects in materials and workmanship. The specific terms and duration of the warranty may vary. Please refer to the warranty card included with your product or visit the official Crimestopper website for detailed warranty information.
Keep your proof of purchase (receipt) as it will be required for any warranty claims.
9.2 Technical Support
For technical assistance, installation questions, or troubleshooting beyond what is covered in this manual, please contact your authorized Crimestopper dealer or the Crimestopper customer support directly. Contact information can typically be found on the manufacturer's website or on the product packaging.
When contacting support, please have your product model number (RS1-G5) and proof of purchase readily available.