1. Introduction
This manual provides detailed instructions for the FOTGA Yongnuo YN140 LED Video Light. Please read this manual thoroughly before use to ensure proper operation and to maximize the product's lifespan. This device is designed to provide adjustable continuous lighting and flash capabilities for photography and videography.
2. Package Contents
Verify that all items listed below are included in your package:
- 1x FOTGA Yongnuo YN140 LED Video Light
- 1x Lamp Base
- 1x Battery Connection Box
- 1x Storage Bag
- 1x Mini Stand
- 1x User Manual (English and Chinese)
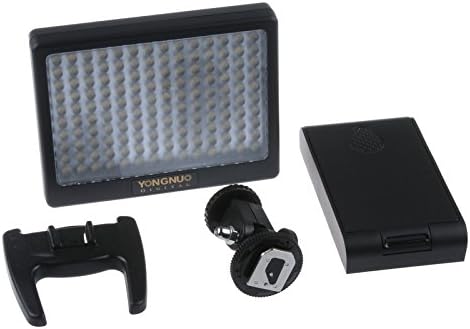
Image 1: Contents of the FOTGA Yongnuo YN140 LED Video Light package, including the LED light panel, battery connection box, lamp base, and mini stand.
3. Key Features
- Adjustable Color Temperature: Ranges from 3200K to 6000K.
- Constant Current Output: Ensures stable and flicker-free light.
- Dual Mode Operation: Functions as both a continuous LED light and a flash.
- High Brightness LEDs: Equipped with 140 high-brightness LEDs.
- Ultra-Thin Design: Facilitates easy portability.
- Durable Mounting: Pure copper bracket for secure attachment to hot shoes and professional lamp stands.
- PC Sync Port: Allows connection to camera flash triggers for synchronized flash.
4. Setup
4.1 Battery Installation
The YN140 LED Video Light supports various battery types. Ensure the device is powered off before installing or removing batteries.
- Open the battery compartment on the battery connection box.
- Insert compatible batteries (NP-F series or AA batteries) according to the polarity indicators.
- Close the battery compartment securely.
- Connect the battery connection box to the main LED light unit.
Compatible Battery Models:
- NP-F330, NP-F530/F550/F570, NP-F730/F750/F770, NP-F930/F950/F960/F970
- 6x AA alkaline batteries or AA Ni-Mh rechargeable batteries
4.2 Mounting the Light
The YN140 can be mounted on a camera's hot shoe or a light stand.
- Hot Shoe Mounting: Attach the lamp base to the bottom of the LED light. Slide the lamp base into your camera's standard hot shoe (e.g., Canon, Nikon) and tighten the locking mechanism.
- Light Stand Mounting: The lamp base also features a 1/4" tripod thread for mounting on compatible light stands or tripods.
5. Operating Instructions
5.1 Power On/Off
Locate the power switch on the device. Toggle it to the "ON" position to power on the light and to "OFF" to power it off.
5.2 Adjusting Brightness
Use the designated control dial or buttons to increase or decrease the light intensity. The YN140 provides a constant current output for consistent brightness.
5.3 Adjusting Color Temperature
The YN140 offers adjustable color temperature. Use the controls to cycle through or fine-tune the color temperature settings between 3200K and 6000K. Pre-set fixed color temperatures are available:
- L1: 3200K (Warm Light)
- L2: 6000K (Cool Light)
- L: 4500K (Neutral Light)
5.4 Flash Mode Operation
The YN140 can operate in both continuous light and flash modes. Select the desired mode using the mode switch or button. When in flash mode, the light can be triggered via the camera's PC sync port.
- Connect the light to your camera's PC sync port using a compatible cable.
- Set your camera and the YN140 to flash mode.
- The flash synchronization time is 1/250s.
6. Specifications
| Feature | Detail |
|---|---|
| Light Source | 140 High Brightness LEDs |
| Power | 9W |
| Operating Modes | Flash or Always On (Continuous) |
| Flash Sync Time | 1/250s |
| Luminous Flux | 1000 lm |
| Color Temperature | 3200K - 6000K (Adjustable) |
| Fixed Color Temperatures | L1 (3200K), L2 (6000K), L (4500K) |
| Color Rendering Index (CRI) | 85% |
| Light Angle | 55° |
| Average LED Lifespan | 20,000 hours |
| Weight | 258g |
| Dimensions (excluding battery box) | 123 x 95 x 23 mm |
| Model Number | AE121 |
| Manufacturer | Fotga |
| Country of Origin | China |
7. Maintenance
- Cleaning: Use a soft, dry cloth to clean the exterior of the light. Do not use harsh chemicals or abrasive materials.
- Storage: When not in use, store the light in the provided storage bag in a cool, dry place, away from direct sunlight and extreme temperatures.
- Battery Care: Remove batteries if the device will not be used for an extended period to prevent leakage.
8. Troubleshooting
- Light not turning on:
- Ensure batteries are correctly installed and fully charged.
- Check that the battery connection box is securely attached to the light unit.
- Verify the power switch is in the "ON" position.
- Inconsistent light output:
- Check battery levels; low batteries can affect performance.
- Ensure connections are secure.
- Flash not triggering:
- Confirm the light is in flash mode.
- Check the PC sync cable connection between the light and the camera.
- Verify camera flash settings.
9. Warranty and Support
For warranty information and technical support, please refer to the documentation provided at the time of purchase or contact your retailer. Keep your proof of purchase for any warranty claims.