1. Introduction
Thank you for choosing the Kaff K OV 60 MGM Oven with Rotisserie. This manual provides essential information for the safe and efficient operation, installation, and maintenance of your new appliance. Please read this manual thoroughly before using the oven and keep it for future reference.
2. Safety Instructions
To prevent personal injury or damage to the appliance, always observe the following safety precautions:
- Electrical Safety: Ensure the oven is properly grounded. Do not operate with a damaged power cord or plug. Disconnect power before cleaning or maintenance.
- Heat Safety: The oven surfaces become hot during operation. Use oven mitts when handling hot dishes or internal components. Keep flammable materials away from the oven.
- Child Safety: This appliance is not intended for use by persons (including children) with reduced physical, sensory or mental capabilities, or lack of experience and knowledge, unless they have been given supervision or instruction concerning use of the appliance by a person responsible for their safety. Children should be supervised to ensure that they do not play with the appliance.
- Ventilation: Ensure adequate ventilation around the oven as specified in the installation section. Do not block ventilation openings.
- Cleaning: Always allow the oven to cool completely before cleaning. Use only recommended cleaning agents and methods.
3. Product Overview
The Kaff K OV 60 MGM is a 60cm built-in oven featuring a rotisserie function, designed for versatile cooking. It includes various heating elements and controls for precise temperature management.

Image 3.1: Front view of the Kaff K OV 60 MGM Oven. This image displays the control panel with knobs, digital display, oven door, and interior racks, along with the rotisserie spit visible inside.
Components:
- Control Panel: Houses the function selector, temperature control, and digital timer/display.
- Oven Cavity: The main cooking area, equipped with multiple rack positions.
- Oven Door: Features tempered glass for insulation and visibility.
- Rotisserie Spit: A rotating rod used for even roasting of poultry or meat.
- Oven Racks & Tray: For supporting cookware and collecting drips.
4. Installation & Setup
Proper installation is crucial for the safe and efficient operation of your oven. It should be performed by a qualified technician.
4.1 Unpacking
Carefully remove all packaging materials. Inspect the oven for any signs of damage. Report any damage to your retailer immediately. Keep packaging materials away from children.
4.2 Placement and Ventilation
The oven is designed for freestanding installation. Ensure the installation location provides adequate ventilation and clearance from combustible materials. Do not install the oven directly above a refrigerator or freezer.
4.3 Electrical Connection
Connect the oven to a properly grounded electrical outlet with the correct voltage and current rating as specified in the technical specifications. Do not use extension cords or adapters.
4.4 Built-in Dimensions
Refer to the diagram below for the required cabinet dimensions for built-in installation.
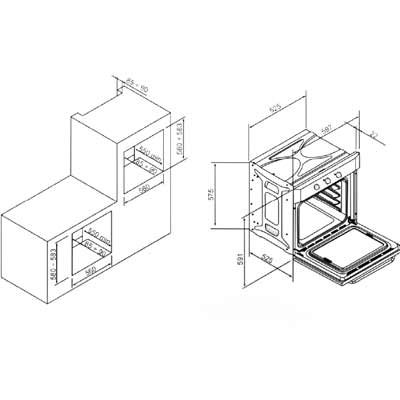
Image 4.1: Technical drawing illustrating the required cut-out dimensions for installing the Kaff K OV 60 MGM oven into a kitchen cabinet. Dimensions are provided in millimeters.
- Oven Dimensions (approx.): 59.5 cm (Width) x 59.5 cm (Height) x 57.5 cm (Depth)
- Cabinet Cut-out (approx.): 56 cm (Width) x 58-59 cm (Height) x 55 cm (Depth)
5. Operating Instructions
Familiarize yourself with the control panel before operating the oven.
5.1 Control Panel Overview
- Function Selector Knob: Used to select the desired cooking function (e.g., Bake, Grill, Rotisserie).
- Temperature Control Knob: Used to set the desired cooking temperature.
- Digital Timer/Display: Shows the time, cooking duration, and other settings.
5.2 First Use
Before cooking food, heat the empty oven for approximately 30 minutes at the maximum temperature setting to burn off any manufacturing residues. Ensure the kitchen is well-ventilated during this process.
5.3 Setting the Time
Upon first connection or after a power outage, the display will flash. Use the timer buttons to set the current time.
5.4 Basic Operation
- Place food in the oven on an appropriate rack or tray.
- Turn the Function Selector Knob to the desired cooking mode.
- Turn the Temperature Control Knob to the desired temperature.
- The oven will begin heating. The indicator light will turn off once the set temperature is reached.
- To stop cooking, turn both knobs to the 'OFF' position.
5.5 Using the Rotisserie Function
The rotisserie function is ideal for roasting whole chickens or large cuts of meat, ensuring even cooking and browning.
- Secure the food onto the rotisserie spit, ensuring it is balanced.
- Insert the spit into the designated rotisserie motor socket inside the oven and rest the other end on its support.
- Place a drip tray on the bottom rack to catch juices.
- Select the rotisserie function using the Function Selector Knob.
- Set the desired temperature.
- Monitor cooking progress through the oven door.
5.6 Timer Functions
Your oven may include various timer functions:
- Minute Minder: A simple countdown timer that sounds an alarm when finished, but does not turn off the oven.
- Cooking Duration: Allows you to set a specific cooking time, after which the oven will automatically turn off.
- End Time: Allows you to set a specific time for the oven to turn off.
Refer to the specific instructions on your control panel for setting these functions.
6. Maintenance & Cleaning
Regular cleaning and maintenance will ensure the longevity and optimal performance of your oven.
6.1 General Cleaning
- Always ensure the oven is cool and disconnected from power before cleaning.
- Exterior: Wipe with a soft cloth dampened with warm soapy water. For stainless steel surfaces, use a non-abrasive stainless steel cleaner.
- Interior: Remove loose food particles. For stubborn stains, use a specialized oven cleaner according to the product instructions. Avoid abrasive cleaners or scourers.
- Oven Racks and Trays: Can be washed in warm soapy water or in a dishwasher.
6.2 Oven Door Cleaning
The tempered glass door can be cleaned with a soft cloth and glass cleaner. Do not use harsh abrasive cleaners or sharp metal scrapers as they can scratch the surface, which may result in shattering of the glass.
6.3 Replacing the Oven Light
Ensure the oven is cool and disconnected from the power supply. Unscrew the protective glass cover, replace the bulb with a new oven-specific bulb (check wattage and type in specifications), and reattach the cover.
7. Troubleshooting
Before contacting customer service, please refer to the following common issues and their solutions:
| Problem | Possible Cause | Solution |
|---|---|---|
| Oven does not heat up. | No power supply; Function/Temperature knobs not set; Timer not set correctly. | Check power connection and circuit breaker. Ensure knobs are set to desired function and temperature. Check timer settings. |
| Oven light not working. | Bulb is faulty or loose. | Replace the oven light bulb (refer to Section 6.3). |
| Uneven cooking. | Incorrect rack position; Overcrowding the oven; Door opened too frequently. | Use recommended rack positions. Avoid overcrowding. Minimize opening the oven door during cooking. |
| Rotisserie not rotating. | Spit not properly inserted; Motor fault. | Ensure the spit is correctly engaged with the motor socket. If problem persists, contact service. |
If the problem persists after attempting these solutions, please contact Kaff customer support.
8. Specifications
| Feature | Specification |
|---|---|
| Brand | Kaff |
| Model | K OV 60 MGM |
| Capacity | 60 litres |
| Installation Type | Freestanding |
| Special Features | Temperature Control, Rotisserie |
| Oven Cooking Mode | Conduction |
| Material | 18/10 Steel |
| Door Material | Tempered Glass |
| Defrost System | Auto Defrost |
| Size | 60cm |
| Included Components | Built-in oven, Rotisserie spit |
9. Warranty and Support
Your Kaff K OV 60 MGM Oven is covered by a manufacturer's warranty. Please refer to the warranty card provided with your purchase for specific terms and conditions, including the warranty period and coverage details.
For technical assistance, spare parts, or to schedule a service appointment, please contact Kaff customer support. Have your model number (K OV 60 MGM) and purchase date ready when you call.