Introduction
This manual provides detailed instructions for the Neewer 750II TTL Flash Speedlite kit. This kit includes the VK750 II Flash, a 2.4 GHz wireless trigger, N1 and N3 cables, a flash diffuser, and a lens cap holder. The flash offers various modes including TTL, Manual, Multi, S1, and S2, with a high guide number of 58 (ISO 100, 105mm). It is designed for use with Nikon DSLR cameras. Please read this manual thoroughly before using the product to ensure proper operation and longevity.
1. Setup
1.1 Battery Installation
The Neewer 750II Flash requires 4x AA-size batteries (alkaline or Ni-MH rechargeable batteries are compatible). The 2.4 GHz wireless trigger requires 2x AAA batteries.
- Open the battery compartment cover on the back of the flash unit and the wireless trigger.
- Insert the batteries according to the polarity indicators (+/-).
- Close the battery compartment cover securely.
1.2 Mounting the Flash on Camera
To attach the flash to your Nikon DSLR camera:
- Ensure both the camera and flash are powered off.
- Slide the flash's hot shoe mount into the camera's hot shoe slot.
- Tighten the locking ring or lever on the flash unit to secure it in place.
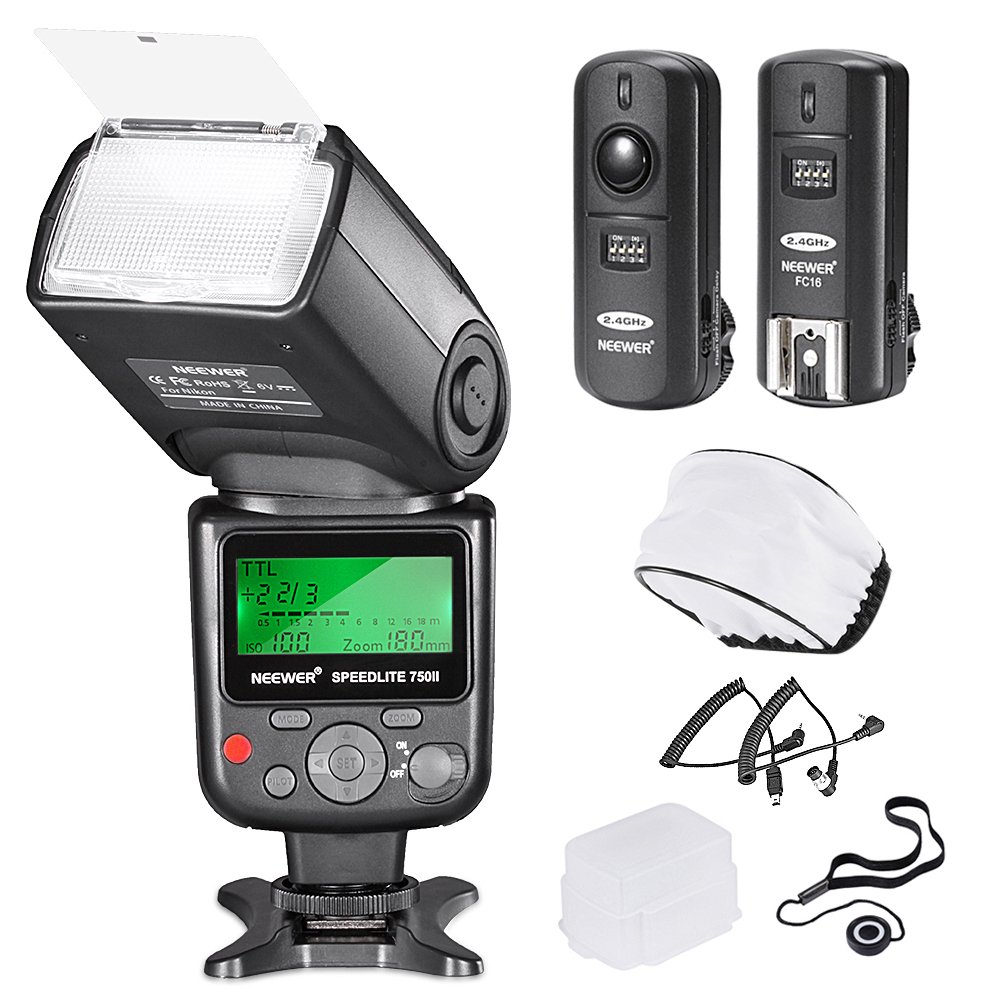
Image: Neewer 750II TTL Flash Speedlite mounted on a Nikon DSLR camera, with the product box next to it.
1.3 Using the Wireless Trigger
The 2.4 GHz wireless trigger allows for off-camera flash operation and remote shutter release.
- Mount the wireless trigger receiver onto your camera's hot shoe.
- Connect the appropriate N1 or N3 cable from the receiver to your camera's remote port.
- Ensure the flash unit is set to a compatible wireless slave mode (e.g., S1 or S2, if applicable, or triggered by the receiver).
- Power on both the receiver and the handheld transmitter. Select the same channel on both units (16 selectable channels).

Image: A Nikon DSLR camera with the wireless trigger receiver mounted on its hot shoe, and the handheld remote control shown separately, indicating wireless communication.

Image: A Nikon DSLR camera connected to the wireless trigger receiver via a coiled N1/N3 cable, with the handheld remote control shown separately.
2. Operating Instructions
2.1 Power On/Off
To power on the flash, slide the power switch to the "ON" position. To power off, slide it to "OFF".
2.2 Flash Modes
Press the MODE button to cycle through the available flash modes:
- TTL (Through-The-Lens) Mode: The flash output is automatically controlled by the camera's metering system for optimal exposure.
- M (Manual) Mode: Allows you to manually set the flash output from 1/128 to 1/1 power. Use the dial to adjust the power level.
- MULTI (Stroboscopic) Mode: Fires a series of rapid flashes during a single exposure to capture multiple movements of a subject. You can set the flash frequency, number of flashes, and flash output.
- S1 (Slave 1) Mode: The flash fires in response to a single pre-flash from a master flash. Suitable for manual or TTL master flashes without pre-flash.
- S2 (Slave 2) Mode: The flash fires in response to the second flash from a master flash, ignoring the pre-flash. Suitable for master flashes with pre-flash.

Image: Front and rear views of the Neewer 750II TTL Flash Speedlite, highlighting the LCD display and control buttons.

Image: Close-up views of the Neewer 750II TTL Flash Speedlite's LCD display, illustrating the interface for TTL, Manual (M), and Multi (MULTI) modes.
2.3 Flash Head Adjustment
The flash head can be rotated and tilted to bounce light off ceilings or walls for softer illumination.
- Vertical Rotation: 0-90 degrees.
- Horizontal Rotation: 0-270 degrees.
2.4 Using Diffusers
The kit includes soft and hard diffusers to soften the light output and reduce harsh shadows.
- Soft Diffuser: Slides over the flash head to spread light more evenly.
- Hard Diffuser: Provides a slightly more focused but still softened light compared to direct flash.

Image: The Neewer 750II TTL Flash Speedlite shown with both the soft diffuser (top left) and hard diffuser (bottom left) attached to the flash head.
3. Maintenance
- Keep the flash unit and accessories clean and dry. Use a soft, dry cloth to wipe surfaces.
- Avoid exposing the unit to extreme temperatures, humidity, or direct sunlight.
- Remove batteries from the flash and wireless trigger if not in use for an extended period to prevent leakage.
- Store the flash in its protective pouch when not in use.
4. Troubleshooting
4.1 Flash Not Firing
- Check Batteries: Ensure batteries are correctly inserted and have sufficient charge.
- Power On: Verify the flash unit is powered on.
- Secure Connection: If mounted on camera, ensure the flash is securely seated in the hot shoe and the locking mechanism is engaged.
- Recycle Time: Allow sufficient recycle time after a full-power flash. The ready indicator should illuminate.
- Camera Settings: Check your camera's flash settings to ensure external flash is enabled.
4.2 Wireless Trigger Issues
- Battery Check: Ensure both the transmitter and receiver have fresh batteries.
- Channel Matching: Verify that the transmitter and receiver are set to the same channel.
- Range: Ensure the units are within the effective operating range (up to 25 meters / 82 feet).
- Flash Mode: Ensure the flash is in a compatible slave mode (S1/S2) or configured to be triggered by the receiver.
4.3 Inconsistent Exposure in TTL Mode
- Flash Exposure Compensation: Adjust flash exposure compensation on your camera or flash unit if available.
- Subject Distance: Ensure the subject is within the effective flash range.
- Reflective Surfaces: Highly reflective or absorptive surfaces can affect TTL metering.
5. Specifications
| Feature | Specification |
|---|---|
| Guide Number | 58 (ISO 100, 105mm) |
| Flash Modes | TTL, M, MULTI, S1, S2 |
| Vertical Rotation Angle | 0-90 degrees |
| Horizontal Rotation Angle | 0-270 degrees |
| Flash Duration | 1/200s - 1/20000s |
| Flash Control | 8 levels of output control (1/128 to 1/1) |
| Color Temperature | 5600K |
| Flash Power Source | 4x AA batteries (Alkaline or Ni-MH) |
| Wireless Trigger Frequency | 2.4 GHz |
| Wireless Trigger Channels | 16 selectable channels |
| Wireless Trigger Sync Speed | Up to 1/250s |
| Wireless Trigger Power Source | 2x AAA batteries |
| Compatible Cameras | Nikon DSLR cameras (e.g., D610, D6, D90, D800, D700, D300, D3S, D4, D3X, D2, N90S, F5, F6, F100, F90X, D4S) |
6. Warranty Information
Please refer to the warranty card included with your product for specific warranty terms and conditions. NEEWER products typically come with a limited warranty covering manufacturing defects. Keep your proof of purchase for warranty claims.
7. Customer Support
For technical assistance, troubleshooting, or product inquiries, please visit the official NEEWER website or contact their customer support team. Contact information can usually be found on the product packaging or the official website.