1. Introduction
This manual provides essential instructions for the proper use and installation of the Replacement Parts Industries (RPI) Compressor PM Kit CMK172. This kit is specifically designed for routine preventative maintenance of Apollo/Midmark quad-headed compressors. Regular maintenance using this kit helps ensure the optimal performance and longevity of your compressor system.
The CMK172 kit includes critical components for filter replacement, which are vital for maintaining air quality and compressor efficiency. Please read this manual thoroughly before proceeding with any maintenance procedures.
2. Safety Information
Always prioritize safety when performing maintenance on compressor systems. Failure to follow safety guidelines can result in injury or damage to equipment.
- Disconnect Power: Ensure the compressor is completely powered off and disconnected from its power source before beginning any maintenance.
- Depressurize System: Verify that the air system is fully depressurized before opening any components.
- Wear Personal Protective Equipment (PPE): Use appropriate PPE, such as safety glasses and gloves, to protect against potential hazards.
- Consult Manufacturer's Manual: Refer to the original compressor manufacturer's manual for specific safety procedures and warnings related to your compressor model.
- Qualified Personnel: Maintenance should only be performed by trained and qualified personnel.
3. Kit Contents
The RPI Compressor PM Kit CMK172 includes the following components:
- Coalescing Filter Element (RPI Part #CMK025): One unit. This filter is crucial for removing oil aerosols and fine particles from compressed air.
- Replacement Filter Element (RPI Part #CME004): Eight units. These elements are used for general air filtration within the compressor system.
- PM Sticker: One unit. For recording the date of maintenance.
- PM Checklist: One unit. A guide to ensure all maintenance steps are completed.
Note: A Fresh Air Intake Filter Kit (RPI Part #CMK003) is available separately and is not included in this PM kit.
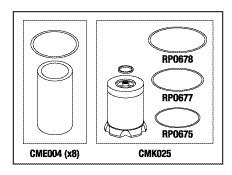
Figure 1: CMK172 Kit Components. This diagram illustrates the primary components of the PM Kit. On the left, eight CME004 replacement filter elements are shown. On the right, the CMK025 coalescing filter element is depicted along with its associated O-rings (RPO678, RPO677, RPO675).
4. Installation Instructions
These instructions provide a general guide for replacing the filter elements. Always refer to your specific compressor model's service manual for detailed, model-specific procedures.
4.1. Replacing CME004 Replacement Filter Elements
- Prepare Compressor: Ensure the compressor is powered off, unplugged, and the air system is fully depressurized.
- Locate Filter Housings: Identify the housings for the CME004 filter elements. These are typically found in the air intake or pre-filtration stages.
- Open Housings: Carefully open the filter housings according to your compressor's manual. Be prepared for any residual oil or debris.
- Remove Old Elements: Extract the old CME004 filter elements. Dispose of them properly.
- Clean Housings: Clean the interior of the filter housings to remove any accumulated dirt or contaminants.
- Install New Elements: Insert the new CME004 filter elements into their respective housings, ensuring they are seated correctly.
- Close Housings: Securely close the filter housings. Check for proper sealing.
4.2. Replacing CMK025 Coalescing Filter Element
- Prepare Compressor: As with the CME004 elements, ensure the compressor is powered off, unplugged, and depressurized.
- Locate Coalescing Filter: Identify the coalescing filter housing, typically located downstream from the compressor pump.
- Open Housing: Carefully open the coalescing filter housing. Note the orientation of the existing filter element and O-rings.
- Remove Old Element and O-rings: Remove the old CMK025 filter element and all associated O-rings (RPO678, RPO677, RPO675). Dispose of them.
- Clean Housing: Thoroughly clean the inside of the coalescing filter housing.
- Install New O-rings: Lubricate and install the new O-rings (RPO678, RPO677, RPO675) in their correct positions.
- Install New Element: Insert the new CMK025 coalescing filter element, ensuring it is correctly oriented and seated.
- Close Housing: Securely close the filter housing.
4.3. Post-Installation
- Reconnect Power: Once all components are securely installed, reconnect the compressor to its power source.
- Test System: Power on the compressor and check for any air leaks around the newly installed filters. Monitor system performance.
- Update PM Sticker: Apply the new PM sticker and fill in the date of maintenance.
- Complete PM Checklist: Use the provided checklist to confirm all maintenance steps have been completed.
5. Maintenance Schedule
The frequency of filter replacement depends on the compressor's usage, environmental conditions, and the manufacturer's recommendations. As a general guideline, it is recommended to perform preventative maintenance and replace filter elements at least annually, or more frequently if operating in dusty or high-demand environments.
- Regular Inspection: Periodically inspect filter elements for signs of clogging or damage between scheduled replacements.
- Air Quality: If air quality deteriorates or compressor performance is affected, inspect and replace filters as needed.
6. Troubleshooting
This section addresses common issues that may arise during or after the installation of the PM kit.
| Problem | Possible Cause | Solution |
|---|---|---|
| Air Leakage around Filter Housing | Improperly seated O-rings; Housing not tightened correctly; Damaged O-ring. | Ensure O-rings are correctly positioned and lubricated. Tighten housing securely. Inspect O-rings for damage and replace if necessary. |
| Reduced Airflow/Pressure after Filter Replacement | Incorrect filter installation; Filter element not fully seated; Obstruction in air path. | Re-check filter installation to ensure elements are correctly seated. Verify no tools or debris were left in the air path. |
| Oil in Compressed Air (after coalescing filter replacement) | Coalescing filter installed incorrectly; Damaged coalescing filter; Bypass of filter. | Verify the CMK025 coalescing filter is installed with the correct orientation. Inspect for damage. Ensure no air is bypassing the filter. |
7. Specifications
This kit is designed for the following compressor models:
- AOCOT62
- AOCOT62D
- AOCOT62DQ
- AOCOT62Q
- AOCOT82
- AOCOT82D
- AOCOT82DQ
- AOCOT82Q
Kit Part Number: CMK172
Manufacturer: Replacement Parts Industries RPI
Item Weight: 7 Pounds
8. Warranty and Support
For specific warranty information regarding the RPI Compressor PM Kit CMK172, please refer to the documentation provided with your purchase or contact Replacement Parts Industries RPI directly. For technical support or inquiries, please reach out to your authorized RPI distributor or visit the official Replacement Parts Industries RPI website.
Contact Information: Please refer to your purchase invoice or the manufacturer's official website for the most current contact details.