1. Introduction
The TC HELICON PLAY ELECTRIC is a versatile vocal multi-effects and looper pedal designed for musicians. It combines professional-quality vocal effects and tone processing with guitar effects, allowing for integrated performance. This manual provides essential information for setting up, operating, and maintaining your device.
Key features include:
- Professional quality vocal effects and tone processing with excellent operability.
- Generates natural vocal harmonies guided by guitar input.
- Equipped with guitar effect styles ported from TC Electronic's popular TonePrint pedal series.
- Features realistic amp simulation inherited from VoiceLive 3.
- Adaptive Tone function for intelligent, automatic adjustment of compression, EQ, de-esser, and gate settings to enhance vocal presence and impact.
2. Setup
2.1 Unpacking and Initial Inspection
Carefully unpack your TC HELICON PLAY ELECTRIC unit. Inspect the device for any signs of damage that may have occurred during shipping. Retain all packaging materials for future transport or if the unit needs to be returned.
2.2 Connecting the Device
Refer to the diagram below for proper connection of your microphone, guitar, and output to an amplifier or PA system.

Figure 2.2.1: Front panel overview of the TC Helicon Play Electric, showing microphone input, guitar input/output, and main display.

Figure 2.2.2: Rear panel connections of the TC Helicon Play Electric, including power input, pedal input, XLR outputs (Left/Right), AUX input, Guitar In/Thru/Out, and Mic In.
- Power: Connect the included 12V DC, 400mA power adapter to the POWER input.
- Microphone: Connect your microphone to the MIC IN XLR input.
- Guitar: Connect your guitar to the GUITAR IN 1/4" jack. If you wish to send the unprocessed guitar signal to another device, use the GUITAR THRU output. Connect the processed guitar signal from GUITAR OUT to your guitar amplifier or mixer.
- Outputs: Connect the OUTPUTS LEFT and RIGHT XLR jacks to your PA system or mixer.
- Auxiliary Input: Use the AUX 1/8" stereo input for connecting an external audio player.
- Pedal: Connect an optional external footswitch to the PEDAL input for additional control.
- USB: The USB port is for firmware updates and connection to VoiceSupport software.
2.3 Mic Gain Adjustment
The Mic Gain knob is located on the side of the unit. Adjust this knob to ensure optimal input level from your microphone without clipping.

Figure 2.3.1: Side view of the TC Helicon Play Electric, highlighting the Mic Gain adjustment knob.
3. Operating Instructions
3.1 Powering On and Off
Connect the power adapter. The unit will power on automatically. To power off, disconnect the power adapter.
3.2 Navigating Presets
Use the central rotary encoder and the UP/DOWN buttons to browse through the available vocal and guitar presets. The main display will show the current preset name and number.
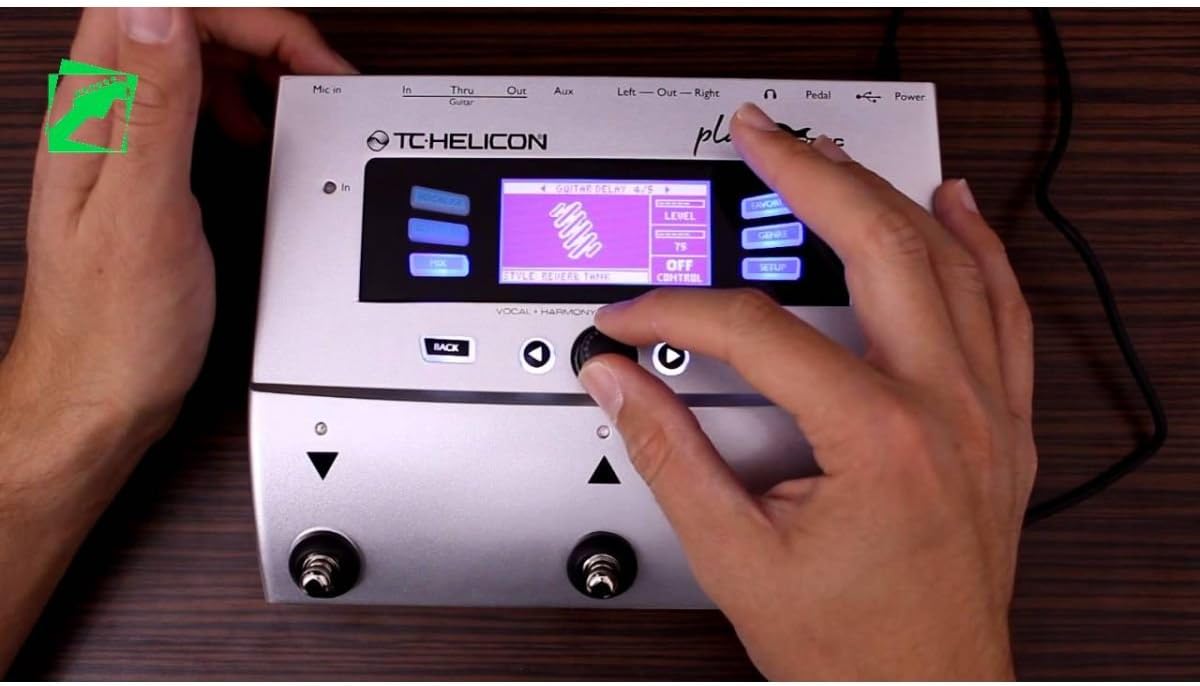
Figure 3.2.1: Close-up of the TC Helicon Play Electric's user interface, showing the display, navigation buttons, and rotary encoder.
3.3 Activating Effects
The footswitches on the unit allow for quick activation and deactivation of effects. The HIT button can be held for talk mode or to engage specific effect layers.
3.4 Customizing Effects
Press the VOCAL FX or GUITAR FX buttons to enter the respective effect editing menus. Use the rotary encoder and navigation buttons to adjust parameters. Press STORE to save your customized presets.
3.5 Looping Functionality
The PLAY ELECTRIC includes a looper. Refer to the on-screen prompts and dedicated looper controls (if available, or assigned to footswitches) for recording, overdubbing, and playback.
4. Maintenance
4.1 Cleaning
Wipe the unit with a soft, dry cloth. Do not use abrasive cleaners or solvents, as these can damage the finish and internal components.
4.2 Firmware Updates
Periodically check the TC Helicon website for firmware updates. Connect the unit to your computer via USB and use the VoiceSupport software to perform updates. Ensure a stable power supply during the update process.
5. Troubleshooting
| Problem | Possible Cause | Solution |
|---|---|---|
| No sound output. | Incorrect cable connections, low volume settings, power issue. | Check all audio cables (Mic In, Guitar In, Outputs). Ensure volume levels on the PLAY ELECTRIC and connected devices are adequate. Verify power adapter is securely connected. |
| Distorted vocal/guitar sound. | Input gain too high, incorrect effect settings. | Adjust the Mic Gain knob (Figure 2.3.1) to prevent clipping. Check individual effect parameters for excessive drive or gain settings. |
| Harmonies are out of key. | Guitar input not detected or incorrect key setting. | Ensure your guitar is properly connected and playing. The unit uses guitar input to guide harmonies. Check harmony settings for manual key selection if applicable. |
| Unit freezes or behaves erratically. | Software glitch, power instability. | Disconnect and reconnect power to restart the unit. If the problem persists, consider performing a firmware update via USB. |
6. Specifications
| Feature | Detail |
|---|---|
| Brand | TC Helicon |
| Model Number | 996363005 |
| Item Weight | 0.94 kg |
| Product Dimensions | 27.9 x 15.2 x 7.6 cm |
| Voltage | 12V |
| Current | 0.4 mA |
| Audio Output Effects | Delay, Looper |
| Hardware Interface | USB |
| Signal Format | Analog |
| UPC | 750408410344 |
| GTIN | 05706622019806 |
7. Warranty & Support
7.1 Warranty Information
The product comes with a 1-year warranty from the date of delivery. A delivery receipt is required. The warranty is valid for use within Japan. By registering the product online within 90 days of purchase, the warranty period can be extended to 3 years.
7.2 Customer Support
For technical support, troubleshooting assistance, or warranty claims, please visit the official TC Helicon website or contact their authorized service centers. Keep your purchase receipt and product serial number handy when contacting support.
Official TC Helicon Website: www.tchelicon.com