1. Introduction
Thank you for choosing the Montolit Masterpiuma Evolution 3 75P3 Tile Cutter. This professional-grade tool is engineered for precise and efficient cutting of various tile types, including porcelain and ceramic. Designed with advanced features for ease of use and durability, this manual will guide you through its setup, operation, maintenance, and provide essential specifications to ensure optimal performance and longevity of your tile cutter.

Figure 1.1: Overview of the Montolit Masterpiuma Evolution 3 75P3 Tile Cutter.
2. Key Features
- Accurate and Powerful Ergonomic Push Scribing Handle: Designed for comfortable grip and precise scoring with minimal effort.
- Self-Adjustable Patented Scoring System: Automatically adapts to different tile thicknesses, ensuring consistent and fast cutting and splitting.
- Quick Setup and Portability: The design allows for rapid deployment and easy transport without needing to dismantle the unit.
- Pulse Engraving: Enhances the scoring process for cleaner breaks.
- Durable Aluminum Construction: Ensures long-lasting performance and resistance to wear.
3. Setup and Assembly
The Montolit Masterpiuma Evolution 3 75P3 is designed for minimal assembly. Follow these steps to prepare your tile cutter for use:
- Unpacking: Carefully remove all components from the packaging. Inspect for any shipping damage.
- Placement: Place the tile cutter on a stable, flat, and level surface. Ensure there is adequate space around the cutter for tile manipulation and safe operation.
- Check Components: Verify that the scoring wheel is properly installed and rotates freely. Ensure the breaking mechanism operates smoothly.
- Adjust Measuring Guides: Familiarize yourself with the adjustable measuring guides and angle stops. These can be set to ensure accurate cuts for various tile sizes and angles.
4. Operating Instructions
Proper operation is key to achieving clean and accurate cuts. Always wear appropriate safety gear, including safety glasses.
4.1. Preparing the Tile
- Clean the tile surface to remove any dust or debris.
- Mark the desired cut line clearly on the tile.
- Position the tile on the cutter's bed, aligning the marked line with the scoring wheel's path. Use the measuring guides for precise alignment.
4.2. Scoring the Tile
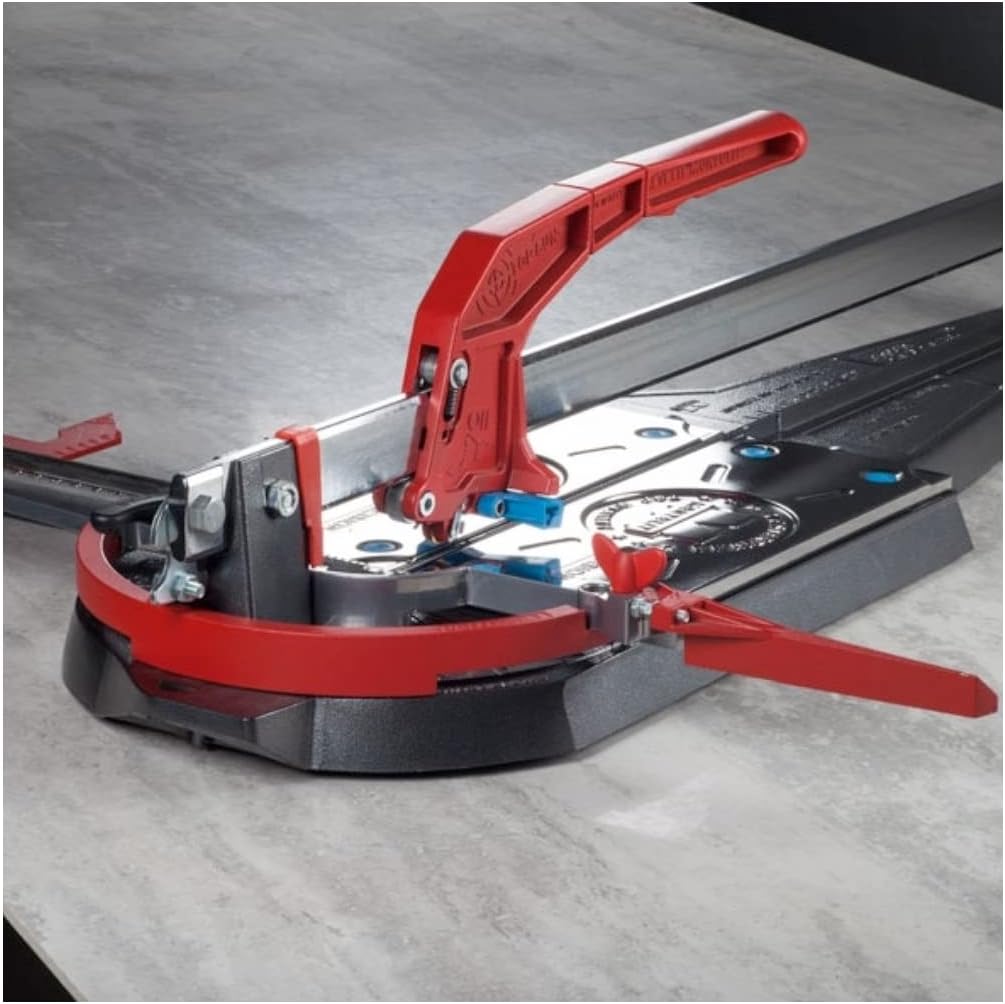
Figure 4.1: Close-up view of the scoring wheel and its contact with the tile surface.
- Lower the scoring handle so the wheel makes contact with the tile at the edge furthest from you.
- Apply firm, consistent pressure to the handle.
- Push the handle smoothly and continuously along the tile, from the back edge to the front edge, creating a single, uninterrupted score line. Avoid multiple passes, as this can weaken the tile and lead to an uneven break.
- Listen for a consistent scoring sound, indicating proper pressure.
4.3. Breaking the Tile

Figure 4.2: The ergonomic handle and breaking mechanism of the tile cutter.
- Once the score line is complete, position the breaking foot directly over the score line.
- Apply a quick, decisive downward pressure on the handle. The tile will snap cleanly along the score line.
- For diagonal cuts, ensure the tile is properly supported on both sides of the score line before breaking.
5. Maintenance
Regular maintenance will extend the life and performance of your Montolit Masterpiuma Evolution 3 tile cutter.
- Cleaning: After each use, wipe down the cutter with a damp cloth to remove tile dust and debris. Ensure the rails and scoring mechanism are free of obstructions.
- Scoring Wheel: The scoring wheel is a wear item. Replace it when you notice a decrease in cutting performance or uneven scores. Refer to the manufacturer's guidelines for compatible replacement wheels.
- Lubrication: Periodically apply a light machine oil to the sliding parts of the handle and rails to ensure smooth operation. Avoid over-lubrication.
- Storage: Store the tile cutter in a clean, dry place, away from extreme temperatures and humidity. The compact design allows for easy storage without disassembly.

Figure 5.1: Detail of the scoring wheel assembly, showing the fluid reservoir for enhanced scoring.
6. Troubleshooting
If you encounter issues with your tile cutter, refer to the following common problems and solutions:
| Problem | Possible Cause | Solution |
|---|---|---|
| Tile not breaking cleanly or uneven break. | Insufficient or inconsistent scoring pressure; dull scoring wheel; multiple score lines; tile not clean. | Apply firm, consistent pressure in a single pass. Replace scoring wheel if dull. Ensure tile is clean. |
| Difficulty scoring the tile. | Dull scoring wheel; insufficient pressure; debris on tile or rails. | Replace scoring wheel. Increase pressure. Clean tile surface and cutter rails. |
| Handle movement is stiff or rough. | Lack of lubrication; accumulated dust/debris on rails. | Clean rails thoroughly. Apply a light machine oil to the sliding parts. |
| Cutter not stable during operation. | Uneven work surface. | Ensure the cutter is placed on a flat, stable, and level surface. |
7. Specifications
Detailed specifications for the Montolit Masterpiuma Evolution 3 75P3 Tile Cutter:

Figure 7.1: Technical specifications of the tile cutter.
| Specification | Value |
|---|---|
| Manufacturer | Montolit |
| Model Number | '75 P3' taglio cm.75-53x53 |
| Part Number | 6050320 |
| Max Cutting Length | 750 mm (approx. 29.5 inches) |
| Max Tile Dimensions for Diagonal Cut | 530 x 530 mm (approx. 20.8 x 20.8 inches) |
| Max Cutting Thickness | 22 mm (approx. 0.86 inches) |
| Cutting Angle Range | 0° - 45° |
| Item Weight | 11.8 kg (approx. 26.0 lbs) |
| Product Dimensions | 19.69 x 19.69 x 11.02 inches |
| Material | Aluminum |
| Batteries Required? | No |
| Date First Available | July 28, 2014 |
8. Warranty and Support
For warranty information and customer support, please refer to the documentation included with your purchase or contact the authorized Montolit dealer or the manufacturer directly. Keep your proof of purchase for any warranty claims.
For technical assistance or spare parts, please reach out to Montolit customer service or your local distributor. Contact details can typically be found on the manufacturer's official website.