1. Important Safety Information
Read all instructions carefully before assembling and operating your grill. Failure to follow these instructions could result in fire, explosion, or serious injury.
General Safety Warnings
- FOR OUTDOOR USE ONLY. Do not operate this appliance inside any building, garage, or other enclosed area.
- Keep the grill area clear and free from combustible materials, gasoline, and other flammable vapors and liquids.
- Maintain a minimum clearance of 10 inches (25 cm) from the back and sides of the grill to any combustible construction.
- Do not obstruct the flow of combustion and ventilation air.
- Always perform a leak test on gas connections before initial use and after any cylinder change.
- Never store a spare LP cylinder under or near the grill.
- Keep children and pets away from the grill at all times.
- Do not attempt to repair or alter the grill. Contact qualified service personnel for repairs.
Carbon Monoxide Hazard
This appliance can produce carbon monoxide, which has no odor. Using it in an enclosed space can kill you. Never use this appliance in an enclosed space such as a camper, tent, car, or home.
2. Assembly and Setup
The Landmann 42211 Falcon grill requires assembly. Follow the included user manual for detailed step-by-step instructions. Ensure all components are present before beginning assembly.
Unpacking and Component Check
- Carefully remove all parts from the packaging.
- Verify that all listed components, including cooking grates, casters, and hardware, are present.
- Inspect for any shipping damage.
Assembly Steps Overview
- Attach the casters to the grill base for mobility. Two casters are locking for stability.
- Assemble the side shelves. Note that the side shelves on this model do not fold down.
- Install the heat tents (flame tamers) above the burners.
- Place the stainless steel cooking grates into position.
- Connect the LP gas cylinder to the regulator and hose assembly. Ensure a secure connection.

Image: The Landmann 42211 Falcon gas grill with its left side shelf extended, showcasing the overall assembled structure.

Image: The Landmann 42211 Falcon gas grill with its right side shelf, featuring the side burner with its cover closed.
Leak Testing
Before first use and after every gas cylinder change, perform a leak test:
- Mix a solution of equal parts liquid dish soap and water.
- Ensure all grill control knobs are in the OFF position.
- Turn on the LP cylinder valve.
- Apply the soap solution to all gas connections, including the regulator connection, hose, and manifold connections.
- Look for bubbles. If bubbles appear, there is a leak. Tighten the connection and retest. If the leak persists, do not use the grill and contact customer support.
- After testing, wipe off any soap solution.
3. Operating Instructions
Pre-Lighting Checks
- Ensure the grill is on a level, stable surface.
- Confirm the LP cylinder valve is fully open.
- Keep the grill lid open during ignition.
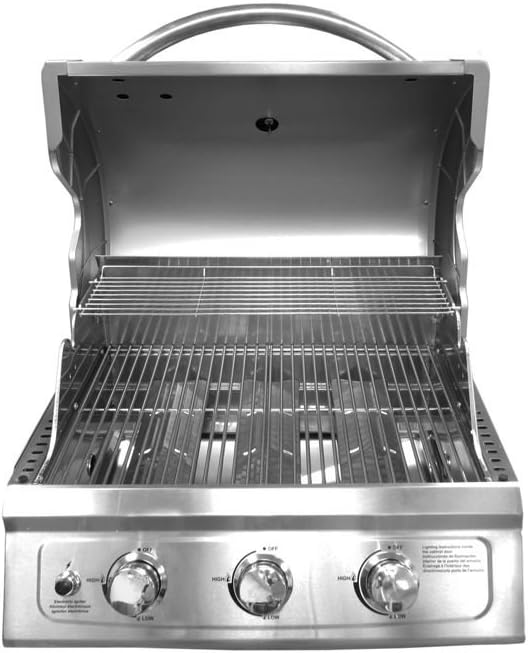
Image: View of the Landmann 42211 Falcon grill's interior, showing the stainless steel cooking grates, warming rack, and the control panel with ignition button and burner knobs.
Lighting the Main Burners
- Open the grill lid.
- Ensure all burner control knobs are in the OFF position.
- Turn on the LP cylinder valve fully.
- Push and turn one main burner control knob to the HIGH position.
- Immediately press and hold the electronic igniter button until the burner lights. You should hear a clicking sound.
- If the burner does not light within 5 seconds, turn the control knob to OFF, wait 5 minutes for gas to dissipate, and repeat the lighting procedure.
- Once the first burner is lit, you can light the other main burners by turning their respective control knobs to HIGH.
Lighting the Side Burner
The side burner has a separate ignition system.
- Open the side burner lid.
- Ensure the side burner control knob is in the OFF position.
- Turn on the LP cylinder valve fully.
- Push and turn the side burner control knob to the HIGH position.
- Immediately press and hold the side burner igniter button until the burner lights.
- If the burner does not light within 5 seconds, turn the control knob to OFF, wait 5 minutes, and repeat.

Image: Close-up view of the Landmann 42211 Falcon's side burner with its lid open, showing the burner grate ready for use.

Image: The Landmann 42211 Falcon's side burner with its lid closed, providing a flat surface when not in use.
Temperature Control
Adjust the burner control knobs between HIGH and LOW settings to achieve the desired cooking temperature. The lid-mounted temperature gauge provides an indication of the internal grill temperature.
Shutting Down the Grill
- Turn all burner control knobs to the OFF position.
- Turn off the LP cylinder valve fully.
4. Care and Maintenance
Regular cleaning and maintenance will extend the life of your grill and ensure optimal performance.
Cleaning Cooking Grates
- After each use, while the grates are still warm, use a grill brush to remove food residue.
- For deeper cleaning, remove grates and wash with warm soapy water, then rinse and dry thoroughly.
Cleaning Stainless Steel Surfaces
- Wipe stainless steel surfaces with a soft cloth and a mild detergent or a specialized stainless steel cleaner.
- Always wipe in the direction of the grain to prevent scratching.
- Avoid abrasive cleaners or scouring pads, which can damage the finish.
Burner Maintenance
- Periodically inspect burner ports for blockages (e.g., spider webs, food debris).
- Use a wire brush or a stiff wire to clean out any obstructions.
- Ensure the air shutters are clear and unobstructed.
LP Tank Storage and Winterization
- Store LP cylinders outdoors in a well-ventilated area, away from direct sunlight and heat sources.
- During extended periods of non-use or for winter storage, disconnect the LP cylinder and store it separately.
- Clean the grill thoroughly, cover it with a weather-resistant grill cover, and store it in a protected outdoor area.
5. Troubleshooting Guide
Refer to this section for common issues and their solutions.
| Problem | Possible Cause | Solution |
|---|---|---|
| Burner does not light with igniter | No gas flow; Igniter electrode dirty or damaged; Low battery in igniter. | Check LP cylinder connection and valve; Clean electrode with a wire brush; Replace AA battery in igniter module. |
| Uneven heating | Blocked burner ports; Grease buildup; Regulator issue. | Clean burner ports; Clean interior of grill and heat tents; Ensure regulator is properly connected and not in bypass mode. |
| Excessive flare-ups | Grease buildup; High fat content food; Grill too hot. | Clean grill interior and drip tray regularly; Trim excess fat from meat; Reduce heat or move food to a cooler part of the grill. |
| Gas odor | Gas leak. | Immediately turn off gas supply at the cylinder. Perform a leak test. Do not operate if leak persists. |
6. Product Specifications
| Feature | Detail |
|---|---|
| Model Number | 42211 |
| Brand | Landmann |
| Fuel Type | Liquid Propane (LP) Gas |
| Main Burner Count | 3 |
| Main Burner BTU | 36,000 BTU |
| Side Burner BTU | 10,000 BTU |
| Total Cooking Area | 577 Square Inches (412 Primary + 165 Secondary) |
| Material | Stainless Steel (Frame, Handle, Burners, Cooking Grates) |
| Color | Stainless Steel |
| Item Dimensions (L x W x H) | 53.78 x 24.53 x 45.75 inches |
| Item Weight | 85 Pounds |
| Assembly Required | Yes |
| Special Features | Locking Casters, Rust Resistant, Corrosion Resistant, Weather Resistant, Digital Temperature Control (gauge), Superior Heat Retention |
| Included Components | Cooking Grates, Casters, User Manual |
| Batteries Required | 1 AA (included for igniter) |
7. Warranty and Customer Support
This Landmann grill is covered by a manufacturer's warranty. Please refer to the separate warranty card included with your product for specific terms, conditions, and duration of coverage.
For technical assistance, replacement parts, or warranty claims, please contact Landmann customer support. Contact information can typically be found on the manufacturer's website or in the original packaging materials.