1. Important Safety Information
Please read this instruction manual thoroughly before operating your new Hitachi refrigerator. Keep this manual for future reference. Failure to follow these instructions may result in property damage, personal injury, or death.
- Electrical Safety: Ensure the refrigerator is connected to a grounded power outlet. Do not use extension cords or adapters.
- Ventilation: Maintain adequate space around the refrigerator for proper ventilation.
- Flammable Materials: Do not store explosive substances or flammable materials inside or near the refrigerator.
- Child Safety: Keep children away from the refrigerator, especially when the doors are open. Prevent children from playing with the controls.
- Moving the Unit: Always use proper lifting techniques and assistance when moving the refrigerator to prevent injury.
2. Product Overview and Features
The Hitachi R-W720FPND1X is a 638-liter frost-free side-by-side refrigerator designed for efficient food storage. It features an Inverter Compressor for energy efficiency and reduced noise, along with a dual cooling system for uniform temperature distribution.
Key Features:
- Capacity: 638 Liters, suitable for large families.
- Frost Free: Automatic defrosting prevents ice build-up.
- Inverter Compressor: Provides precise cooling control, energy efficiency, and durability.
- Toughened Glass Shelves: Spill-proof and capable of holding heavy items.
- Water Dispenser: Convenient access to chilled water.
- Automatic Ice Maker: Produces ice automatically.
- Digital Control Panel: Easy temperature adjustment and mode selection.
- Child Lock: Prevents unintended changes to settings.
- Energy Saving Mode: Optimizes power consumption.
- Large Vegetable Compartment with Moisture-Guard: Maintains optimal humidity for fresh produce.
Product Components:

Figure 2.1: Water Dispenser. This image shows a hand holding a glass under the water dispenser on the refrigerator door, ready to receive chilled water.
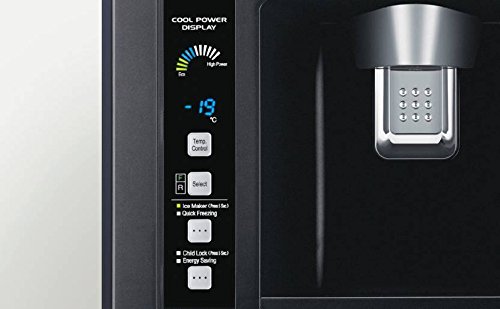
Figure 2.2: Digital Control Panel. This image displays the internal digital control panel with options for temperature control, ice maker, quick freezing, child lock, and energy saving mode, showing a temperature of -19°C.

Figure 2.3: Refrigerator Interior. This image shows the spacious interior of the refrigerator with both French doors open, displaying multiple shelves, door bins, and drawers organized with food items.
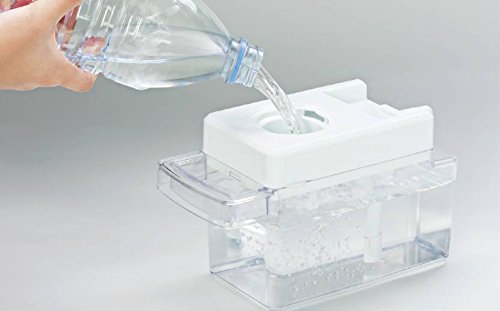
Figure 2.4: Filling Water Tank. This image illustrates the process of refilling the internal water tank, with a hand pouring water from a bottle into the designated reservoir.
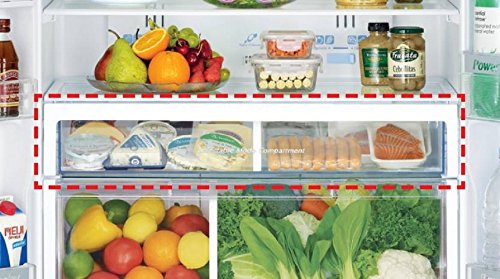
Figure 2.5: Chilled Compartment. This image highlights a specific chilled compartment or multi-purpose drawer within the refrigerator, suitable for storing items like cheese and deli meats.
3. Setup and Installation
3.1 Unpacking
- Remove all packaging materials, including tape and protective films.
- Inspect the refrigerator for any shipping damage. Report any damage immediately to your retailer.
3.2 Placement
- Place the refrigerator on a firm, level floor.
- Ensure adequate clearance (at least 10 cm) around the sides and back for proper air circulation.
- Avoid direct sunlight or heat sources (e.g., stoves, radiators).
- The ambient temperature should be between 10°C and 43°C.
3.3 Leveling
- Adjust the leveling feet at the bottom front of the refrigerator to ensure it is stable and level.
- A slight tilt backward (about 2-3 degrees) helps the doors close properly.
3.4 Electrical Connection
- Plug the power cord into a dedicated, grounded 3-prong outlet.
- Do not use an adapter or extension cord.
3.5 Water Supply (for Dispenser & Ice Maker)
- Fill the internal water tank as shown in Figure 2.4. Ensure the tank is securely placed.
- For initial use, dispense several glasses of water to flush the system.
3.6 Initial Operation
- After plugging in, allow the refrigerator to run for at least 4 hours before loading food. This allows the interior to reach the set temperature.
4. Operating Instructions
4.1 Digital Control Panel
The digital control panel (Figure 2.2) allows you to adjust settings. Press the 'Temp Control' button to cycle through temperature options for the refrigerator and freezer compartments. Use the 'Select' button to confirm.
4.2 Temperature Settings
- Refrigerator Compartment: Recommended setting is typically 3°C to 5°C.
- Freezer Compartment: Recommended setting is typically -18°C to -20°C.
4.3 Automatic Ice Maker
- Ensure the water tank is filled.
- Activate the ice maker function via the digital control panel.
- The first batch of ice may take several hours to produce. Discard the first few batches of ice.
4.4 Water Dispenser
- Place a glass under the dispenser nozzle.
- Press the dispenser lever to release chilled water.
4.5 Quick Freezing Mode
- Select 'Quick Freezing' on the control panel to rapidly freeze newly added items. This mode will automatically deactivate after a set period.
4.6 Energy Saving Mode
- Activate 'Energy Saving' mode from the control panel to optimize power consumption, especially during periods of low usage or when away from home.
4.7 Child Lock
- Engage the 'Child Lock' feature on the control panel to prevent accidental changes to settings.
5. Maintenance
5.1 Cleaning the Interior
- Frequency: Clean regularly, or as needed.
- Procedure: Unplug the refrigerator. Remove all food items. Wash shelves, drawers, and interior surfaces with a mild detergent and warm water. Rinse and dry thoroughly.
- Note: Do not use abrasive cleaners, solvents, or hot water.
5.2 Cleaning the Exterior
- Wipe exterior surfaces with a soft cloth dampened with mild detergent. Dry with a clean, soft cloth.
- Clean door gaskets regularly to ensure a tight seal.
5.3 Water Tank Cleaning
- Remove the water tank and wash it with mild soap and water. Rinse thoroughly to remove any soap residue.
- Clean the water dispenser nozzle with a small brush if necessary.
5.4 Defrosting
- This refrigerator is frost-free and automatically defrosts. Manual defrosting is not required.
5.5 Power Cord Inspection
- Periodically check the power cord for any damage. If damaged, contact qualified service personnel for replacement.
6. Troubleshooting
Before contacting service, please check the following common issues:
| Problem | Possible Cause | Solution |
|---|---|---|
| Refrigerator does not operate. | No power supply; power cord unplugged; circuit breaker tripped. | Check power connection; reset circuit breaker. |
| Refrigerator is not cooling sufficiently. | Door not closed properly; excessive door openings; warm food placed inside; temperature setting too high; poor ventilation. | Ensure doors are sealed; reduce door openings; allow hot food to cool before storing; adjust temperature; ensure proper clearance. |
| Unusual noises. | Refrigerator not level; items vibrating inside; normal compressor operation. | Level the refrigerator; rearrange items; some noises are normal. |
| Water leakage on the floor. | Water tank not installed correctly; drain pan overflow. | Reinstall water tank properly; check and clean drain pan if accessible. |
| Ice maker not producing ice. | Water tank empty; ice maker turned off; water line frozen. | Fill water tank; activate ice maker; contact service if water line is frozen. |
If the problem persists after checking these points, please contact authorized Hitachi service personnel.
7. Specifications
| Feature | Specification |
|---|---|
| Brand | Hitachi |
| Model Number | R-W720FPND1X |
| Capacity | 638 Litres |
| Configuration | Side-by-Side (4-Door) |
| Defrost System Type | Frost Free |
| Compressor Type | Inverter Compressor |
| Shelf Type | Toughened Glass (6 shelves) |
| Refrigerant | R-600A |
| Color | Black |
| Material | Tempered Glass (Door) |
| Special Features | Water Dispenser, Automatic Ice Maker, Digital Control Panel, Child Lock, Energy Saving Mode |
| Installation Type | Freestanding |
| BEE Star Rating | 5 Star Rating |
8. Warranty and Support
8.1 Warranty Information
This Hitachi refrigerator comes with a 1-year comprehensive warranty on the product and a 5-year warranty on the compressor from the date of purchase. Please retain your purchase receipt as proof of warranty.
The warranty covers manufacturing defects under normal use. It does not cover damage caused by improper installation, misuse, accidents, unauthorized repairs, or natural disasters.
8.2 Customer Support
For technical assistance, service requests, or warranty claims, please contact Hitachi customer support. Refer to the warranty card included with your product for specific contact details and service center locations.
When contacting support, please have your model number (R-W720FPND1X) and purchase date readily available.