1. Introduction
This manual provides detailed instructions for the setup, operation, and maintenance of your Schellenberg 20032 Smart Home Wireless Timer Premium. This 5-channel device offers convenient control for various wireless products, including roller shutter drives, awning drives, wireless sockets, and light switches. It supports both manual operation and programmable timer functions.
2. Safety Information
- Read all instructions carefully before use.
- Keep the device away from water and moisture.
- Do not attempt to open or repair the device yourself. Refer all servicing to qualified personnel.
- Use only AAA batteries as specified. Ensure correct polarity when inserting batteries.
- Dispose of used batteries according to local regulations.
- Keep out of reach of children.
3. Package Contents
Verify that all items are present in the package:
- 1x Schellenberg 20032 Wireless Timer Premium
- 1x Wall bracket (for gluing or screwing)
- 2x AAA batteries
- Instruction Manual
4. Product Features
- 5-Channel Control: Manage up to 25 wireless Schellenberg products (5 products per channel).
- Versatile Compatibility: Compatible with Schellenberg roller shutter drives, awning drives, wireless sockets, wireless light switches, and selected gate drives.
- Integrated Timer Functions: Features daily and weekly programs, a random function for vacation simulation, and an astro function for automatic evening closing.
- Flexible Use: Functions as a fixed wall switch when mounted or as a portable remote control when removed from its bracket.
- Clear Display: Large display indicates time, active channel, and program status.
- Wireless Range: Operates within a range of up to 20 meters indoors.
5. Setup
5.1 Inserting Batteries
- Locate the battery compartment cover on the back of the timer.
- Slide or unclip the cover to open it.
- Insert the two AAA batteries, ensuring correct polarity (+/-).
- Replace the battery compartment cover.
5.2 Mounting the Wall Bracket
The wireless timer can be used as a handheld remote or mounted on a wall using the included bracket.
- Adhesive Mounting: Clean the desired wall surface thoroughly. Remove the protective film from the adhesive strips on the back of the wall bracket. Press the bracket firmly onto the wall for at least 30 seconds.
- Screw Mounting: Mark the desired position on the wall. Drill two holes suitable for the screws (not included) and insert wall plugs if necessary. Secure the wall bracket with screws.
Once the bracket is secured, slide the wireless timer into the bracket until it clicks into place.

Image: Hand inserting the Schellenberg Wireless Timer into its wall mount. The timer can be easily removed for use as a remote control.
5.3 Pairing with Wireless Products
To control your Schellenberg wireless products, the timer must be paired with them. The exact pairing procedure may vary slightly depending on the specific Schellenberg product (e.g., roller shutter drive, awning drive, wireless socket). Refer to the individual product's instruction manual for detailed pairing steps.
Generally, the process involves:
- Activating the pairing mode on your Schellenberg wireless product.
- Pressing a specific button or sequence of buttons on the Wireless Timer Premium to send a pairing signal.
- Confirming successful pairing (often indicated by a movement of the roller shutter/awning or an LED on the product).
The timer allows you to assign products to one of its five channels. Each channel can control up to five wireless products as a group.
6. Operating the Wireless Timer

Image: Close-up of the Schellenberg Wireless Timer display and control buttons.
6.1 Manual Control
The timer features dedicated buttons for manual control:
- Up Arrow Button: Moves roller shutters/awnings up, or turns on lights/sockets.
- Down Arrow Button: Moves roller shutters/awnings down, or turns off lights/sockets.
- Stop Button: Halts movement or action.
To operate, select the desired channel using the channel selection buttons (usually numbered 1-5 or indicated by arrows next to the channel number on the display), then press the appropriate control button.

Image: Hand operating the Schellenberg Wireless Timer near a window with roller shutters.
6.2 Channel Selection
The timer has 5 channels. Use the channel selection buttons (often labeled with numbers or arrows) to switch between channels. The active channel is displayed on the screen. Each channel can control a group of up to five paired wireless products.
6.3 Programming Timer Functions
The Wireless Timer Premium offers advanced programming options:
- Setting Current Time and Date: Access the settings menu to set the accurate time and day of the week. This is crucial for all timer functions.
- Daily Programs: Set specific times for your connected devices to open/close or turn on/off each day.
- Weekly Programs: Configure different schedules for weekdays and weekends, or specific days of the week.
- Random Function (Vacation Mode): Activate this function to simulate presence by randomly opening and closing roller shutters or turning lights on/off at varying times. This feature enhances home security when you are away.
- Astro Function: This feature automatically adjusts the closing time of roller shutters based on sunrise and sunset times, providing optimal light control throughout the year.
Detailed instructions for accessing and configuring these programs are typically found in the full product manual or on the manufacturer's website. Use the navigation buttons on the timer to scroll through menu options and confirm selections.
6.4 Using as a Remote Control
The timer can be easily removed from its wall bracket to be used as a portable remote control. This allows you to operate your devices from anywhere within the wireless range (up to 20m indoors).

Image: Person relaxing outdoors, holding the Schellenberg Wireless Timer as a remote control.
7. Maintenance
7.1 Cleaning
Wipe the device with a soft, dry cloth. Do not use abrasive cleaners or solvents, as these can damage the surface or internal components.
7.2 Battery Replacement
When the display becomes dim or the device stops responding, it is time to replace the batteries. Follow the steps in section 5.1 to replace the two AAA batteries. Always replace both batteries at the same time with new ones.
8. Troubleshooting
| Problem | Possible Cause | Solution |
|---|---|---|
| Device does not respond | Dead batteries | Replace AAA batteries (see section 7.2). |
| No control of paired product | Out of range | Move closer to the product or ensure no obstructions. Max indoor range is 20m. |
| Product not properly paired | Repeat the pairing process (see section 5.3). | |
| Timer programs not executing | Incorrect time/date setting | Verify and correct the current time and date settings. |
| Program not activated | Ensure the desired timer program is enabled for the respective channel. |
If you continue to experience issues, please contact Schellenberg customer support.
9. Specifications
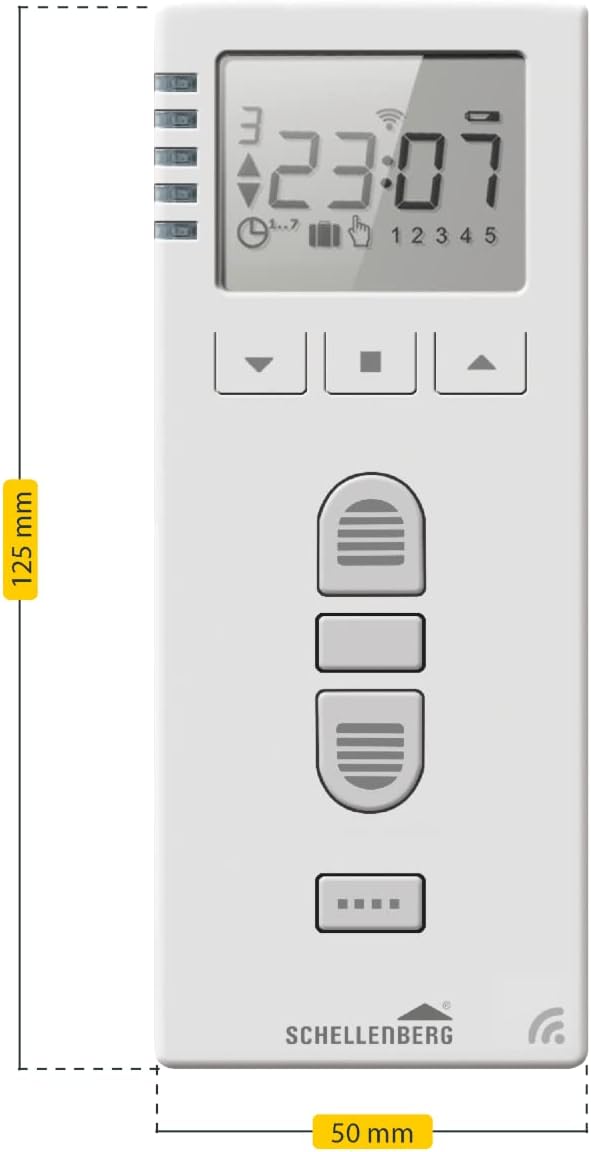
Image: Diagram showing the dimensions of the Schellenberg Wireless Timer: 125 mm length and 50 mm width.
- Model Number: 20032
- Product Dimensions: 12.5 x 5 x 3 cm
- Item Weight: 200 Grams
- Battery Type: 2x AAA (included)
- Channels: 5
- Max. Products per Channel: 5
- Wireless Range: Up to 20m indoors
- Included Components: Wireless Timer, Wall Bracket, 2x AAA Batteries
10. Warranty Information
Schellenberg products are manufactured to high-quality standards. For specific warranty terms and conditions, please refer to the warranty card included with your product or visit the official Schellenberg website. Keep your proof of purchase for any warranty claims.
11. Support
Should you have any questions regarding the installation, operation, or troubleshooting of your Schellenberg Wireless Timer Premium, please contact Schellenberg customer support. You can find contact information on the official Schellenberg website or on the product packaging.
Online Resources: For additional support, FAQs, and product updates, please visit the official Schellenberg website.