1. Introduction
This manual provides comprehensive instructions for the installation, operation, and maintenance of your Retevis RT-9908 Window Intercom System. Designed for clear, two-way voice communication, this system is ideal for environments such as banks, ticket windows, hospitals, and other business settings where communication through a barrier is necessary.
Key features of the Retevis RT-9908 include:
- Automatic Two-Way Voice Transmission: Enables seamless communication without the need to press buttons.
- Recording Output Jack: Allows connection to external recording equipment for documentation.
- Clear Sound Quality: Equipped with a high-sensitivity microphone and anti-interference functions.
- High Power Speakers: Ensures loud and clear audio for both sides of the conversation.
- Flexible Microphone Neck: Adjustable gooseneck microphone for optimal positioning.

Figure 1: Retevis RT-9908 Window Intercom System, showing the main unit with gooseneck microphone and the external speaker.
Video 1: An overview of the Retevis RT-9908 Window Intercom System, demonstrating its components and basic functionality.
2. Product Overview
2.1 Package Contents
Verify that all items are present in the package:
- 1 x Retevis RT-9908 Two-way Counter Intercom (Main Unit)
- 1 x Retevis RT-9908 External Speaker
- 1 x Charger (Power Adapter)
- 1 x English User Manual

Figure 2: Image showing the contents included in the Retevis RT-9908 package: the main unit, external speaker, charger, and user manual.
2.2 Component Identification
Familiarize yourself with the main unit and external speaker components:

Figure 3: Detailed diagram identifying the microphone, speaker, power indicator, On/Off switch, Inside Volume control, Outside Volume control on the main unit, and the Power Jack, Speaker Jack (Extension), and Recording Jack on the rear.
Video 2: A close-up demonstration of the external speaker component of the Retevis RT-9908 Window Intercom.
2.3 Product Dimensions
The dimensions of the main unit and external speaker are as follows:
- Main Unit: 6.5 x 6.3 x 3.74 inches (L x W x H)
- External Speaker Diameter: Approximately 3.07 inches

Figure 4: Visual representation of the main unit and external speaker dimensions, including cable lengths.
3. Setup
3.1 Connecting the System
- Connect the external speaker cable to the 'Extension' (Speaker Jack) port on the rear of the main unit.
- Plug the power adapter into the 'Power Jack' on the rear of the main unit, then connect the adapter to a power outlet.
Video 3: A demonstration of connecting the external speaker and power adapter to the main unit's jacks.

Figure 5: Close-up view of the power jack, speaker jack (extension), and recording jack on the rear of the main unit, illustrating where to connect external devices.
3.2 Placement
Position the main unit on the inside of the counter or window, accessible to the operator. Place the external speaker on the outside of the counter or window, facing the customer. Ensure the gooseneck microphone is positioned for clear voice pickup from the operator.

Figure 6: Example of the Retevis RT-9908 system installed at a bank counter, demonstrating optimal placement for both units.
4. Operation
4.1 Powering On/Off
Locate the red 'POWER' switch on the main unit. Flip the switch to the 'ON' position to power on the device. The power indicator light will illuminate. Flip the switch to 'OFF' to power down.
Video 4: A demonstration of the power switch and volume control buttons on the Retevis RT-9908 main unit.
4.2 Two-Way Communication
The Retevis RT-9908 features automatic two-way voice transmission. Once powered on, the system allows simultaneous speaking and listening between the operator and the customer without requiring any button presses.
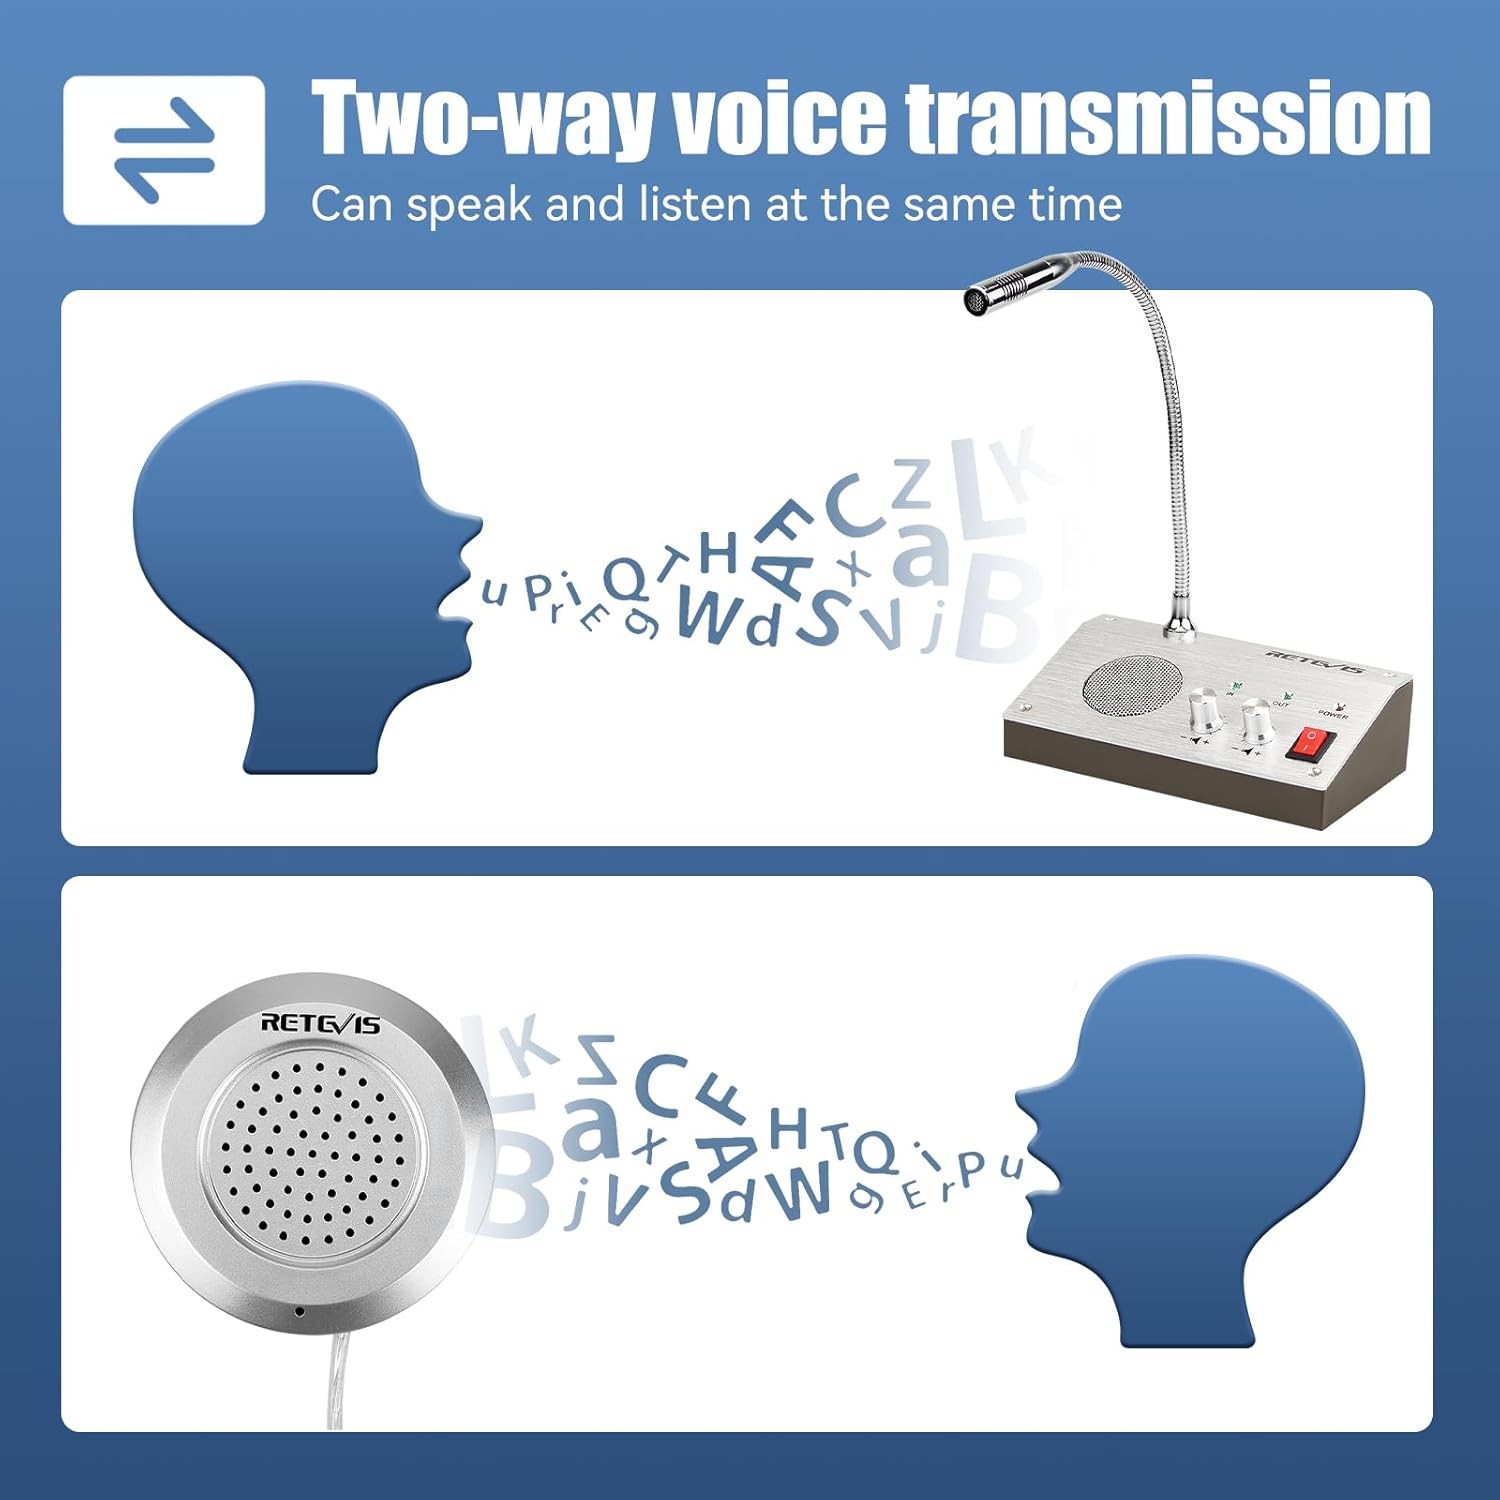
Figure 7: Diagram showing the bidirectional flow of sound, indicating that both parties can speak and listen simultaneously.
4.3 Adjusting Volume
Two rotary knobs are provided for independent volume control:
- 'IN' Volume: Controls the volume of the sound coming from the external speaker (customer's voice heard by the operator).
- 'OUT' Volume: Controls the volume of the sound going to the external speaker (operator's voice heard by the customer).
Adjust these knobs to achieve a comfortable and clear listening level for both parties, minimizing echo or feedback.

Figure 8: Close-up of the main unit highlighting the 'IN' and 'OUT' volume control knobs for independent adjustment.
4.4 Using the Recording Output
The system includes a recording output jack, allowing you to connect external recording equipment. The system automatically recognizes and processes the voice signal during a call, so no additional action is required to record conversations once connected.

Figure 9: Detailed view of the recording output jack on the main unit, designed for connecting external recording devices.
4.5 Microphone Adjustment
The gooseneck microphone on the main unit is flexible and can be rotated 360 degrees. Adjust it to a suitable angle and height for comfortable and clear voice pickup, ensuring optimal communication.

Figure 10: Image demonstrating the flexibility and 360-degree rotation capability of the gooseneck microphone.
4.6 Sound Quality Demonstration
Video 5: A short clip demonstrating the sound quality of the Retevis RT-9908 Window Intercom system.
Video 6: A demonstration focusing on the sound output from the external speaker of the Retevis RT-9908 Window Intercom.
5. Maintenance
To ensure the longevity and optimal performance of your Retevis RT-9908 Window Intercom System, follow these maintenance guidelines:
- Cleaning: Use a soft, dry cloth to clean the surfaces of the main unit and external speaker. Avoid using abrasive cleaners, solvents, or strong chemicals, as these can damage the finish and internal components.
- Environment: Keep the device in a dry environment, away from direct sunlight, extreme temperatures, and high humidity.
- Cables: Periodically check all cables for any signs of wear or damage. Ensure connections are secure.
- Handling: Handle the gooseneck microphone gently to prevent damage to its flexible neck.
6. Troubleshooting
If you encounter issues with your Retevis RT-9908, refer to the following table for common problems and solutions:
| Problem | Possible Cause | Solution |
|---|---|---|
| No sound from either unit | Power is off; cables are loose or disconnected; volume is set to minimum. | Ensure the power switch is ON and the power indicator is lit. Check all cable connections (power, external speaker). Increase 'IN' and 'OUT' volume knobs. |
| Distorted or unclear sound | Volume too high; microphone too far/close; interference. | Adjust 'IN' and 'OUT' volume levels to a moderate setting. Reposition the gooseneck microphone closer to the operator's mouth. Ensure no strong electromagnetic devices are nearby. |
| Intermittent connection or sound cutting out | Loose cable connection; faulty cable or jack. | Firmly re-plug all cables, especially the external speaker cable. If the problem persists, inspect cables for damage. Contact support if issues continue. |
| External recording not working | Recording device not connected correctly; recording device settings. | Ensure the recording device is properly connected to the 'Recording Jack'. Check the recording device's own power and recording settings. |

Figure 11: Visual representation of common issues like 'Not work', 'No sound', or 'Side not work', indicating areas to check for troubleshooting.
7. Specifications
Technical specifications for the Retevis RT-9908 Window Intercom System:
| Feature | Detail |
|---|---|
| Brand | Retevis |
| Model Name | FA9101A (RT-9908) |
| Connectivity Technology | Auxiliary |
| Connector Type | 3.5 mm Jack |
| Power Source | Corded Electric |
| Material | Metal |
| Color | Silver |
| Item Dimensions (L x W x H) | 6.5 x 6.3 x 3.74 inches |
| Item Weight | 0.01 Ounces |
| Audio Sensitivity | 48 Decibels |
| Signal-to-Noise Ratio | 80 dB |
| Frequency Response | 20 KHz |
| Number of Channels | 2 |
| Microphone Form Factor | Gooseneck |
| Polar Pattern | Unidirectional |
8. Warranty and Support
Warranty Policy: Retevis provides a 1-year warranty for this product. If any parts of the product stop working within 1 year, you do not need to return them. Please contact us via Amazon email, and we will send you a free replacement. We recommend using only original accessories.
For further support or inquiries, please visit the official Retevis Store on Amazon: Retevis Store.