
TP-Link RE200
TP-Link RE200 AC750 Wi-Fi Range Extender User Manual
Model: RE200 | Brand: TP-Link
Introduction
The TP-Link RE200 AC750 Wi-Fi Range Extender is designed to conveniently extend the coverage and improve the signal strength of an existing wireless network to eliminate Wi-Fi dead zones. With 802.11ac Wi-Fi technology, it delivers dual-band Wi-Fi speeds of up to 750 Mbps (300 Mbps on 2.4 GHz and 433 Mbps on 5 GHz), making it ideal for HD video streaming, online gaming, and other bandwidth-intensive tasks. Its compact, wall-mounted design allows for flexible deployment.
Product Overview
Familiarize yourself with the physical components of your RE200 range extender.

Image: Front view of the TP-Link RE200 AC750 Wi-Fi Range Extender, showing the TP-Link logo and indicator lights for 5G, 2.4G, Wi-Fi, Ethernet, Power, and WPS/RE.
LED Indicators
- Power LED: Indicates the power status of the extender.
- Wi-Fi LED: Indicates the connection status to the host router's Wi-Fi network.
- 2.4G LED: Indicates the 2.4 GHz wireless connection status.
- 5G LED: Indicates the 5 GHz wireless connection status.
- Ethernet LED: Indicates the status of the Ethernet port connection.
- RE/WPS LED: Indicates the connection status to the host router via WPS or the extender's operational status.
Physical Ports and Buttons

Image: Bottom view of the TP-Link RE200 AC750 Wi-Fi Range Extender, showing the Ethernet port and the recessed Reset button.
- Ethernet Port: Used to connect a wired device to your network.
- Reset Button: Press and hold for 1 second to reset the extender to factory default settings.
- RE/WPS Button: Used to establish a connection with the host router via WPS.
Setup
The RE200 can be set up in two primary ways: using the WPS button or via a web browser.
Method 1: Using the WPS Button (Recommended)
- Plug In: Plug the extender into an electrical outlet near your host router. Wait until the Power LED turns solid.
- Press WPS on Router: Press the WPS button on your host router.
- Press RE/WPS on Extender: Within two minutes, press the RE/WPS button on your extender. The RE/WPS LED should start blinking.
- Observe LED: The RE/WPS LED will turn solid blue, indicating a successful connection. If it does not, try again or use Method 2.
- Relocate: Once connected, you can unplug the extender and move it to a location between your router and the Wi-Fi dead zone. Ensure the RE/WPS LED remains solid blue for optimal performance.
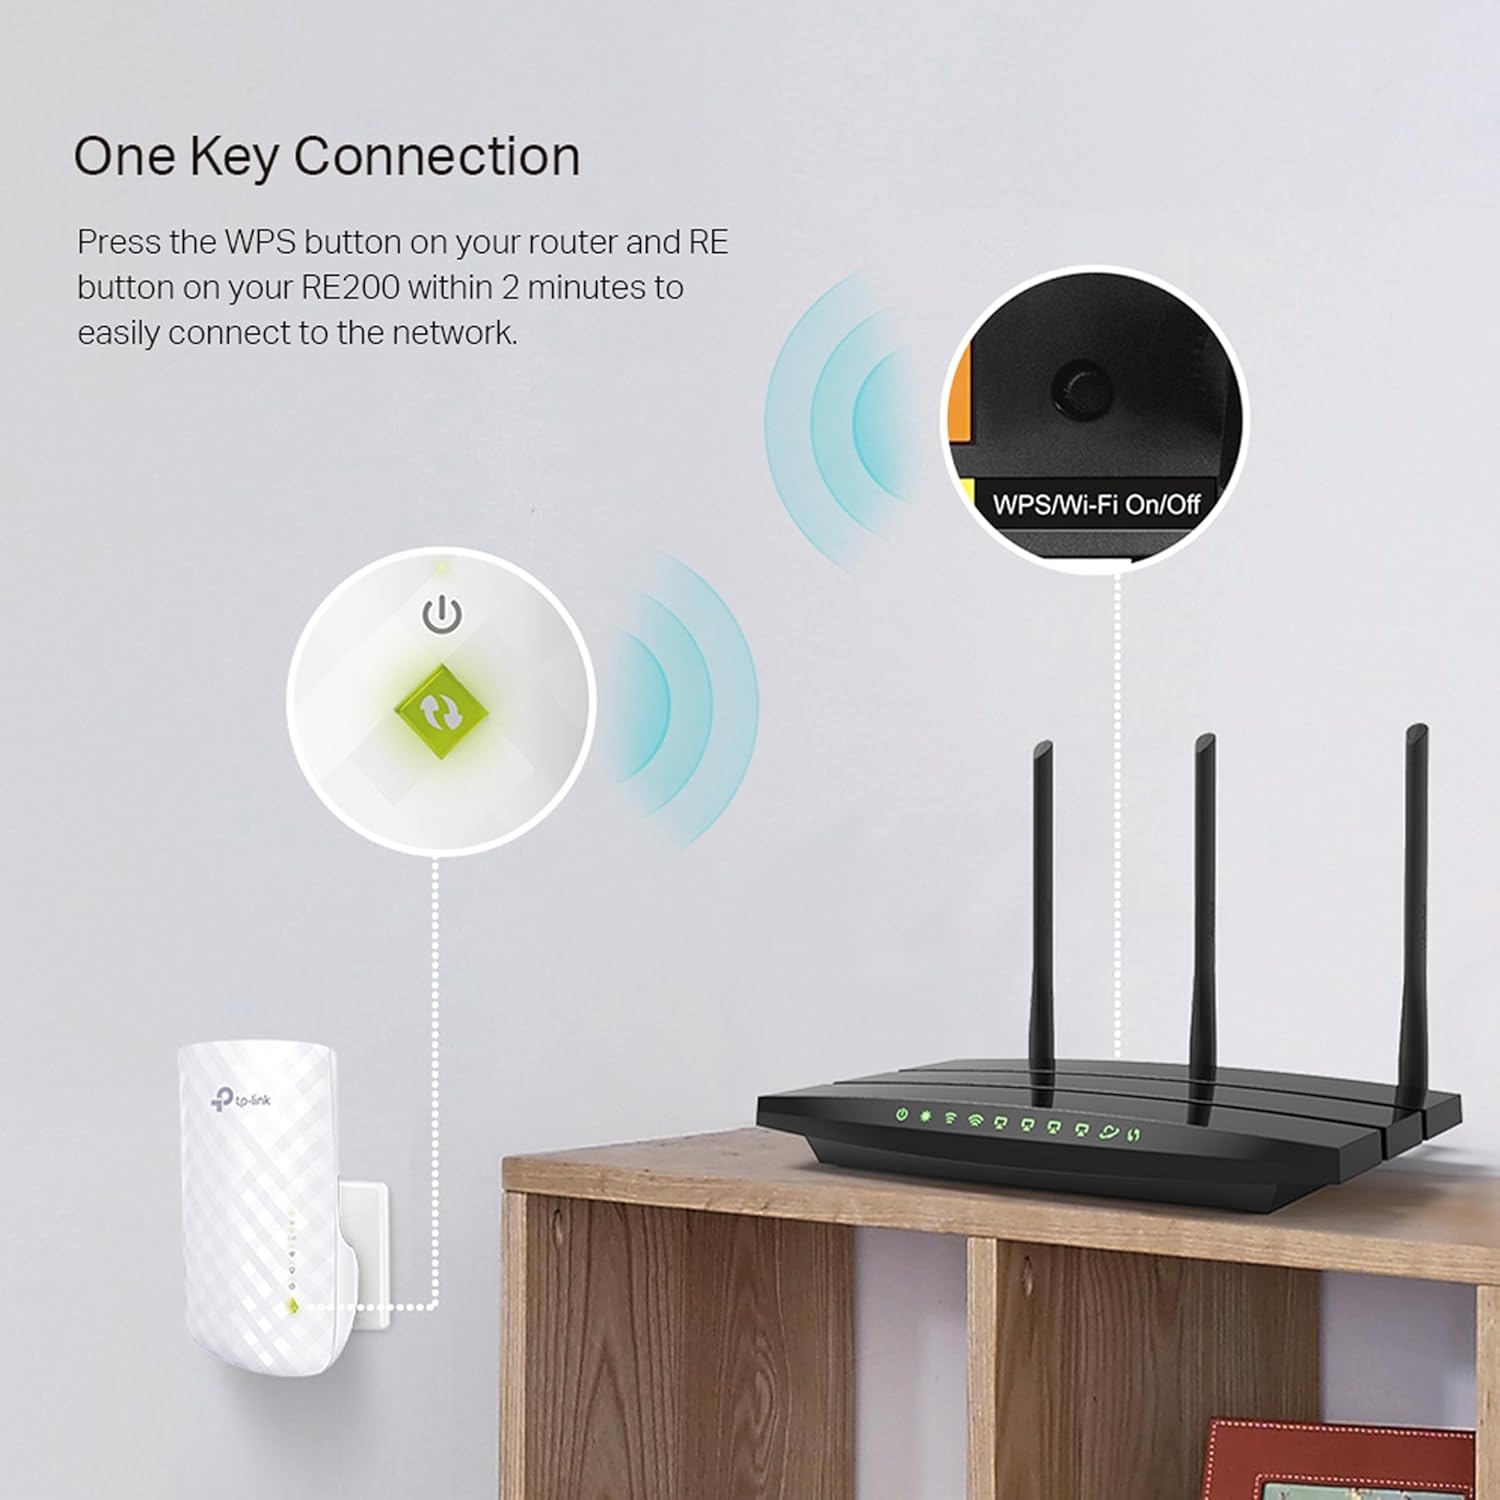
Image: Diagram illustrating the WPS setup process, showing the RE200 plugged into a wall socket and a router, with arrows indicating pressing the WPS button on both devices for connection.

Image: The TP-Link RE200 extender plugged into a wall outlet, demonstrating its compact design and how it blends into a home environment.
Method 2: Using a Web Browser
- Plug In: Plug the extender into an electrical outlet near your host router. Wait until the Power LED turns solid.
- Connect to Extender's Wi-Fi: On your computer or mobile device, disconnect from your current Wi-Fi network and connect to the extender's network (e.g., "TP-Link_Extender" or "TP-Link_Extender_2.4G/5G").
- Access Web UI: Open a web browser and type http://tplinkrepeater.net or http://192.168.0.254 into the address bar.
- Create Login: Create a username and password for future logins.
- Follow On-Screen Instructions: The Quick Setup wizard will guide you through selecting your host Wi-Fi network and configuring the extender's settings.
- Relocate: After successful configuration, unplug the extender and move it to a location between your router and the Wi-Fi dead zone. Ensure the RE/WPS LED remains solid blue for optimal performance.
Operating the Extender
Once set up, the RE200 operates automatically to extend your Wi-Fi signal. Here are some key operational aspects:
Optimal Placement
For best performance, place the extender in a location where it receives a strong signal from your host router and can effectively broadcast the extended signal to the desired areas. The RE/WPS LED's color indicates signal strength:
- Solid Blue: Good connection.
- Solid Red: Poor connection. Relocate the extender closer to the router.
- Off: No connection.
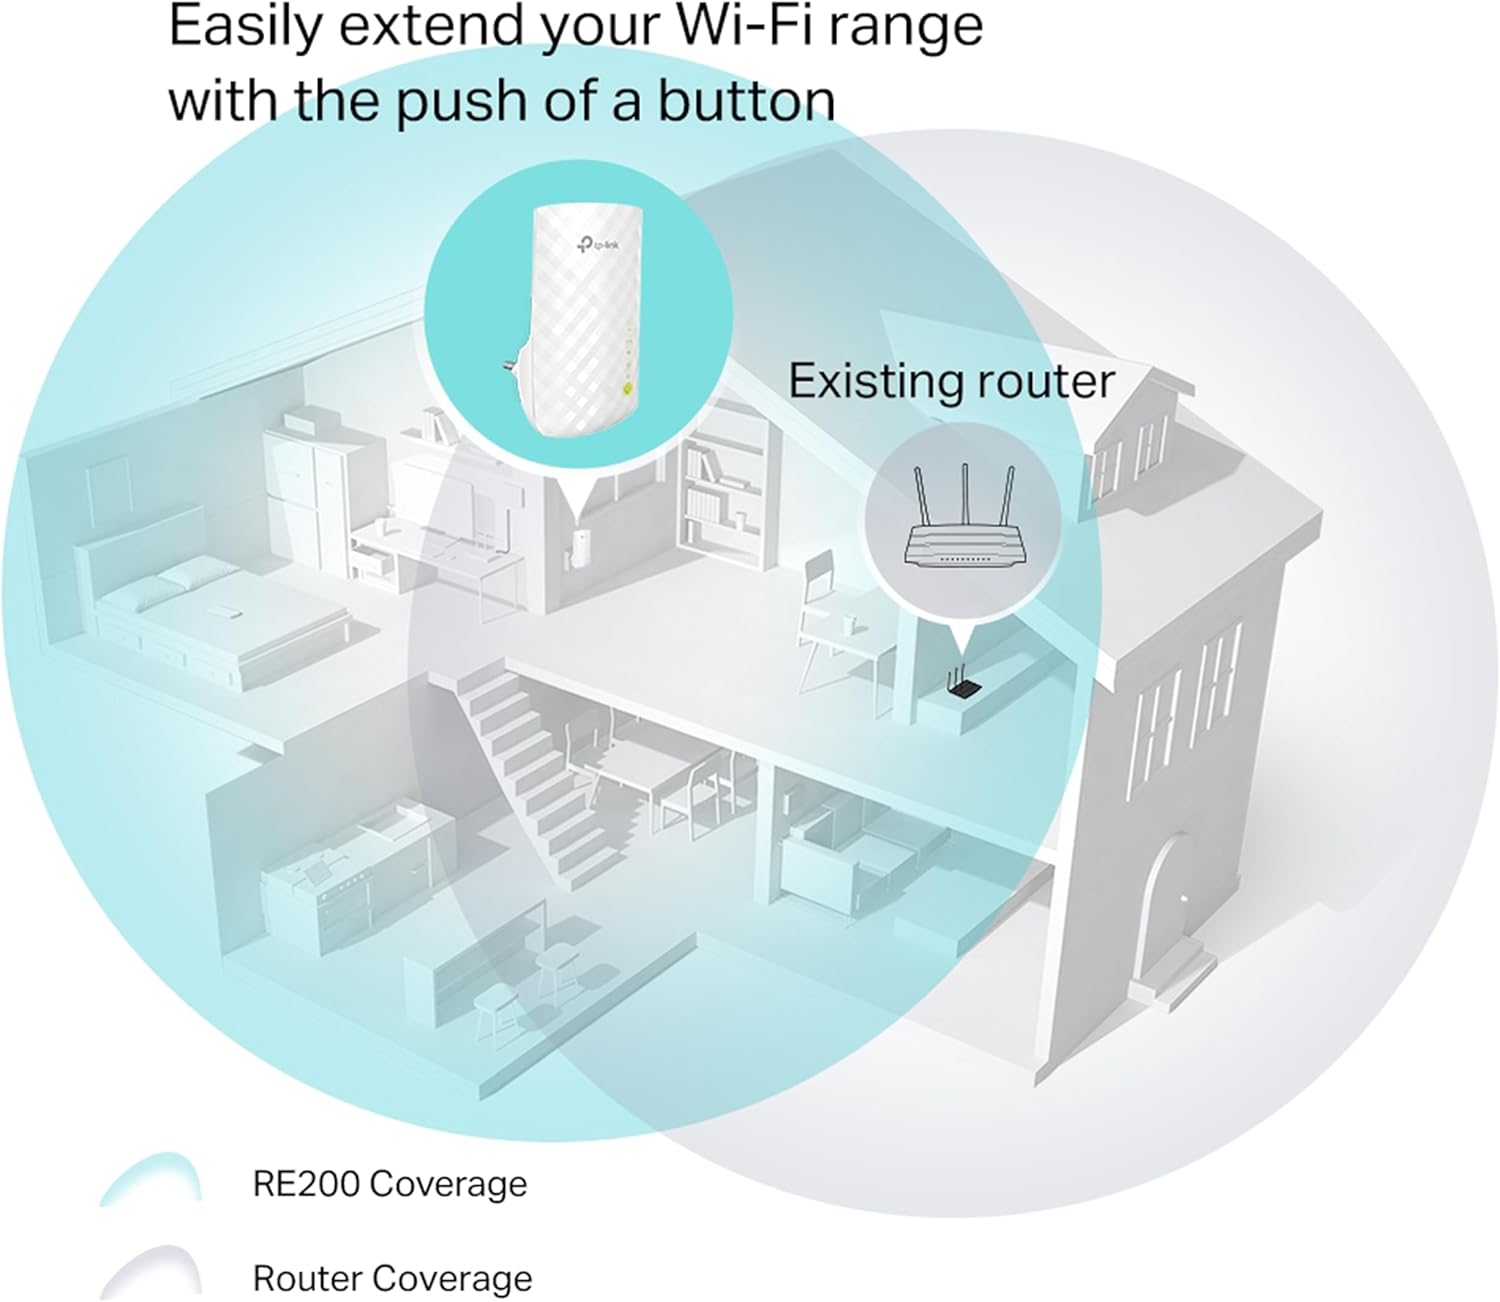
Image: A diagram illustrating how the TP-Link RE200 extends Wi-Fi coverage, showing the original router's coverage and the expanded coverage provided by the extender within a multi-story house.
Ethernet Port Functionality
The RE200 includes an Ethernet port, allowing you to connect a wired device (such as a smart TV, game console, or desktop computer) to your Wi-Fi network. This acts as a wireless adapter for the wired device.
Access Point Mode
The RE200 can also function as an Access Point (AP). In AP mode, it transforms your existing wired network into a wireless one. To switch to AP mode, access the web management page and navigate to the operating mode settings.
Maintenance
- Firmware Updates: Regularly check the TP-Link website for firmware updates to ensure optimal performance and security.
- Cleaning: Keep the device clean and free from dust. Use a soft, dry cloth. Do not use liquid cleaners.
- Ventilation: Ensure the extender is placed in a well-ventilated area to prevent overheating.
- Power Cycle: If you experience intermittent issues, try power cycling the extender (unplug it, wait 10 seconds, then plug it back in).
Troubleshooting
If you encounter issues with your RE200, refer to the following common solutions:
- Extender cannot connect to the host router:
- Ensure the RE/WPS LED is solid blue. If not, relocate the extender closer to the router.
- Verify that your router's wireless settings (SSID, password, security type) are correct.
- Try resetting both the router and the extender to factory defaults and re-configuring.
- Poor signal strength from the extender:
- Relocate the extender to a position that is halfway between your router and the Wi-Fi dead zone.
- Avoid placing the extender near obstacles like thick walls, metal objects, or large electrical appliances.
- Cannot access the web management page:
- Ensure your device is connected to the extender's Wi-Fi network.
- Verify that you are using the correct address: http://tplinkrepeater.net or http://192.168.0.254.
- Clear your browser's cache and cookies, or try a different browser.
Specifications
| Feature | Detail |
|---|---|
| Model | RE200 |
| Wireless Standards | IEEE 802.11ac/n/g/b |
| Frequency | 2.4 GHz & 5 GHz (Dual Band) |
| Data Rate | Up to 750 Mbps (300 Mbps 2.4 GHz, 433 Mbps 5 GHz) |
| Dimensions (L x W x H) | 2.6 x 2.95 x 4.33 inches (66 x 75 x 110 mm) |
| Weight | 3.88 ounces (110 g) |
| Ethernet Port | 1 x 10/100M Ethernet Port (RJ45) |
| Power Consumption | Approximately 6.5 W |
| Operating Systems Supported | Linux, Windows Vista, Windows XP, Windows 7, Windows 98, and others via web browser |
Official Product Video
Video: An animated demonstration showing how the TP-Link RE200 Wi-Fi Range Extender works to expand wireless coverage in a home, illustrating the signal extension from the router to the extender and then to devices in previously uncovered areas.
Warranty and Support
The TP-Link RE200 AC750 Wi-Fi Range Extender typically comes with a manufacturer's warranty. Please refer to the warranty card included in your product packaging or visit the official TP-Link website for detailed warranty information specific to your region.
For technical support, troubleshooting guides, firmware updates, and frequently asked questions, please visit the official TP-Link support website:
You may also find helpful resources and community forums on the TP-Link website.
Related documentsRE200


Ask a question about this manual
Ask about setup, troubleshooting, compatibility, parts, safety, or missing instructions. Manuals+ will review the question and use this page’s manual context to help answer it.