Important Safeguards
When using electrical appliances, basic safety precautions should always be followed to reduce the risk of fire, electric shock, and/or injury to persons, including the following:
- Read all instructions before operating the appliance.
- Do not touch hot surfaces. Use handles or knobs.
- To protect against electrical shock, do not immerse cord, plugs, or appliance in water or other liquid.
- Close supervision is necessary when any appliance is used by or near children.
- Unplug from outlet when not in use and before cleaning. Allow to cool before putting on or taking off parts, and before cleaning the appliance.
- Do not operate any appliance with a damaged cord or plug, or after the appliance malfunctions or has been damaged in any manner. Return appliance to the nearest authorized service facility for examination, repair, or adjustment.
- The use of accessory attachments not recommended by the appliance manufacturer may cause injuries.
- Do not use outdoors.
- Do not let cord hang over edge of table or counter, or touch hot surfaces.
- Do not place on or near a hot gas or electric burner, or in a heated oven.
- Extreme caution must be used when moving an appliance containing hot oil or other hot liquids.
- To disconnect, turn any control to 'off', then remove plug from wall outlet.
- Do not use appliance for other than intended use.
Product Overview
The CROFTON Mini Cupcake Maker is designed for baking up to 12 mini cupcakes or muffins at a time. It features a non-stick coating for easy release and cleaning, and indicator lights for power and readiness.
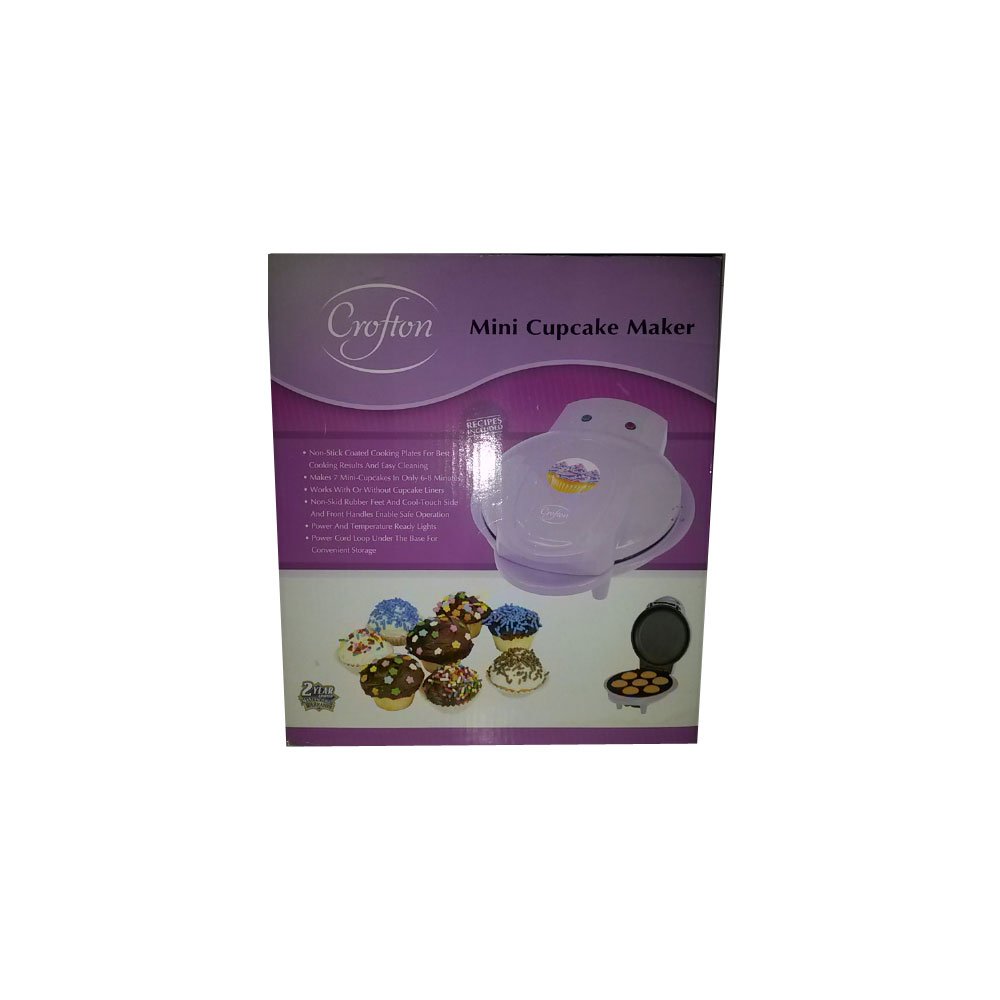
Image: The Crofton Mini Cupcake Maker, shown in purple, with its lid closed and power cord visible. This appliance is compact and designed for baking small treats.
Before First Use
- Carefully unpack the Mini Cupcake Maker and remove all packaging materials.
- Wipe the baking plates with a damp cloth or sponge. Do not immerse the appliance in water.
- Dry thoroughly.
- For best results, lightly grease the non-stick baking plates with a small amount of cooking oil or non-stick spray before the first use. This helps to condition the non-stick surface.
- Close the lid and plug the appliance into a standard electrical outlet. Allow it to heat for approximately 5 minutes to burn off any manufacturing residues. A slight odor or smoke may be present; this is normal.
- Unplug the appliance and allow it to cool completely before wiping the plates again.
Setup
- Place the Mini Cupcake Maker on a clean, dry, flat, and heat-resistant surface. Ensure there is adequate ventilation around the appliance.
- Ensure the appliance is closed before plugging it in.
- Plug the power cord into a standard 120V AC electrical outlet. The power indicator light will illuminate, indicating the appliance is receiving power and beginning to preheat.
Operating Instructions
Baking Mini Cupcakes
- Prepare your favorite mini cupcake or muffin batter according to your recipe.
- Plug in the Mini Cupcake Maker. The power indicator light will turn on. Allow the appliance to preheat until the ready indicator light illuminates (approximately 3-5 minutes).
- Once preheated, carefully open the lid.
- Pour or spoon batter into each of the 12 cupcake cavities, filling each approximately two-thirds full. Do not overfill, as the batter will expand during baking.
- Close the lid.
- Bake for approximately 5-8 minutes. Baking time may vary depending on the recipe and desired doneness. For best results, check for doneness by inserting a toothpick into a cupcake; if it comes out clean, the cupcakes are ready.
- Carefully open the lid and remove the baked cupcakes using a heat-resistant, non-metallic utensil (e.g., a wooden or silicone spatula). Do not use metal utensils, as they can damage the non-stick coating.
- If baking additional batches, close the lid and allow the appliance to reheat until the ready indicator light illuminates again.
- When finished baking, unplug the appliance from the wall outlet.
Cleaning and Maintenance
Proper cleaning and maintenance will ensure the longevity and performance of your Mini Cupcake Maker.
- Always unplug the appliance from the electrical outlet and allow it to cool completely before cleaning.
- Wipe the baking plates with a soft, damp cloth or sponge. For stubborn residue, a small amount of mild dish soap can be used. Avoid abrasive cleaners or scouring pads, as they can damage the non-stick surface.
- Wipe the exterior of the appliance with a damp cloth.
- Never immerse the Mini Cupcake Maker in water or any other liquid.
- Ensure all parts are thoroughly dry before storing.
Storage
Once the Mini Cupcake Maker is completely cool and clean, store it in a dry, safe place. The power cord can be wrapped around the base for compact storage.
Troubleshooting
| Problem | Possible Cause | Solution |
|---|---|---|
| Appliance does not heat up. | Not plugged in or power outlet is not functioning. | Ensure the appliance is securely plugged into a working electrical outlet. Check the circuit breaker. |
| Cupcakes are sticking to the plates. | Plates not greased sufficiently or non-stick coating is worn. | Lightly grease the plates with cooking oil or non-stick spray before each use. Avoid using metal utensils that can damage the coating. |
| Cupcakes are not baking evenly. | Lid not fully closed or uneven batter distribution. | Ensure the lid is fully closed during baking. Distribute batter evenly into each cavity. |
| Smoke or odor during initial use. | Manufacturing residues burning off. | This is normal for first use. Ensure good ventilation. It should dissipate after a few minutes. |
Specifications
- Brand: CROFTON
- Model: Mini Cupcake Maker
- Special Feature: Non-Stick Coating
- Color: Purple
- Included Components: 1 Mini Cupcake Maker
- Power: Standard 120V AC (check product label for specific wattage)
Warranty and Support
This CROFTON Mini Cupcake Maker comes with a limited warranty. For specific warranty details, terms, and conditions, please refer to the warranty card included with your purchase or contact CROFTON customer support.
For technical assistance, troubleshooting, or to inquire about replacement parts, please visit the official CROFTON website or contact their customer service department. Keep your purchase receipt as proof of purchase for warranty claims.


