1. Introduction
This manual provides detailed instructions for the installation, operation, and maintenance of your WENKO 2-Tier Corner Shower Caddy with Vacuum-Loc Technology. This product is designed to offer a reliable and drill-free storage solution for your shower essentials, ensuring a tidy and organized bathroom space.

Image: The WENKO 2-Tier Corner Shower Caddy, showcasing its design and Vacuum-Loc suction cups.
2. Safety Information
- Ensure the installation surface is clean, dry, and smooth. The Vacuum-Loc system requires non-porous, air-impermeable surfaces for optimal adhesion.
- Do not exceed the maximum weight recommendation of 33 kg (approximately 72.75 lbs). Overloading can compromise the stability of the caddy.
- Keep small parts, such as the vacuum pump and adapters, away from children during installation and storage.
- Regularly check the Vacuum-Loc for secure attachment. If the caddy feels loose, re-apply the vacuum as per the installation instructions.
3. Package Contents
The WENKO Shower Caddy package typically includes the following components:
- 1 x WENKO 2-Tier Corner Shower Caddy (Chrome-plated Steel)
- 2 x Vacuum-Loc Adapters
- 1 x Vacuum Pump
- Optional: Screws and dowels for alternative mounting (check your specific package contents)
4. Installation Instructions: Vacuum-Loc System
The WENKO Shower Caddy utilizes the innovative Vacuum-Loc system for a strong, drill-free attachment. Follow these steps carefully for optimal performance on smooth, air-impermeable surfaces.
- Step 1: Clean the Surface
Thoroughly clean the desired installation surface with a clean, damp cloth. Ensure the surface is completely dry and free of dust, grease, or soap residue. The Vacuum-Loc system works best on smooth surfaces such as tiles, glass, or polished metal.
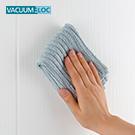
Image: A hand wiping a clean, smooth surface with a cloth, illustrating the first step of preparing the installation area.
- Step 2: Fix the Vacuum Adapter
Remove the cap from the front of the vacuum adapter and the protective film from its back. Press the adapter firmly onto the clean, dry surface. Ensure the arrows on the adapter are facing upwards.
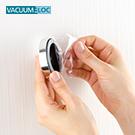
Image: Hands peeling the protective film from the back of a Vacuum-Loc adapter before pressing it onto a surface.
- Step 3: Generate Vacuum
Place the vacuum pump against the Loc (the central part of the adapter). Pull the pump piston out slowly until a distinct "pop" sound is heard. Repeat this action three more times (total of 4 pulls). This creates a strong vacuum seal.
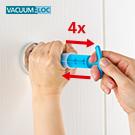
Image: A hand operating the vacuum pump on the Vacuum-Loc adapter, showing the process of creating suction.
- Step 4: Attach the Shower Caddy
Once the vacuum is generated for both adapters, the caddy can be immediately subjected to loads. Carefully align the shower caddy with the installed Vacuum-Loc adapters and hang it securely. Ensure it is stable before placing items on it.
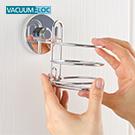
Image: A hand attaching the shower caddy onto the installed Vacuum-Loc adapters.
For a comprehensive visual guide, refer to the following illustration:

Image: A comprehensive diagram illustrating the four steps of the Vacuum-Loc installation process, including cleaning, attaching the adapter, generating vacuum, and hanging the accessory.
Alternative Mounting (Screws and Dowels)
If the Vacuum-Loc system is not suitable for your surface (e.g., rough or porous surfaces), the shower caddy can also be mounted using the included screws and dowels. This method requires drilling. Consult a professional if you are unsure about drilling into your wall.
- Mark the drilling points using the caddy as a template.
- Drill holes at the marked points, ensuring appropriate drill bit size for the dowels.
- Insert the dowels into the drilled holes.
- Secure the caddy to the wall using the provided screws.
5. Operation
The WENKO Shower Caddy is designed for convenient and organized storage of your shower essentials.
- Place shampoo bottles, shower gel, soap, and other items on the two spacious shelves.
- Utilize the integrated hooks at the bottom for hanging loofahs, washcloths, or razors.
- The corner design maximizes space efficiency in your shower, keeping items within easy reach.
The maximum weight capacity for this shower caddy is 33 kilograms (approximately 72.75 lbs). Do not overload the caddy to ensure its stability and longevity.

Image: The WENKO shower caddy installed in a shower corner, holding various bath products and a loofah, demonstrating its storage capacity.
6. Maintenance and Care
To maintain the appearance and functionality of your WENKO Shower Caddy, follow these care guidelines:
- Cleaning: Wipe the caddy regularly with a soft, dry cloth. For stubborn marks, use a mild, non-abrasive cleaner specifically designed for chrome surfaces, and then dry thoroughly. Avoid harsh chemicals, abrasive sponges, or scouring powders that could damage the chrome finish.
- Rust Prevention: While the caddy is made of high-quality chrome-plated steel, prolonged exposure to standing water or certain chemicals can lead to rust over time. Ensure the caddy and its contents dry properly after each use. If minor rust spots appear, they can often be removed with a chrome polish or a mild rust remover designed for chrome surfaces.
- Re-positioning: The Vacuum-Loc system allows for infinite repositioning without leaving residue or damaging the wall. To remove the caddy, locate the small valve on the side of each Vacuum-Loc adapter and open it to release the vacuum. Then, gently pull the adapter off the surface. Clean the adapter and surface before re-installation.
7. Troubleshooting
| Problem | Possible Cause | Solution |
|---|---|---|
| Caddy does not stick or falls off. | Surface is not clean, dry, smooth, or air-impermeable. Insufficient vacuum generated. Adapter not pressed firmly enough. | Clean the surface thoroughly and ensure it is completely dry. Re-apply the adapter, pressing firmly. Ensure the vacuum pump is used correctly, pulling the piston 4 times until a "pop" is heard each time. Test on a different smooth, non-porous surface if issues persist. Avoid installing over grout lines or textured tiles. |
| Rust spots appear on the caddy. | Prolonged exposure to moisture or harsh chemicals. | Ensure the caddy dries completely after each use. Wipe down regularly. Use a chrome polish or mild rust remover specifically for chrome surfaces. Avoid abrasive cleaners. |
| Caddy is wobbly after installation. | Adapters are not perfectly aligned or not fully secured. | Remove and re-install the adapters, ensuring they are precisely aligned and fully vacuum-sealed. Apply even pressure when attaching the caddy to the adapters. |
8. Specifications
- Model: Shower Caddy with Vacuum-Loc System
- Brand: WENKO
- Material: Chrome-plated Steel
- Color: Chrome
- Dimensions (W x H x D): 9.06 inches x 16.93 inches x 8.27 inches (23 cm x 43 cm x 21 cm)
- Weight: Approximately 10.6 ounces (0.3 kg)
- Maximum Weight Recommendation: 33 Kilograms (approx. 72.75 lbs)
- Mounting Type: Vacuum-Loc System (Drill-free), or Screws/Dowels (Drilling required)
- Number of Shelves: 2
- UPC: 791769453564
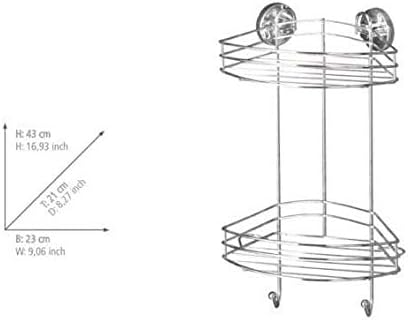
Image: A technical drawing of the shower caddy with its dimensions labeled in centimeters (21 cm depth, 23 cm width, 43 cm height).

Image: A technical drawing of the shower caddy with its dimensions labeled in both inches and centimeters (H: 16.93 inch / 43 cm, D: 8.27 inch / 21 cm, W: 9.06 inch / 23 cm).
9. Warranty and Support
WENKO offers a 10-year manufacturer warranty for this product, ensuring quality and durability. This warranty covers defects in materials and workmanship under normal use.
For any questions, technical support, or warranty claims, please contact WENKO customer service through their official website or the retailer where the product was purchased.
Visit the official WENKO website for more information: WENKO Store