1. Product Overview
This set includes four generic embroidery hoops designed for use with various Janome Memory Craft and Elna embroidery machine models. These hoops provide different embroidery areas to accommodate a wide range of project sizes and designs.
Key Features:
- A complete set of Hoops A, B, C, D
- Hoop A: Approximately 4.7 x 5 inches (120 x 126 mm)
- Hoop B: Approximately 5.5 x 7.92 inches (140 x 200 mm)
- Free Arm Hoop C: Approximately 2 x 2 inches (50 x 50 mm)
- Giga Hoop D: Approximately 9.1 x 7.9 inches (230 x 200 mm)
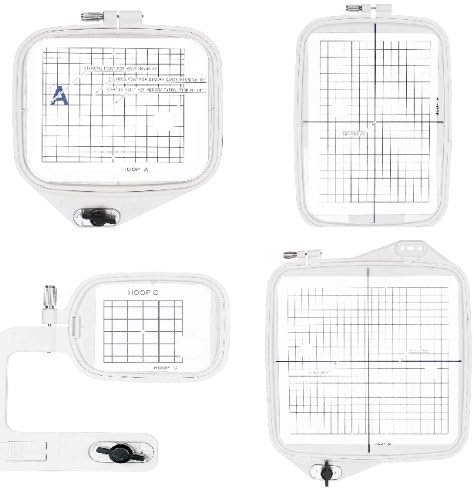
This image displays the complete set of four embroidery hoops included in the package. From top-left to bottom-right, they are Hoop A (rectangular), Hoop B (larger rectangular), Hoop C (small rectangular with an arm for free-arm embroidery), and Hoop D (large rectangular, also known as Giga Hoop). Each hoop features a clear grid overlay to assist with accurate fabric alignment and positioning for embroidery projects.
2. Compatible Models
These generic hoops are designed to be compatible with the following embroidery machine models:
- Janome Memory Craft: 300E, 350E, 9500, 9700, 10000, 10001
- Elna: 820, 8200, 8300, 8600
Always verify your machine's compatibility with the hoop sizes before beginning an embroidery project.
3. Setup
3.1 Unpacking
- Carefully remove all hoops from their packaging.
- Inspect each hoop for any signs of damage. If any damage is found, contact the seller immediately.
- Retain packaging for future storage or transport if desired.
3.2 Attaching the Hoop to Your Machine
- Ensure your embroidery machine is turned off before attaching or detaching any accessories.
- Select the appropriate hoop size for your embroidery design.
- Align the hoop's attachment arm with the corresponding slot on your embroidery machine.
- Gently slide the hoop into place until it clicks or locks securely. Refer to your embroidery machine's manual for specific instructions on attaching hoops.
- Ensure the hoop is firmly seated and does not wobble.
4. Operating Instructions
4.1 Hooping Fabric
- Separate the inner and outer rings of the chosen hoop.
- Place your fabric (and stabilizer, if used) over the inner ring. Ensure the fabric is centered and smooth.
- Carefully place the outer ring over the fabric and inner ring. Press down firmly to secure the fabric between the two rings.
- Tighten the screw on the outer ring until the fabric is taut, but not stretched or distorted. The fabric should be drum-tight.
- Verify that the fabric is flat and free of wrinkles within the hooping area.
4.2 Machine Operation with Hooped Fabric
- Once the fabric is properly hooped and the hoop is attached to the machine, select your desired embroidery design on your machine's interface.
- Follow your embroidery machine's specific instructions for loading designs, setting thread colors, and initiating the embroidery process.
- Monitor the embroidery process to ensure the fabric remains taut and the hoop moves freely.
- After the embroidery is complete, turn off your machine, detach the hoop, and carefully remove the fabric.
5. Maintenance
Proper maintenance will extend the life of your embroidery hoops.
- Cleaning: Wipe the hoops with a soft, damp cloth to remove any dust, lint, or fabric residue. Avoid using harsh chemicals or abrasive cleaners.
- Storage: Store hoops in a clean, dry place away from direct sunlight and extreme temperatures. Keeping them in their original packaging or a dedicated storage container can prevent scratches and damage.
- Inspection: Periodically check the hoop rings and tightening screws for any signs of wear or damage. Ensure the screw mechanism operates smoothly.
6. Troubleshooting
If you encounter issues while using your embroidery hoops, consider the following common solutions:
- Fabric Not Taut: Ensure the tightening screw is fully tightened. If the fabric still sags, try using a heavier stabilizer or re-hooping the fabric.
- Hoop Not Recognized by Machine: Double-check that the hoop is correctly and securely attached to the machine's hoop arm. Refer to your machine's manual for specific attachment procedures.
- Skipped Stitches or Poor Stitch Quality: While often machine-related, ensure the fabric is hooped correctly and taut. Loose fabric can lead to poor stitch formation. Also, verify that the correct hoop size is selected on your machine for the design.
- Hoop Jamming During Embroidery: Ensure no fabric or thread is obstructing the hoop's movement. Check that the hoop is not bent or damaged.
For persistent issues, consult your embroidery machine's user manual or contact the machine manufacturer's support.
7. Specifications
| Attribute | Detail |
|---|---|
| Product Name | Set of 4 Embroidery Hoops |
| Brand | Embroidex |
| Hoop A Embroidery Area | 4.7 x 5 inches (120 x 126 mm) |
| Hoop B Embroidery Area | 5.5 x 7.92 inches (140 x 200 mm) |
| Hoop C (Free Arm) Embroidery Area | 2 x 2 inches (50 x 50 mm) |
| Hoop D (Giga Hoop) Embroidery Area | 9.1 x 7.9 inches (230 x 200 mm) |
| Overall Product Dimensions | 7.92 x 5.5 x 0.04 inches (approximate largest hoop) |
| Item Weight | 2 pounds (total package) |
| Material | Plastic |
| Shape | Rectangular (various sizes) |
| ASIN | B00KGP73QS |
| Date First Available | May 21, 2014 |
8. Warranty and Support
As these are generic replacement parts, specific warranty information may vary. Please refer to the seller or manufacturer for details regarding any applicable warranty for this product.
For product support or inquiries, please contact the seller directly through the platform where the purchase was made. For issues related to your embroidery machine, please consult your machine's manufacturer support resources.