
Introduction
This manual provides comprehensive instructions for the setup, operation, maintenance, and troubleshooting of your Wildgame Innovations TDX 6v/12v Digital Timer. Please read this manual thoroughly before using the device to ensure proper function and longevity.
Product Overview
The Wildgame Innovations TDX Digital Timer is designed to provide precise control over feeding schedules for various applications. It features a digital display, intuitive button controls, and compatibility with both 6-volt and 12-volt power sources.

Figure 1: Front view of the Wildgame Innovations TDX Digital Timer, showing the digital display, navigation buttons (up, down, left, right, OK), and connection wires at the bottom.
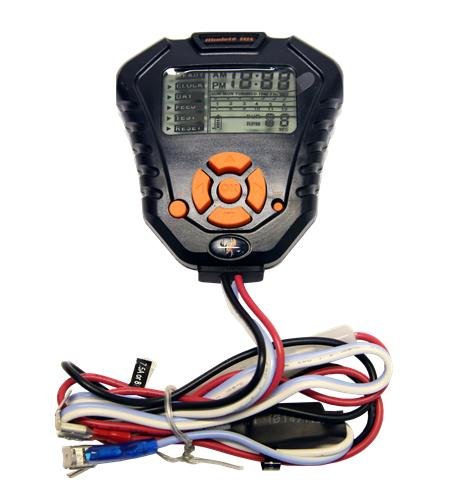
Figure 2: The Wildgame Innovations TDX Digital Timer, illustrating the complete unit with its integrated wiring harness for power and motor connections.
Key Components:
- Digital Display: Shows time, day, feed settings, and other operational parameters.
- Control Buttons: Navigation (Up, Down, Left, Right) and OK button for menu selection and setting confirmation.
- Wiring Harness: Includes wires for power input (6v/12v) and output to the feeder motor.
Setup
Before installation, ensure your power source (6v or 12v battery) is fully charged and compatible with the timer.
- Prepare Wiring: The timer comes with a wiring harness. You may need to cut and splice wires to connect it to your existing feeder motor and battery terminals. Ensure all connections are secure and insulated to prevent short circuits.
- Connect Power: Connect the timer's power wires to your 6v or 12v battery. Typically, red is positive (+) and black is negative (-). Use alligator clips or appropriate connectors for a secure connection.
- Connect Motor: Connect the motor control wires from the timer to your feeder motor. Refer to your feeder's manual for specific motor wiring instructions if needed.
- Initial Power On: Once connected, the timer's display should illuminate. If not, check your battery connections and charge level.
Operating Instructions
The TDX Digital Timer offers extensive programming options. Patience and careful attention to detail are key during setup.
1. Setting Current Time and Day:
- Navigate to the "CLOCK" setting on the display using the Up/Down buttons.
- Press "OK" to enter the clock settings.
- Use the Up/Down buttons to adjust the hour, then press "OK". Repeat for minutes and AM/PM.
- Navigate to "DAY" and press "OK". Use Up/Down to select the current day of the week.
- Press "OK" to confirm.
2. Programming Feed Times:
The timer allows for multiple feed times per day, and settings can be customized for each day of the week.
- Navigate to the "FEED" setting. Press "OK".
- You will see options for different feed events (e.g., Feed 1, Feed 2, etc.). Select the desired feed event and press "OK".
- Set Time: Adjust the hour and minute for this feed event using Up/Down, then press "OK" for each.
- Set Duration: Adjust the duration (in seconds) for which the motor will run during this feed event. Press "OK".
- Set Days: You can select specific days for this feed event to occur. Use the Left/Right buttons to toggle days on/off (indicated by a segment above the day). Press "OK" to confirm the day selection.
- Repeat for all desired feed events.
3. Adjusting Motor Speed (RPM):
The timer allows you to control the motor's speed, which can affect the feed rate and spread area.
- Navigate to the "RPM" setting. Press "OK".
- Use the Up/Down buttons to adjust the motor speed percentage.
- Press "OK" to confirm.
4. Using the Test Function:
To manually test the feeder motor, use the "TEST" function.
- Navigate to the "TEST" setting. Press "OK".
- The motor should run for a short duration (e.g., 5 seconds).
5. Finalizing Settings ("READY" State):
Crucial Step:
After setting all desired times and durations, you must return to the "READY" state and confirm it for the settings to take effect and for the timer to operate correctly.
- After completing all programming, use the Up/Down buttons to navigate back to the top of the main menu, highlighting "READY".
- Press the "OK" button while "READY" is highlighted. This action saves your settings and activates the timer's schedule.
Maintenance
- Battery Check: Regularly check your battery's charge level to ensure continuous operation. A low battery can cause erratic behavior or prevent the timer from functioning.
- Cleanliness: Keep the timer unit clean and free from dirt, dust, and moisture. Use a soft, dry cloth for cleaning.
- Connections: Periodically inspect all wire connections for corrosion or looseness. Ensure they remain secure and insulated.
- Storage: If storing the timer for an extended period, disconnect it from the battery and store it in a cool, dry place.
Troubleshooting
| Problem | Possible Cause | Solution |
|---|---|---|
| Timer display is blank or not powering on. | No power, incorrect wiring, dead battery. | Check battery connections and charge. Ensure correct polarity (+/-). |
| Feeder motor does not spin at scheduled times. | Timer not in "READY" state, incorrect programming, low battery, motor issue. | Ensure you pressed "OK" on "READY" after programming. Re-check feed times and durations. Test battery. Use "TEST" function to check motor. |
| Difficulty programming or settings not saving. | Incorrect button sequence, not confirming "READY" state. | Follow programming steps carefully, especially the final "READY" confirmation. Try resetting and re-programming if persistent. |
| Motor spins but feed rate is too low/high. | Incorrect RPM setting, feeder mechanism issue. | Adjust the "RPM" setting. Check feeder mechanism for obstructions. |
Specifications
- Model: TDX
- Power Compatibility: 6v/12v DC
- Material: Plastic
- Color: Multicolour
- Item Weight: 90.7 g (0.2 Pounds)
- Item Dimensions (LxWxH): 15.2 x 5.1 x 22.9 Centimeters
- Generic Name: Timer
- UPC: 616376506154, 616376506628
Warranty and Support
For warranty information and technical support, please refer to the original product packaging or contact Wildgame Innovations directly through their official website or customer service channels. Keep your proof of purchase for any warranty claims.
Note: Specific warranty terms may vary by region and retailer.

